GNS3 VM and VMware Workstation 12 Player: Could not find the default VM directory

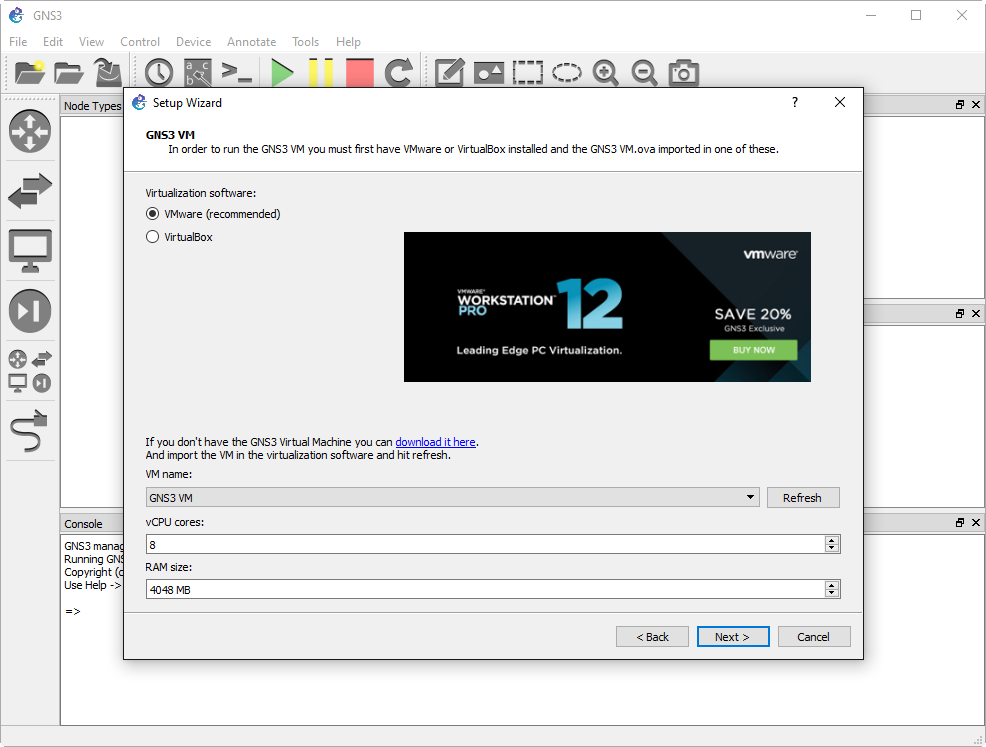
While setting up the new GNS3 1.4 Virtual Machine with VMware Workstation 12 Player, I ran into an interesting error that was preventing me from completing the installation.

gns3-vm01
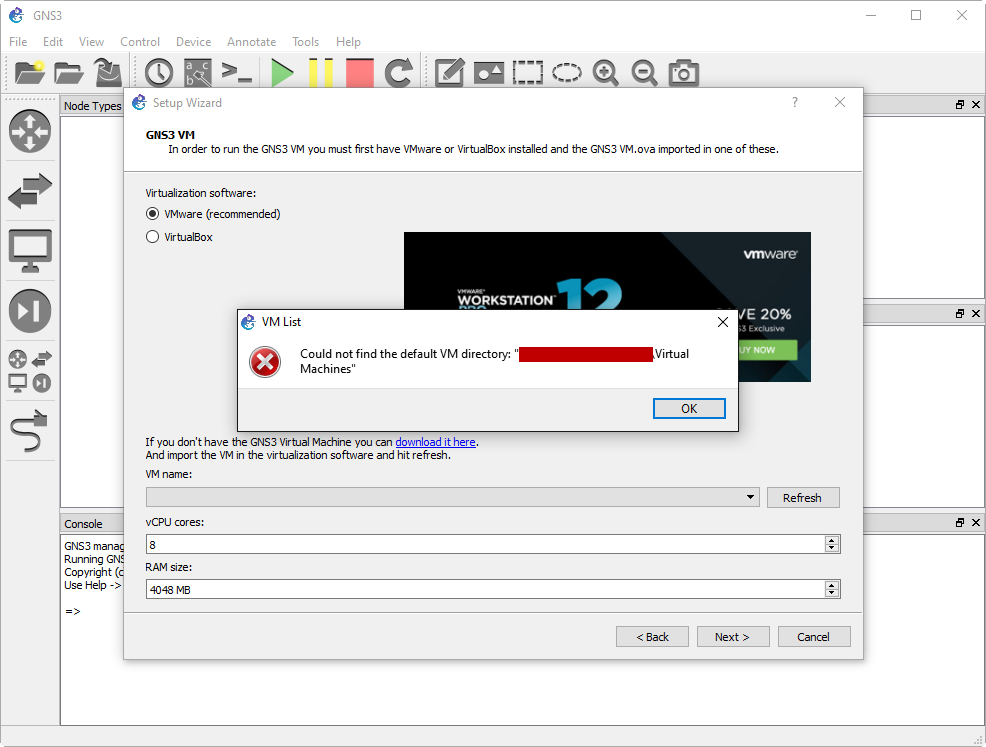
Thankfully the fix is fairly straight forward and requires that we edit the VMware Workstation preferences file.

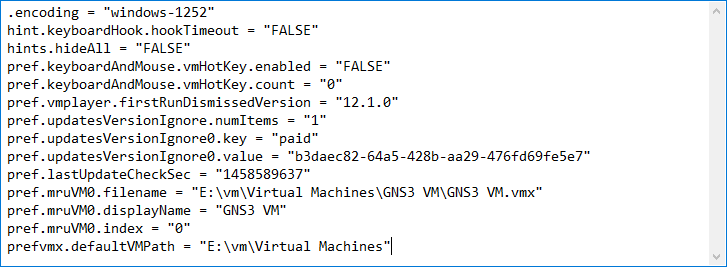
  • Open preferences.ini in your text editor of choice
    • %Appdata%\VMware\preferences.ini
  • Add or edit the following line, changing the path to where your virtual machines are stored
    • prefvmx.defaultVMPath = "C:\Path\To\My\VMs"
  • And that’s it. Save the ini and restart the GNS3 Setup Wizard.

gns3-vm02gns3-vm03Credit to the VMware support forums: https://communities.vmware.com/thread/245114?start=0&tstart=0

Installing a CA Signed Certificate in Cisco Prime Infrastructure 2.2

After following the Prime Infrastructure upgrade path to 2.2 you’ll need to re-issue CA signed certificates. Unfortunately, this can’t be accomplished from the Web GUI and will need to be done via the CLI.

Here’s Cisco’s documentation for installing CA-Signed Certificates and the steps I used to import a new certificate from our Active Directory Certificate Services server.

  • First you’ll want to SSH to your Prime Infrastructure server as well as create a FTP server on your workstation. See my previous blog post for instructions how to do so.
  • Generate a new CSR file and answer the information prompts
    • PIServer/admin# ncs key genkey -newdn -csr CSRFile .csr repository defaultRepo
    • The NCS server is running. Changes will take affect on the next server restart
      Enter the domain name of the server: (the fqdn you'll use to access prime from e.g., prime.company.org)
      Enter the name of your organizational unit:
      Enter the name of your organization:
      Enter the name of your city or locality:
      Enter the name of your state or province:
      Enter the two letter code for your country:
      Generating RSA key
  • Copy the CSR to your FTP server
    • PIServer/admin# copy disk: /defaultRepo/ CSRFile.csr ftp://your.ftp.server
  • Open your CSR in a text editor, copying the text to your clipboard

pi-cert01

  • Navigate to your internal CA and click Request a certificate

pi-cert02

  • Click Submit an advanced certificate request

pi-cert03

  • Under “Saved Request,”paste your certificate request output from earlier and select the Web Server certificate template. Click Submit

pi-cert04

  • Download your certificate and copy it to your FTP server directory

pi-cert05

  • Copy the certificate from the FTP server to the default repository
    • PIServer/admin# copy ftp://your.ftp.server/CertFile.cer disk:defaultRepo
  • Import the certificate into the Prime Infrastructure server
    • PIServer/admin# ncs key importsignedcert CertFile.cer repository defaultRepo
  • Restart Prime Infrastructure
    • ncs stop
    • ncs start
  • When the server comes back up, reload the web page and you should notice that the site is now trusted!

pi-cert07

Upgrading Cisco Prime Infrastructure 2.1 to 2.2

At the moment we’re running Cisco Prime Infrastructure 2.1 on a Gen1 physical appliance. We’re looking to take the upgrade path from 2.1 all the way up to 3.1 (currently only 3.0.2 is supported on the Gen1 appliance).

First stop, 2.2.

The Gen1 appliance upgrade path isn’t a fun one. It requires that we back up our current application database, wipe our appliance, do a bare-metal install of 2.2, and then restore our application database. Cisco’s documentation for application backup and restore can be found here: http://www.cisco.com/c/en/us/td/docs/net_mgmt/prime/infrastructure/2-2/administrator/guide/PIAdminBook/backup_restore.html#72460


Step one

Back up the PI application database to an FTP repository (I recommend FileZilla Server for hosting a light-weight FTP server on your workstation).

  • Create a ftp repository on your Prime Infrastructure server via CLI
    • SSH to PI
    • conf t
    • repository NAME
    • url ftp://x.x.x.x
    • user username password plain password
  • Verify your repository configuration
    • show repository NAME

pi2-1

  • Backup your Prime Infrastructure application
    • backup backup-name repository repository-name application NCS


Step two

Install Prime Infrastructure 2.2

Reboot your appliance from the PI 2.2 installation media and follow the on-screen configuration prompts. For more information follow Cisco’s Installation Guide

pi2-5


Step three

Restore your application database

  • SSH to the Prime Infrastructure server and setup your ftp repository again
    • conf t
    • repository NAME
    • url ftp://x.x.x.x
    • user username password plain password
  • Verify your repository configuration, and check that your backup is there
    • show repository NAME

pi2-1pi2-3

  • Run the restore command, taking note of the scary warnings
    • restore BACKUP_NAME.tar.gpg repository REPOSITORY_NAME application NCS

pi2-6

pi2-7


Fix for “The Change Password Operation Failed” Error on XenApp 6.5

After running February 2016’s batch of Microsoft security updates, we started receiving calls from end users about errors when attempting to update their passwords through the Citrix web interface.

xenapppass01While the error indicates the password change failed, it does in fact work, and users can log out and log back in with the new password.

Thankfully it didn’t take long for some savvy Citrix support forums users to pinpoint the issue to a recent patch Microsoft released which changes the api behavior for NetUserChangePassword.

http://discussions.citrix.com/topic/375446-help-wi-error-when-user-changes-password/

Uninstalling patches KB3126587 or KB3126593 from your Citrix XML brokers will resolve the issue, but on March 8th 2016, Microsoft released a security update which addresses the problem.

Simply install the new patch on your XML brokers –which does require a reboot!– and you should be good to go.

See Citrix’s updated support article below, along with Microsoft’s patch information.

http://support.citrix.com/article/CTX207802

https://support.microsoft.com/en-gb/kb/3140410

xenapppass02

Windows 10 WMI Filter for Group Policy

Windows 10 devices have started to trickle into our production environment and I needed a quick way to apply Windows 10 specific policies to these computers.

By creating a WMI filter that looks for the Windows 10 version number and then linking that query to our Windows 10 group policies, we can ensure that only Windows 10 PCs will get the policies we want.

First we use the command line utility ‘wmic‘ to find out what version of Windows wmi is reporting. (Make note of the version number, quite a jump from previous versions of windows; Windows 7 used 6.1, Windows 8 used 6.2, and Windows 8.1 used 6.3)

  • wmic os get buildnumber,caption,version

win10gpo03

  • Open Group Policy Management and expand Domains -> your Domain -> WMI Filters
  • Right click WMI Filters and select New
  • Enter a name for the filter, I went with the descriptive “Windows 10,” and then click Add
  • Namespace should say root\CIMv2 and under query we’ll enter the following select * from Win32_OperatingSystem where Version like "10.%" and ProductType="1"

win10gpo01

  • Click OK and then Save
  • Now find the policy that you want to apply the filter to and look for the section at the bottom that says WMI Filtering
  • Click the drop down box and select your new Windows 10 WMI Filter

win10gpo02


You can validate that the WMI filter worked correctly by running a group policy results report on a Windows 10 PC that would receive the policy.

Look at the details tab of the report and then under WMI Filters

win10gpo04