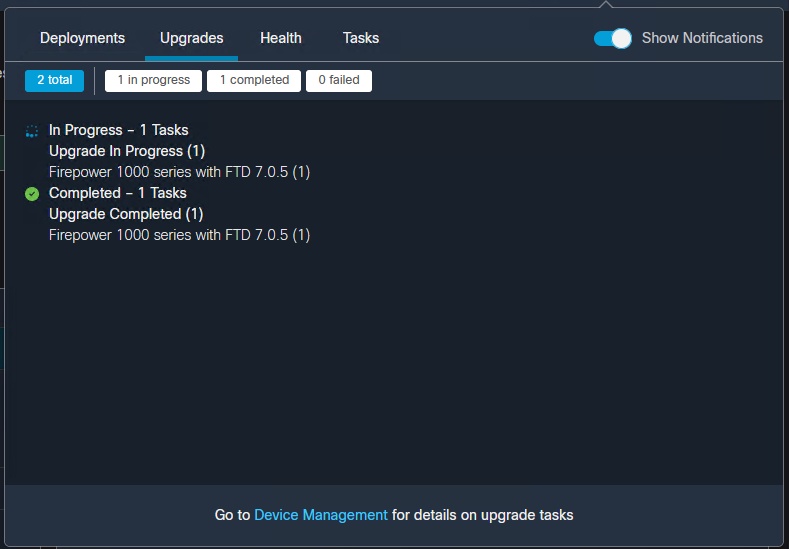
While Cisco’s Secure Firewall Management Center is a great tool there’s still some missing functionality here and there. Upgrades, for one, is a great example. How do you know when an upgrade has failed? Why did it fail? Where did it fail?
Sure the Task pane shows us the progress but truthfully that’s about it.
So for today, a quick update on how I monitor the progress of a Firepower Threat Defense upgrade through the command line.
First, SSH into the device.
Issue the “expert” command.
Enter into super user mode with “sudo su”
Change directory to “/ngfw/var/log/sf/<upgrade version number>”
Run “tail -f status.log”
Roll that beautiful bean footage.
Last login: Tue Jan 24 18:18:07 UTC 2023 from 192.168.100.30 on pts/0
Successful login attempts for user 'admin' : 1

Copyright 2004-2019, Cisco and/or its affiliates. All rights reserved.
Cisco is a registered trademark of Cisco Systems, Inc.
All other trademarks are property of their respective owners.

Cisco Fire Linux OS v6.4.0 (build 2)
Cisco Firepower 1120 Threat Defense v6.4.0.9 (build 62)
> expert
**************************************************************
NOTICE - Shell access will be deprecated in future releases
         and will be replaced with a separate expert mode CLI.
**************************************************************
admin@lab-ftd-01:~$ sudo su

We trust you have received the usual lecture from the local System
Administrator. It usually boils down to these three things:

    #1) Respect the privacy of others.
    #2) Think before you type.
    #3) With great power comes great responsibility.

Password:
root@lab-ftd-01:/# cd /ngfw/var/log/sf
root@lab-ftd-01:/ngfw/var/log/sf# ls

Cisco_FTD_SSP_FP1K_Upgrade-7.0.5

root@lab-ftd-01:/ngfw/var/log/sf# cd Cisco_FTD_SSP_FP1K_Upgrade-7.0.5
root@lab-ftd-01:/ngfw/var/log/sf/Cisco_FTD_SSP_FP1K_Upgrade-7.0.5# tail -f status.log
ui: Upgrade in progress: ( 0% done.26 mins to reboot). Checking device readiness... (000_start/000_0_start_upgrade_status_api_stack.sh)
ui: Upgrade in progress: ( 0% done.26 mins to reboot). Checking device readiness... (000_start/000_check_platform_support.sh)
ui: Upgrade in progress: ( 0% done.26 mins to reboot). Checking device readiness... (000_start/000_check_update.sh)
ui: Upgrade in progress: ( 0% done.26 mins to reboot). Checking device readiness... (000_start/099_check_legacy_amp_port.pl)
ui: Upgrade in progress: ( 0% done.26 mins to reboot). Checking device readiness... (000_start/100_start_messages.sh)
ui: Upgrade in progress: ( 0% done.26 mins to reboot). Checking device readiness... (000_start/101_run_pruning.pl)
ui: Upgrade in progress: ( 0% done.26 mins to reboot). Checking device readiness... (000_start/105_check_model_number.sh)
ui: Upgrade in progress: ( 0% done.26 mins to reboot). Checking device readiness... (000_start/107_version_check.sh)
ui: Upgrade in progress: ( 0% done.26 mins to reboot). Checking device readiness... (000_start/110_DB_integrity_check.sh)
ui: Upgrade in progress: ( 0% done.26 mins to reboot). Checking device readiness... (000_start/113_EO_integrity_check.pl)
ui: Upgrade in progress: ( 0% done.26 mins to reboot). Checking device readiness... (000_start/200_clean_csp_files.sh)
ui: Upgrade in progress: ( 0% done.26 mins to reboot). Checking device readiness... (000_start/250_check_system_files.sh)
ui: Upgrade in progress: ( 4% done.25 mins to reboot). Checking device readiness... (000_start/320_remove_backups.sh)
ui: Upgrade in progress: ( 4% done.25 mins to reboot). Checking device readiness... (000_start/400_run_troubleshoot.sh)
Occasionally you may come across issues with SIP inspection on an ASA or Firepower, leading to problems with SIP/RTP voip audio. As a troubleshooting step, it’s often helpful to disable SIP inspection for testing.
Please read this note from Cisco on disabling SIP inspection to verify you everything in order before doing so:
You would typically disable SIP only if the inspection is causing problems in the network. However, if you disable SIP, you must ensure that your access control policies allow the SIP traffic (UDP/TCP 5060) and any dynamically allocated ports, and that you do not need NAT support for SIP connections. Adjust the access control and NAT policies accordingly through the standard pages, not through FlexConfig.
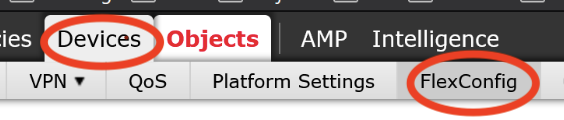
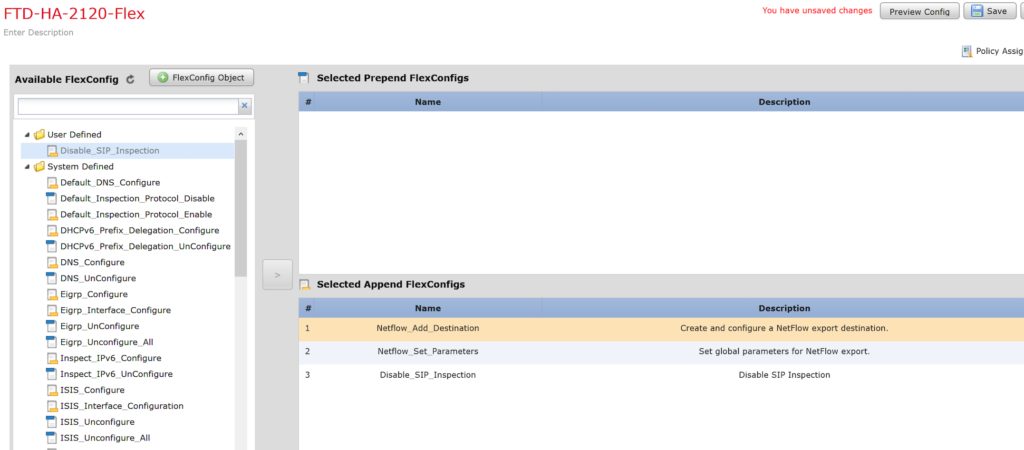
For Firepower devices managed by an FMC, here are some quick instructions to push out a FlexConfig policy to disable SIP inspection.
In FMC, navigate to Devices > FlexConfig
Click the Pencil icon to edit your FlexConfig device policy. If you don’t have a policy yet click New Policy to create one.
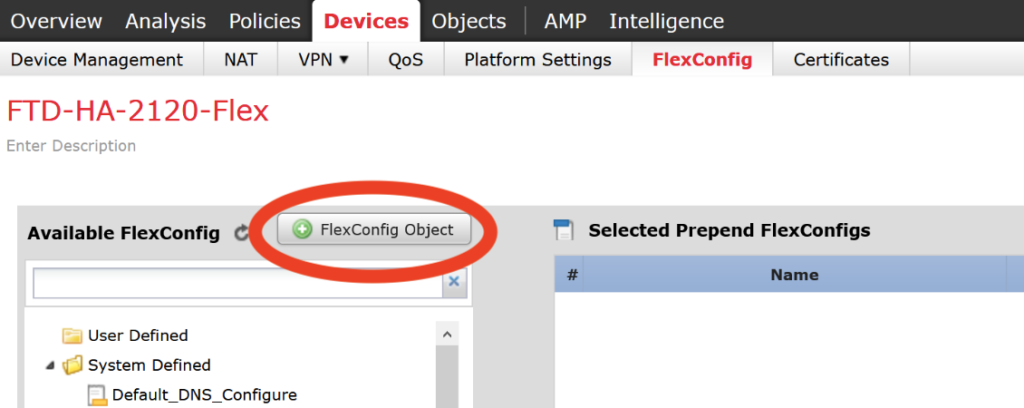
In the FlexConfig policy click the New FlexConfig Object.
Give a name a name and description for the new new object and in the text field copy the commands below (note the indentations). Click Save.
policy-map global_policy
 class inspection_default
  no inspect sip
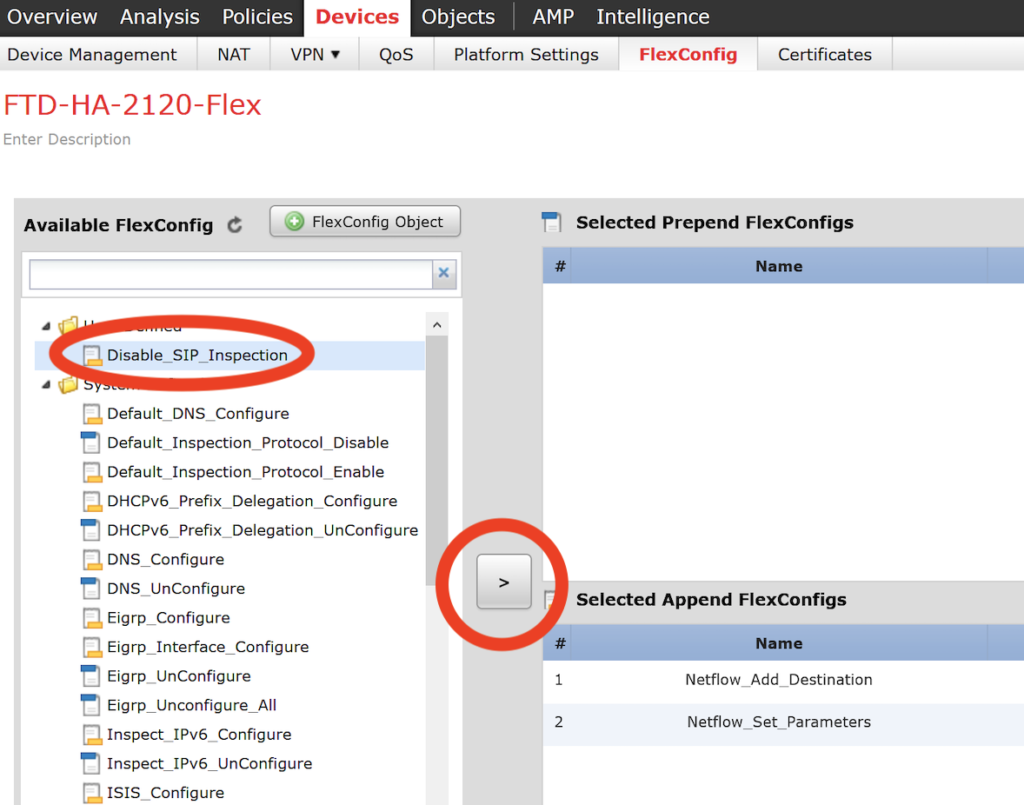
Under available FlexConfig find the new object we created, highlight it, and click the left arrow to add it to the policy.
With the new object added to the policy, save the policy and deploy to your FirePower.
SSH to the Firepower and run the following command to verify that SIP is no longer in the inspection list:
show run policy-map | beg global_policy

policy-map global_policy
 class inspection_default
  inspect dns preset_dns_map
  inspect ftp
  inspect h323 h225
  inspect h323 ras
  inspect rsh
  inspect rtsp
  inspect sqlnet
  inspect skinny
  inspect sunrpc
  inspect xdmcp
  inspect netbios
  inspect tftp
  inspect icmp
  inspect icmp error
Ran into an interesting issue the other day setting up a two node ISE deployment. I figured I’d put it up on the blog in case anyone else is pulling out their hair.
After adding a secondary node, the deployment nodes status page lists an error saying “synchronization failed.”
When I consoled into the ISE node I saw multiple failed logins:
Failed to log in 51 time(s)
Last failed login on Tue Oct 15 11:38:37 2019 from 10.102.10.168
ISE3615-1/admin#
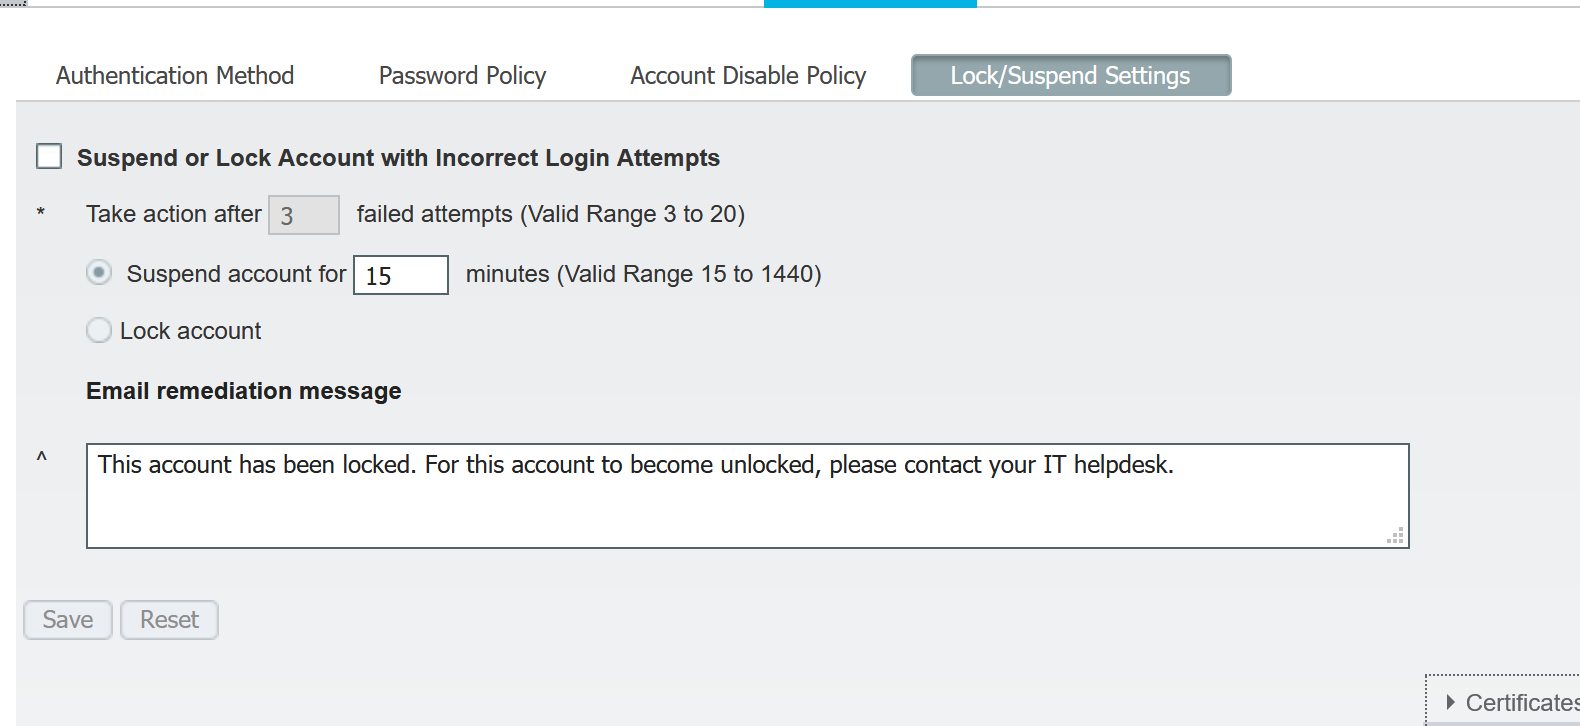
When the second node was setup, the admin account password originally differed from the existing node. Even after changing passwords to match the failed logins continued.
To work around the issue I disabled admin account lockouts on the new node, and attempted to register again. Afterwards the node registered and everything sync’ed properly.
To disable account lockouts, go to Administration -> System -> Admin Access -> Lock/Suspend Settings and uncheck “Suspend or Lock Account with Incorrect Login Attempts”
As of version 2.0, Cisco ISE now supports TACACS+ for user authentication, command authorization, and accounting (the three A’s in AAA) for network device management.
I won’t get into the age old debate of TACAS+ vs RADIUS but for many industries, especially those that may be under stricter compliance, governance and regulation; TACACS+ presents certain advantages thanks to per-command authorization and detailed accounting/logging.
This post will go over the steps to implement TACACS+ based AAA for Cisco devices based on active directory group membership.
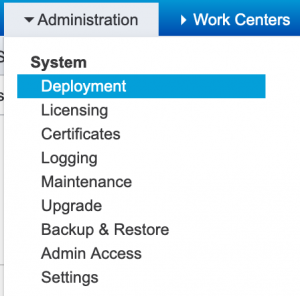
This is a fresh install of the ISE 2.4 evaluation vm, installed in my test lab. After the initial setup, log in to ISE and go to Administration -> Deployment.
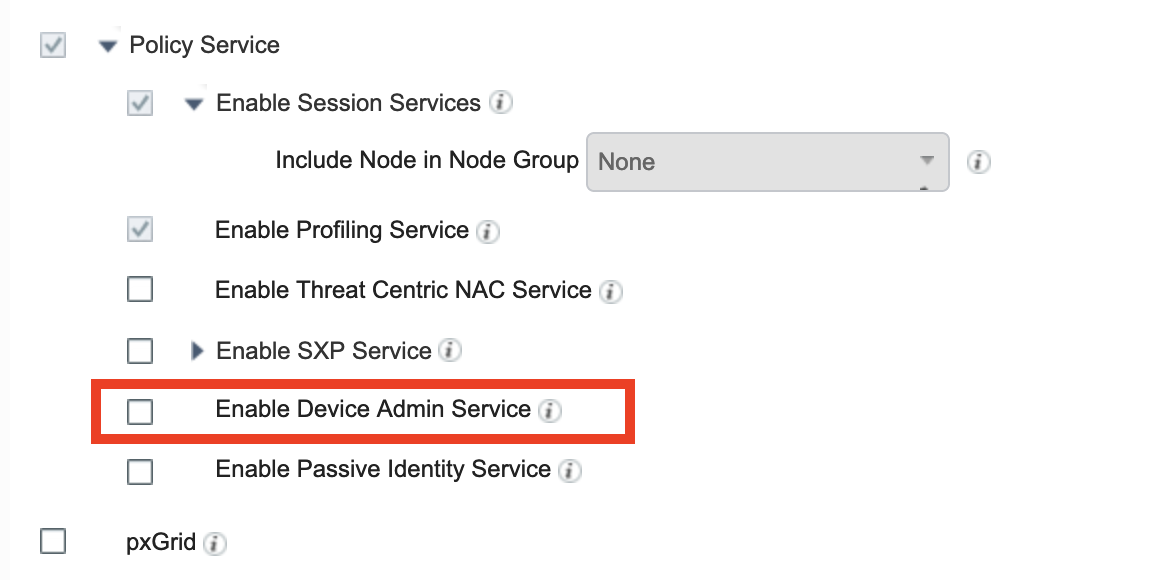
Find your ISE server and click Edit. Scroll down to Policy Service and check “Enable Device Admin Service.” Click Save.
Next we will need to bind the ISE server to the Active Directory domain and grab our AD groups. For this example I have created two AD groups, one called Network Admins and the other Help Desk. We will create two separate authorization profiles, one that allows Network Admins full access to the device and a second for help desk users that will limit them to only show commands.
Go to Administration-> External Identity Sources -> Active Directory
Click Add
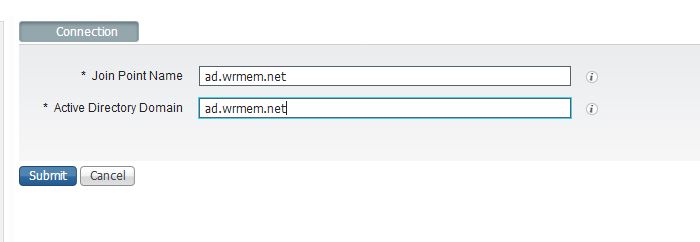
Enter a name for the Join Point as well as the Active Directory domain name. Click Submit.
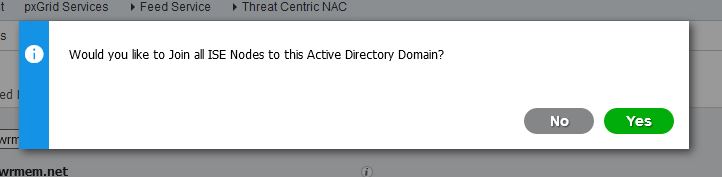
When prompted to join the node to the domain press Yes.
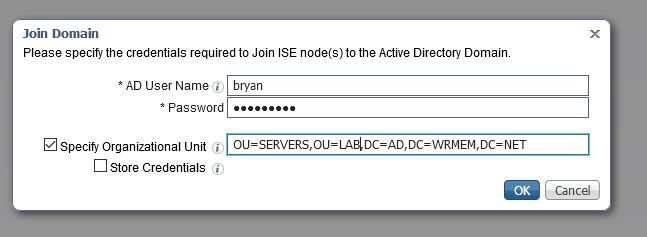
Enter your domain credentials that have permission to join a computer to the domain and specify the OU to place the object if you’d like. Click Ok.
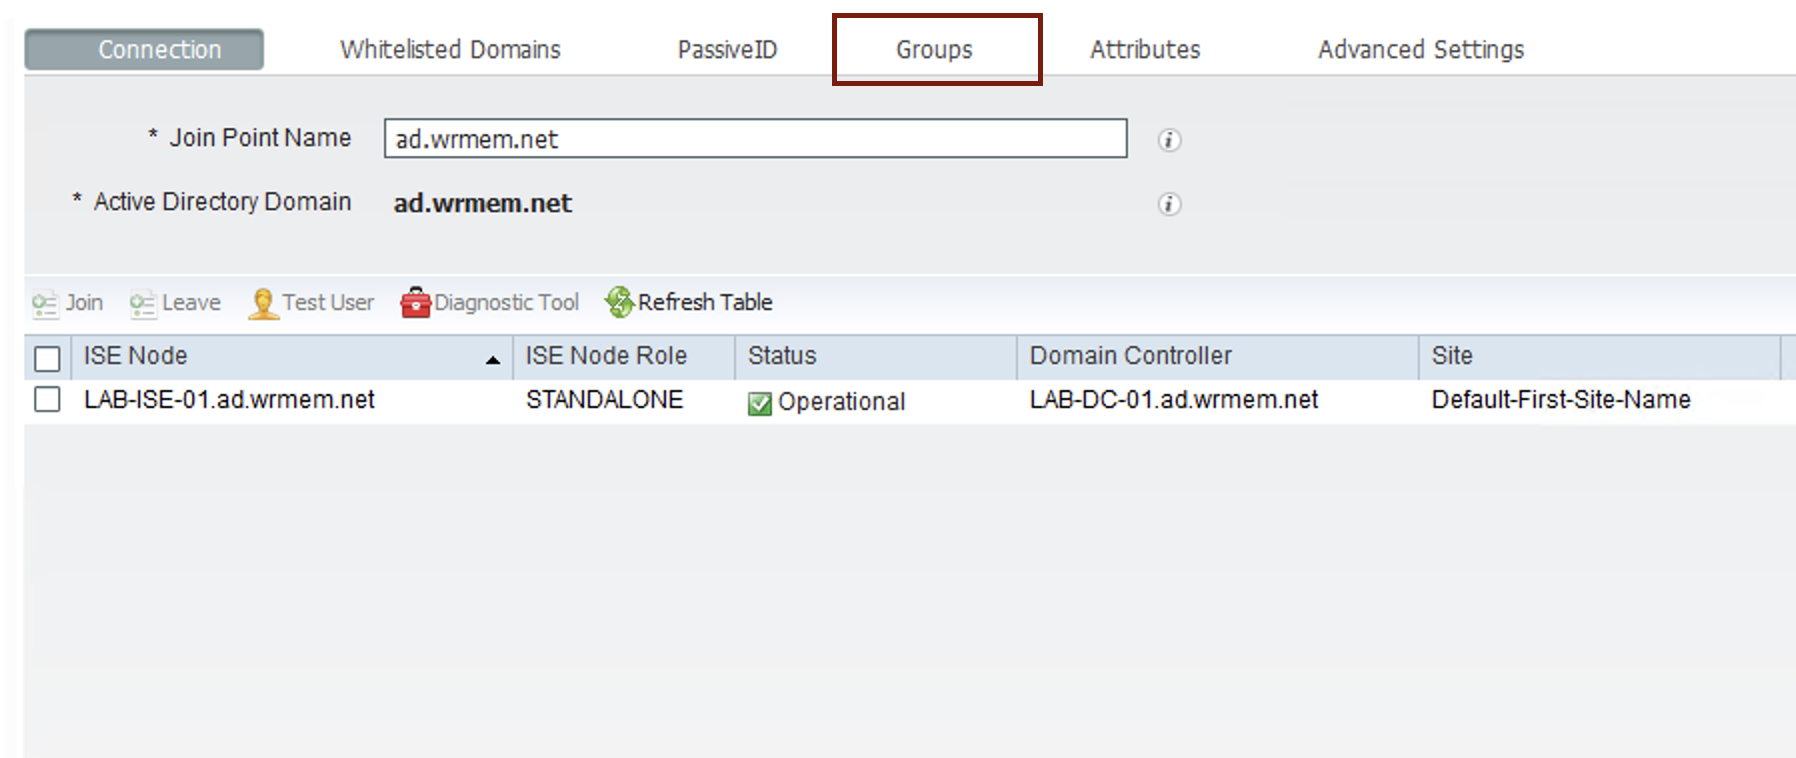
Wait a moment after hitting ok and you should see a status messaging indicating if the join was successful or not.
After clicking close click the Groups tab.
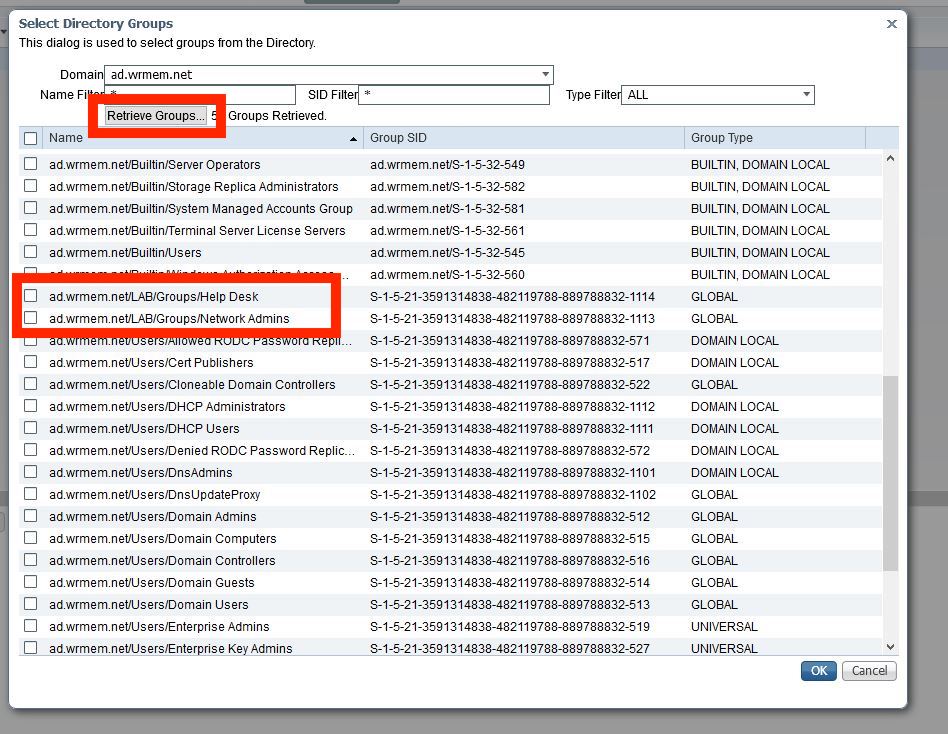
Click Add and “Select Groups From Directory“
A Select Directory Groups window should appear. To list all AD groups you can leave the wild card in the name filter or enter a more specific name if you know the group you’d like to add.
Click Retrieve Groups and a list of AD groups should populate.
For the purpose of this demo I will select Network Admins and Help Desk and then click Ok.
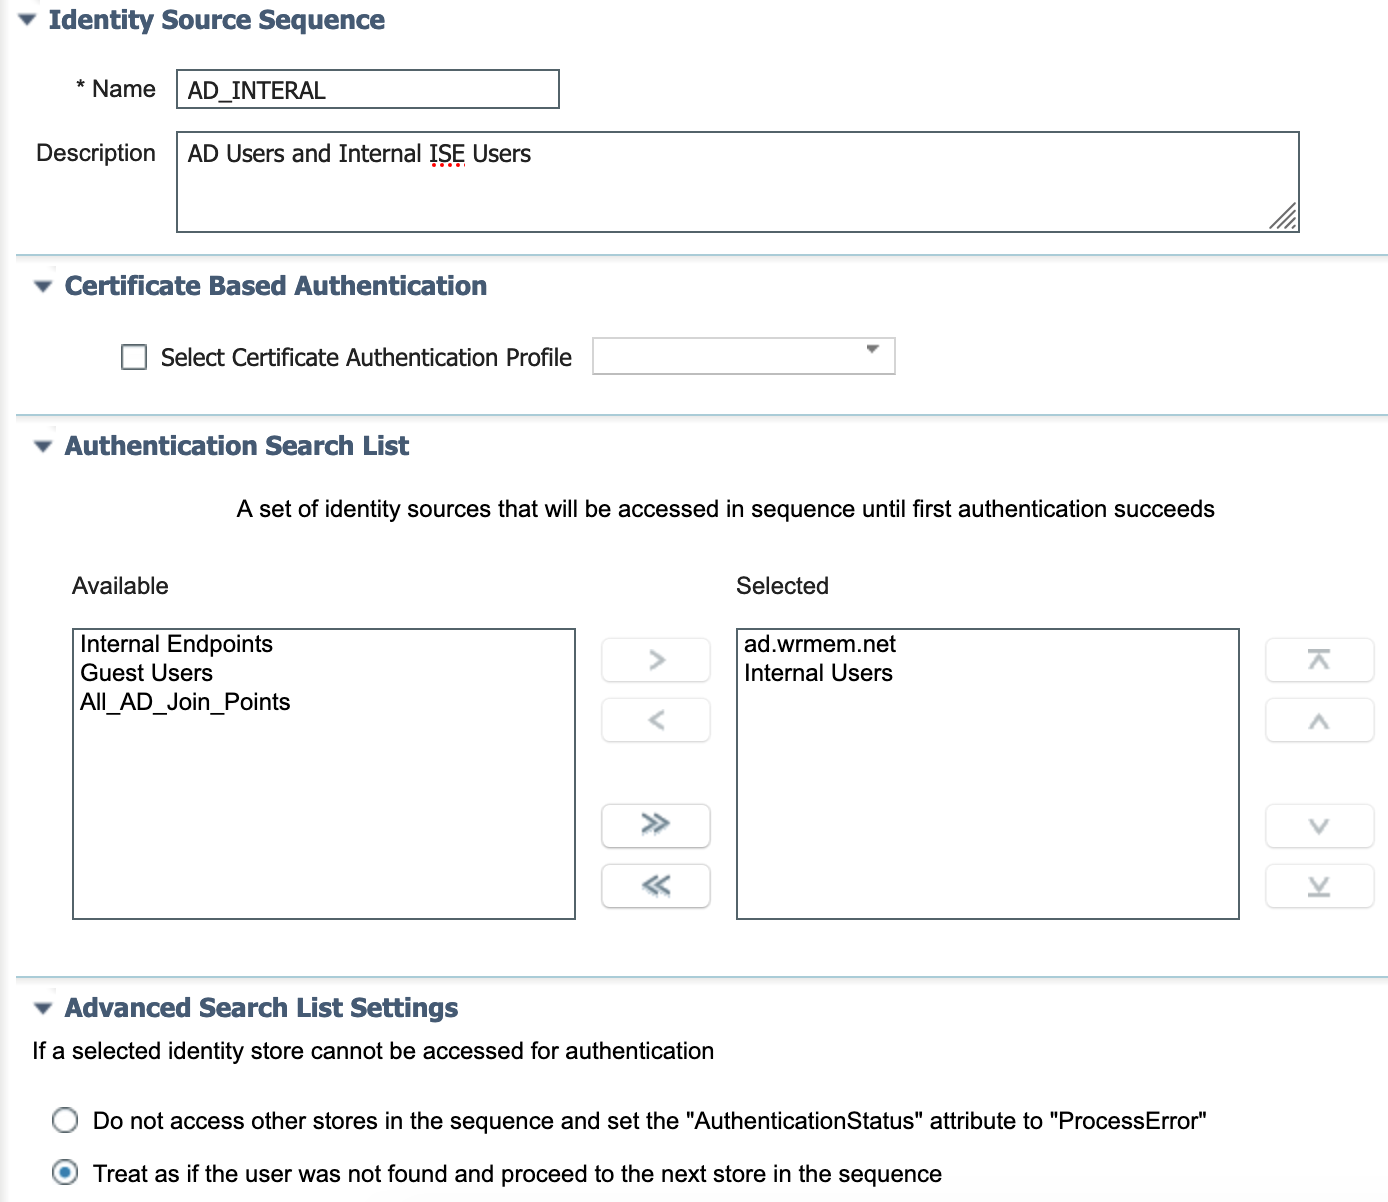
Now we’ll want to create an Identity Source Sequence that will contain our AD groups, and if needed any local accounts on ISE (in the event that AD can’t be contacted it’s not a bad idea to have a local ISE account to log into your equipment).
Go to Administration -> Identity Management -> Identity Source Sequences
Click Add
Give a name, optional description, add your ad join point and internal users, then select the option to Treat as if the user was not found and proceed to the next store in the sequence
Click Save
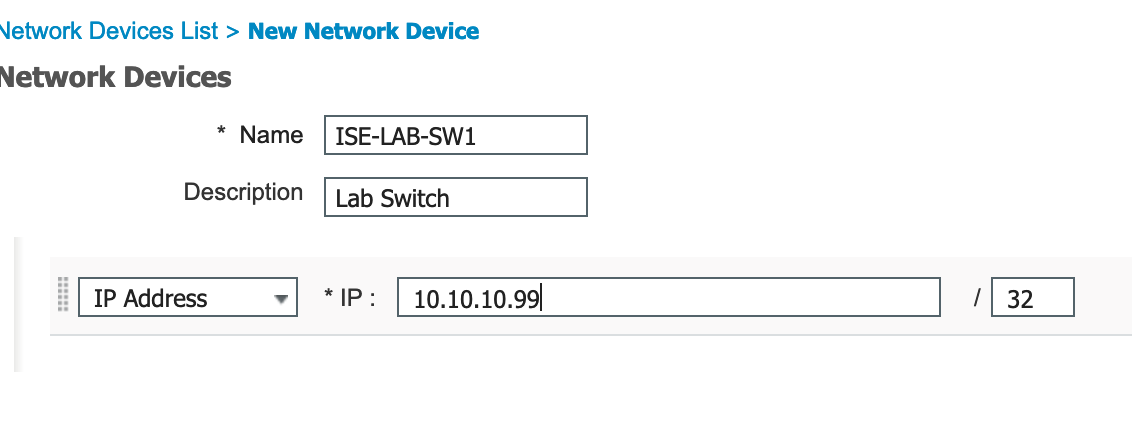
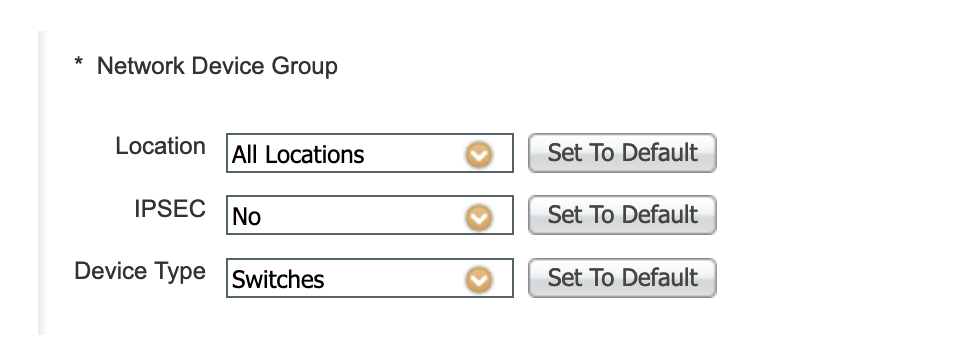
Next we’ll want to add our network device. In this demo I’m running a 3750 switch.
First I like to create a network device group for the type of device I’m adding. In this example it’s a switch. You can create as many device groups/locations/etc. to get as granular as you’d like for your devices and rule sets.
To add a network device group go to Work Centers -> Device Administration -> Network Resources -> Network Device Groups
Click Add.
Enter a descriptive name and the parent group.
Click Save.
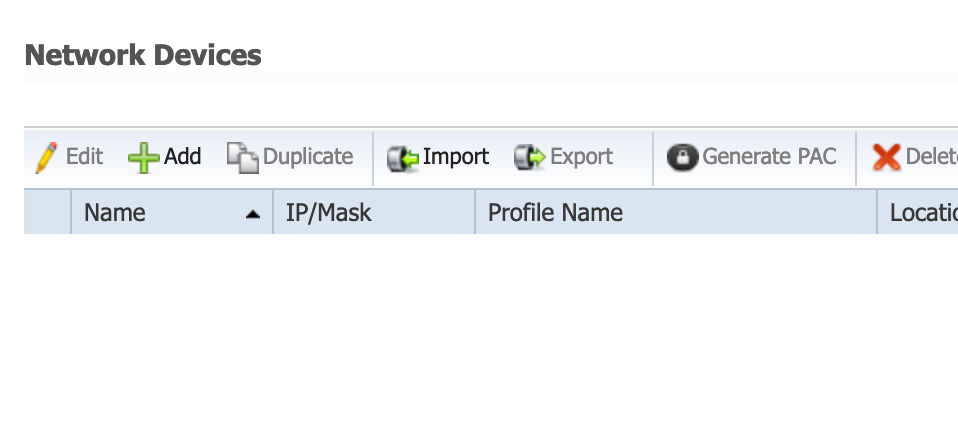
To add a network device go to Work Centers -> Device Administration -> Network Resources -> Network Devices
Click Add
Enter a name, optional description, ip address, and select the device type from the drop down.
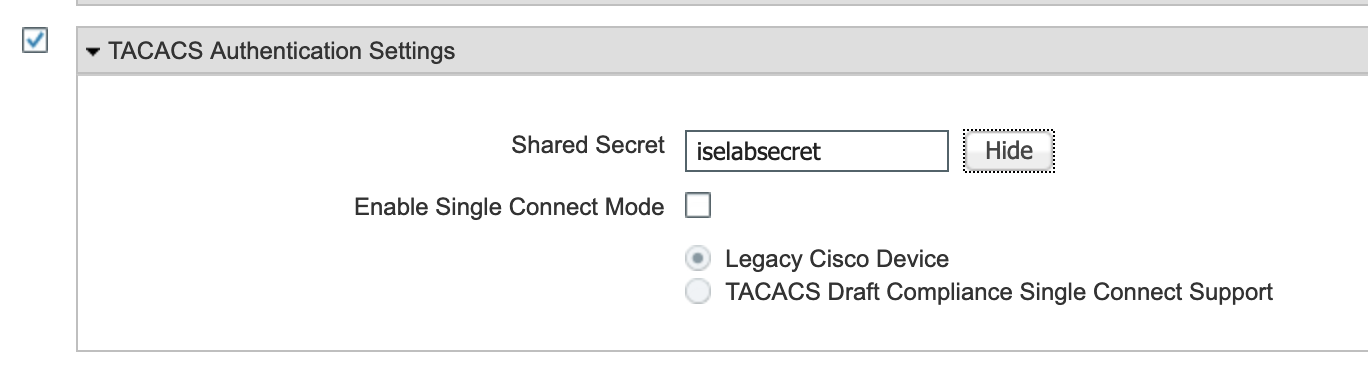
Scroll down and place a check mark next to TACACS Authentication Settings.
Enter a shared secret.
Click Submit.
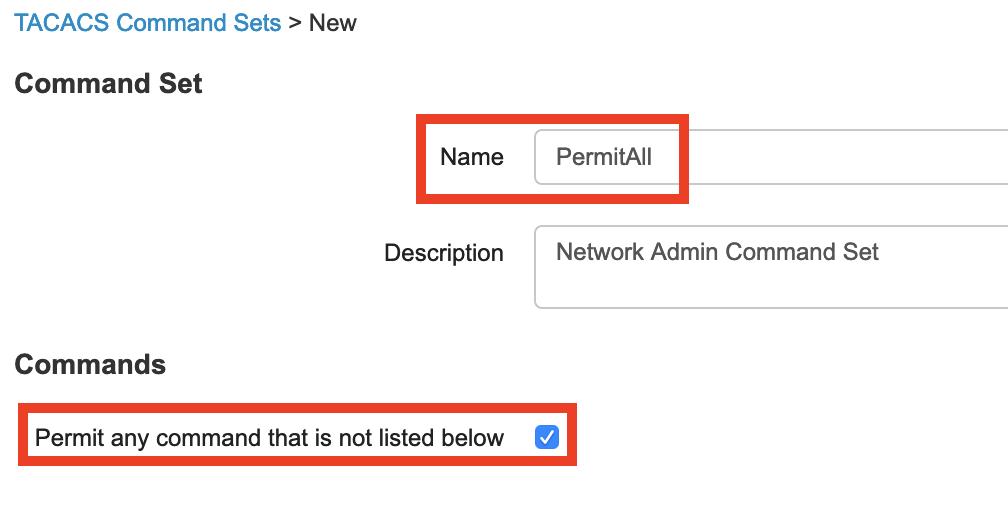
Next up we need to configure our command sets and TACACS profiles. These will be the allowable/available commands for users of the different AD groups.
Go to Work Centers -> Device Administration -> Policy Elements -> Results -> TACACS Command Sets
Click Add.
Enter a name and check the box for “Permit any command that is not listed below“
Click Submit.
You should be back at the TACACS command set page.
Click Add again.
This next command set will be for help desk users.
Enter a name and under commands click Add to add the commands you wish to grant your help desk users (e.g. show, ping, etc.)
Click Submit.
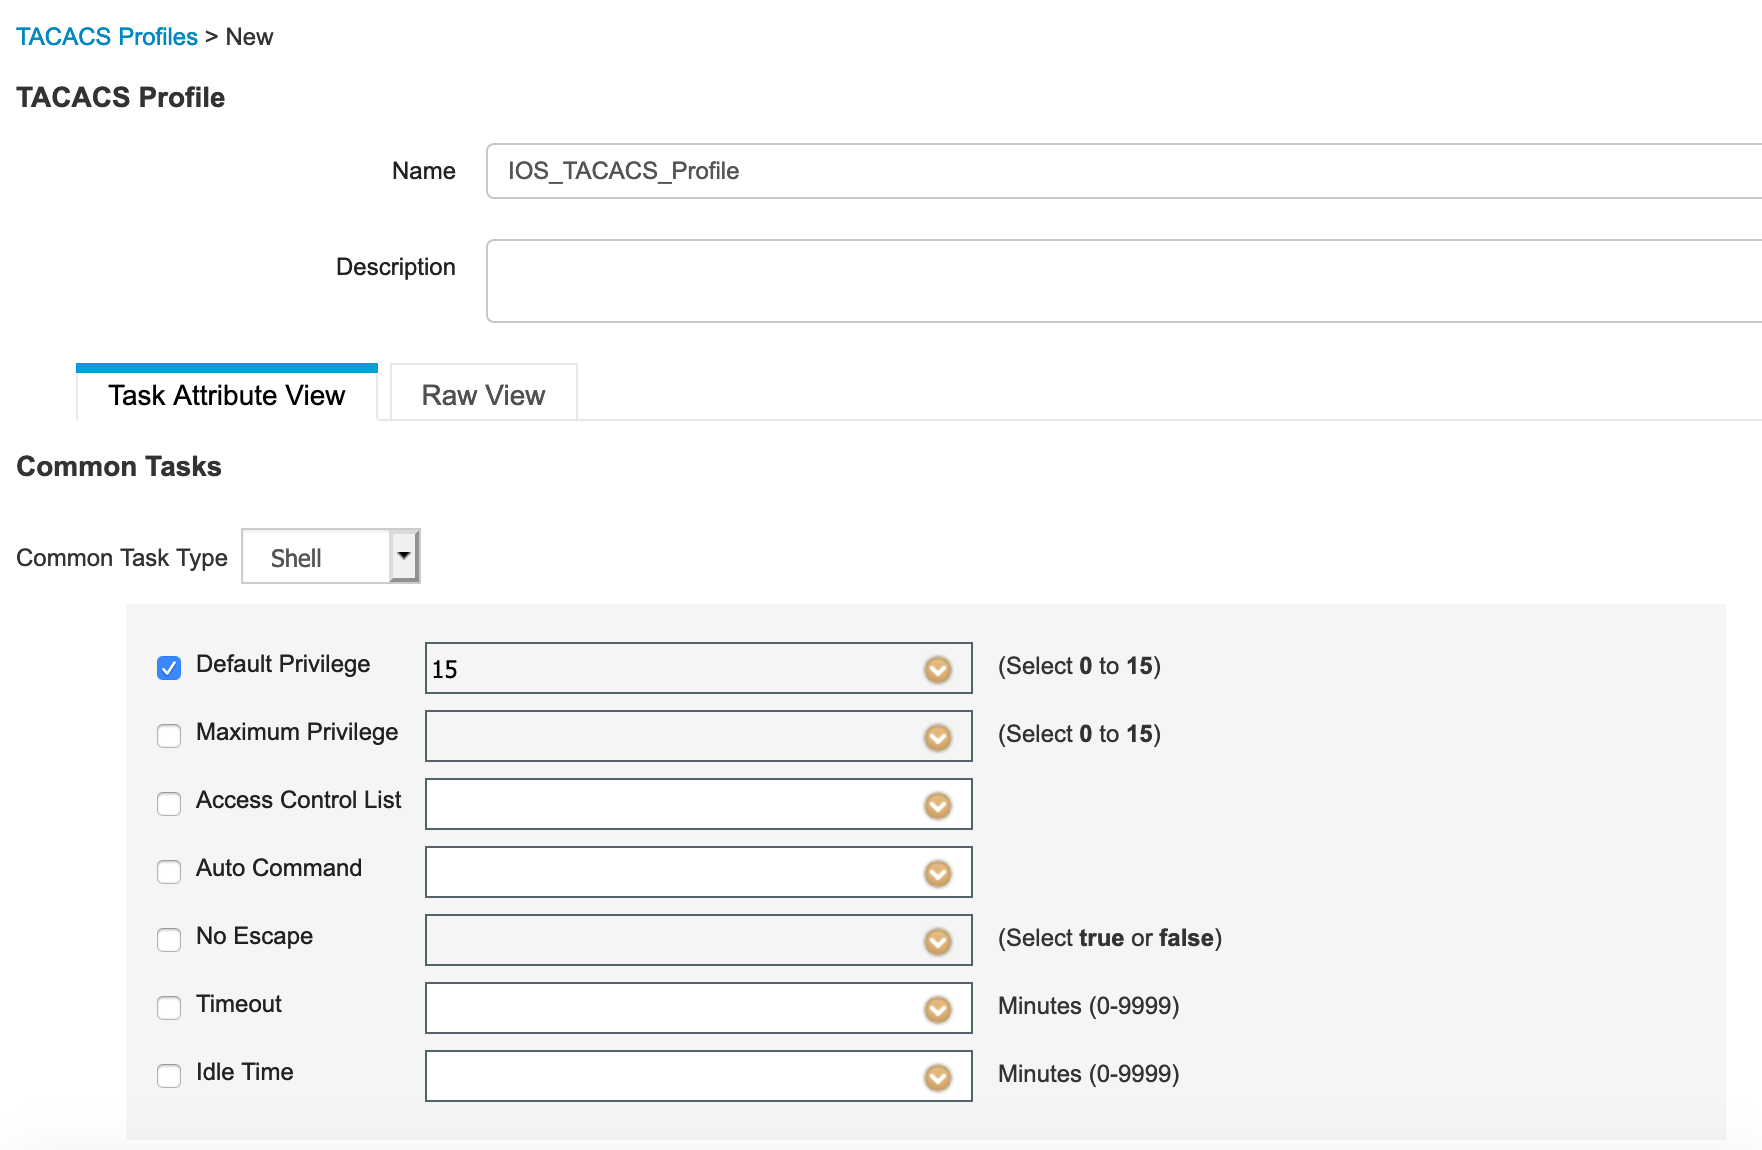
Next up are the TACACS profiles. These determine privilege levels, think level 1-15 on IOS switches.
Go to Work Centers -> Device Administration -> Policy Elements -> Results -> TACACS Profiles
Click Add.
Enter a name for the Profile and set the default privilege level to 15. We don’t need to worry about Help Desk users being able to run actual level 15 commands as the list of available commands have been set in TACACS Command set.
Click Submit.
Still with me? Almost there. The next step is to configure the actual ISE TACACS policies, combing all the previous efforts into one comprehensive policy.
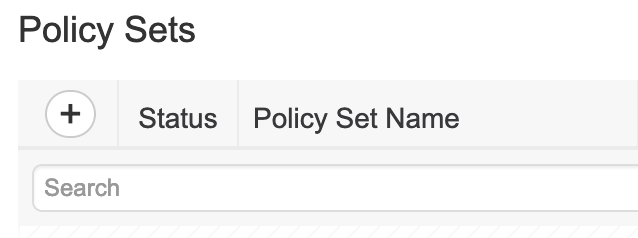
Go to Work Centers -> Device Administration -> Device Admin Policy Sets
Click the Plus sign to add a new Policy Set
Enter a name for the policy.
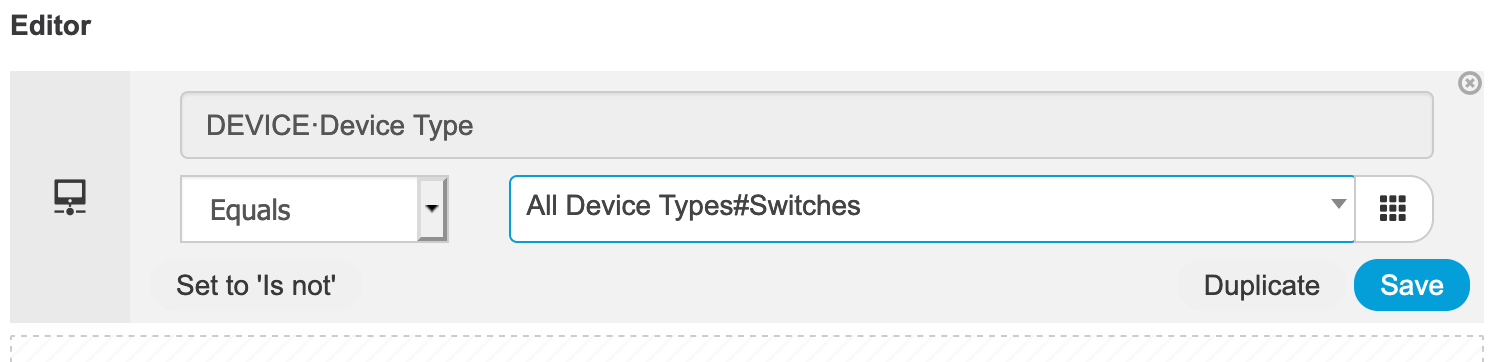
Click the Plus sign under Conditions. In the condition editor select Device Type Equals and then select the device type you created earlier. In this case “Switches.”
Click Use.
Under Allowed Protocols select Default Device Admin
Click Save.
Next expand Authentication Policy by clicking the arrow on the left.
To keep things simple you can change the the default authentication rule to use the new Identity Source Sequence we made earlier. You can also get granular and add a new Authentication policy that targets TACACS logons. For this demo we’ll just change the default rule.
Click Save.
Next, expand the Authorization Policy by click the left arrow.
We’ll add our Network Admins policy first.
Click the plus sign to add a new policy.
Give it a rule name such as Network Admins.
Click the plus sign under conditions.
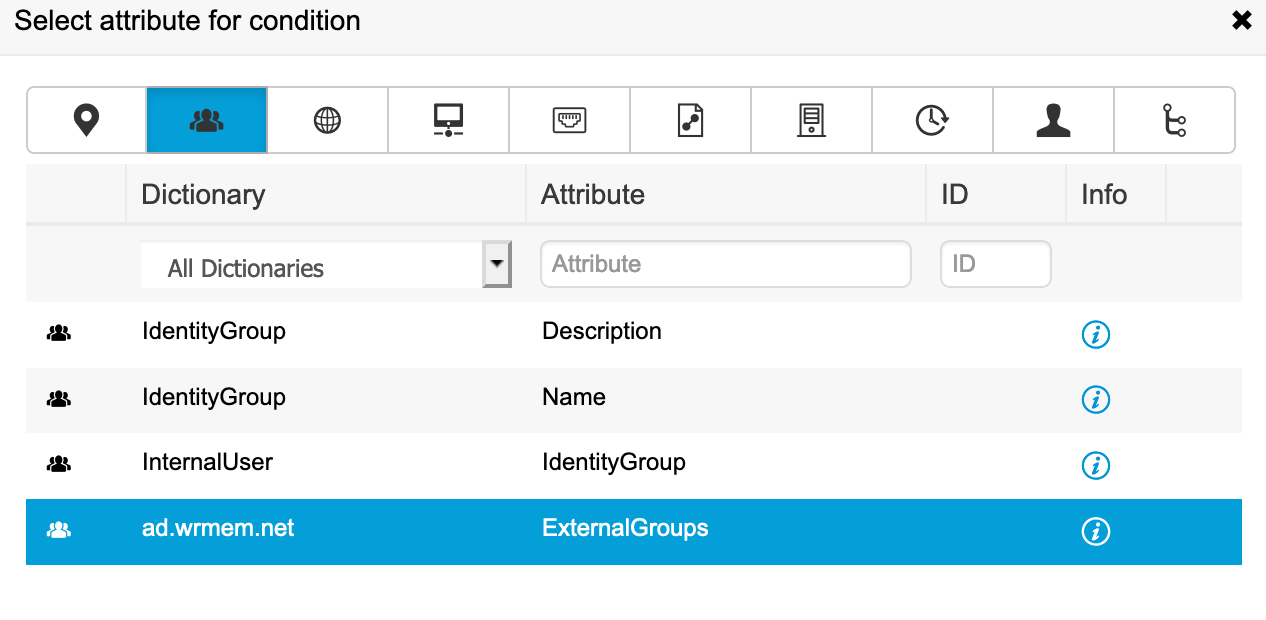
In the Conditions Studio click attributes over on the right hand side.
Click the Identity Group icon and you should see your ad join point, click that.
Click where it says Choose from list or type and select Network Admins from the drop down.
The condition should look something like this:
Click Use to go back to the Authorization policy editor.
Under command sets select PermitAll
Under shell profiles select the TACACS profile we created earlier.
The policy should look like this:
Repeat the same steps to build your Help Desk policy, selecting your help desk AD group and changing the command set to PermitShow and settingthe TACACS profile.
Click Save.
In the home stretch now, next we need to configure our network devices, test and verify.
My lab switch is an old 3750 running IOS 12. The following commands work with IOS 12, please note that IOS 15 has deprecated some commands. For example in IOS 12 you would use tacacs-server host X.X.X.X to define your TACACS server where as in IOS 15 the command is:
tacacs server TACACS_ISE address ipv4 X.X.X.X
First enable new-model AAA and define your TACACS server.
IOS12
aaa new-model
!
tacacs-server host 10.10.10.20
tacacs-server directed-request
tacacs-server key iselabsecret
!
aaa group server tacacs+ TACACS-ISE
server 10.10.10.20
IOS15
aaa new-model
!
tacacs server ISE
address ipv4 10.10.10.20
key iselabsecret
aaa group server tacacs+ TACACS-ISE
server name ISE
Define a new login list named ISE-VTY using the group TACACS-ISE followed by local login if failed, the -case following local means that username/passwords are case sensitive.
aaa authentication login ISE-VTY group TACACS-ISE local-case
Define enable access using the TACACS-ISE group followed by the local enable password.
aaa authentication enable default group TACACS-ISE enable
Create a new login authentication list called CONSOLE that uses case sensitive local users
aaa authentication login CONSOLE local-case
Create an authorization list that allows exec mode for ISE-VTY users if authenticated.
aaa authorization exec ISE-VTY group TACACS-ISE local if-authenticated
To allow IOS to authorize configuration commands we use the config-commands command.
aaa authorization config-commands
Allow for command authorization of level 1 and level 15 commands for ISE-VTY users.
aaa authorization commands 1 ISE-VTY group TACACS-ISE local if-authenticated
aaa authorization commands 15 ISE-VTY group TACACS-ISE local if-authenticated
Enable exec, system, and command accounting.
aaa accounting exec default start-stop group TACACS-ISE
aaa accounting commands 1 default start-stop group TACACS-ISE
aaa accounting commands 15 default start-stop group TACACS-ISE
aaa accounting system default start-stop group TACACS-ISE
Set the source interface for TACACS communication.
ip tacacs source-interface Loopback 0
Before we apply these new aaa lists to our vty lines it might be best to test that the switch can properly communicate and authenticate with ISE. You can do this with the test aaa comand.
ISE-LAB-SW1#test aaa group TACACS-ISE bryan XXXXXX legacy
Attempting authentication test to server-group TACACS-ISE using tacacs+
User was successfully authenticated.
Now that we know authentication works we can finally, set our console and vty lines to use the new authentication and authorization sets.
Now we can attempt to connect to the switch with out AD credentials and test and verify our setup.
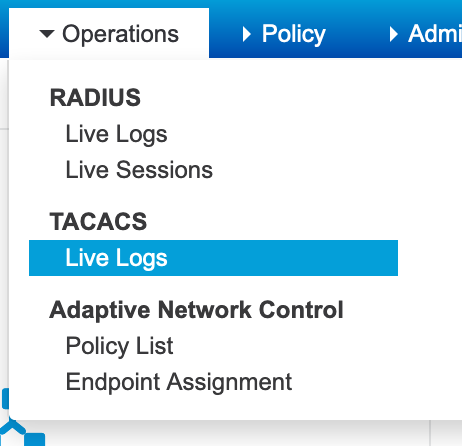
In ISE you can navigate to Operations -> TACACS Live Logs to get a quick view of connection status, policies applied, etc.
If you were successful in logging in to the switch you should see a green check mark as well as the authentication and authorization polices that have been applied. Clicking the little icon under the detail columns will give you a detailed report showing each step of authentication and authorization, in painful detail.
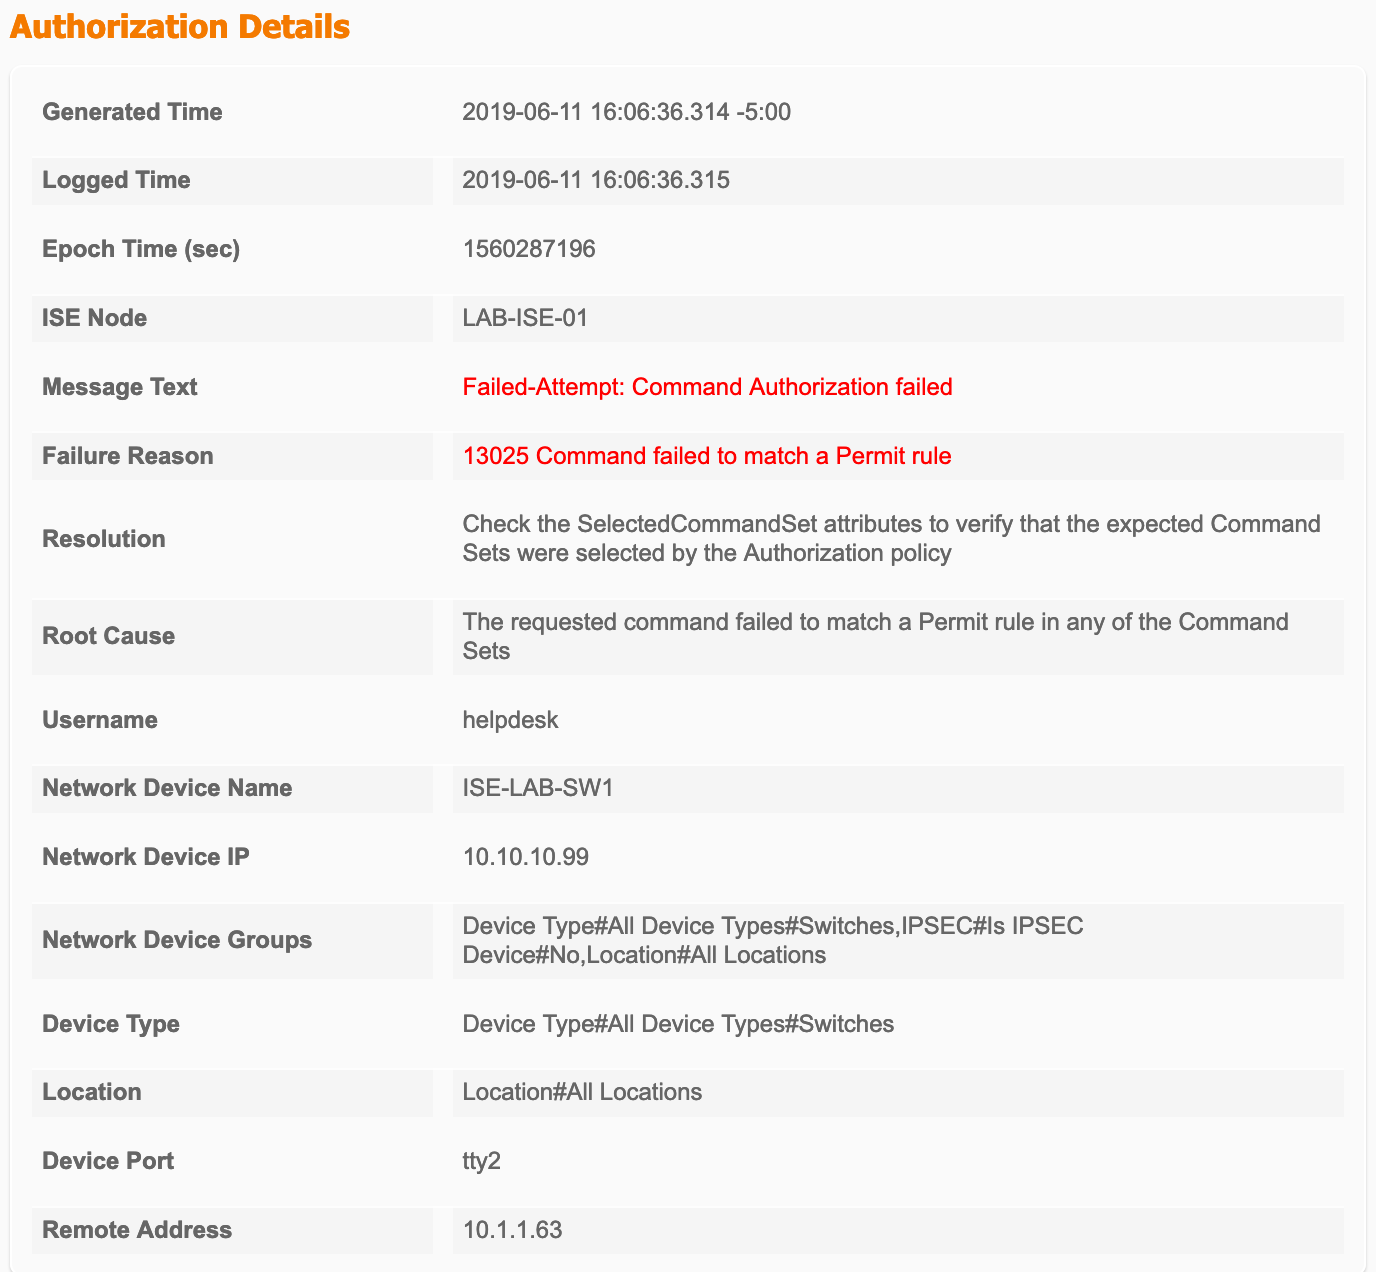
We can now test our help desk use to see if they’re getting the proper restricted command set we defined earlier.
ISE-LAB-SW1#ping 1.1.1.1

Type escape sequence to abort.
Sending 5, 100-byte ICMP Echos to 1.1.1.1, timeout is 2 seconds:
!!!!!
Success rate is 100 percent (5/5), round-trip min/avg/max = 33/35/42 ms
ISE-LAB-SW1#sh run int fa1/0/1
Building configuration...

Current configuration : 35 bytes
!
interface FastEthernet1/0/1
end

ISE-LAB-SW1#conf t
Command authorization failed.

ISE-LAB-SW1#
And here’s our failure report from when we tried to enter configure terminal.
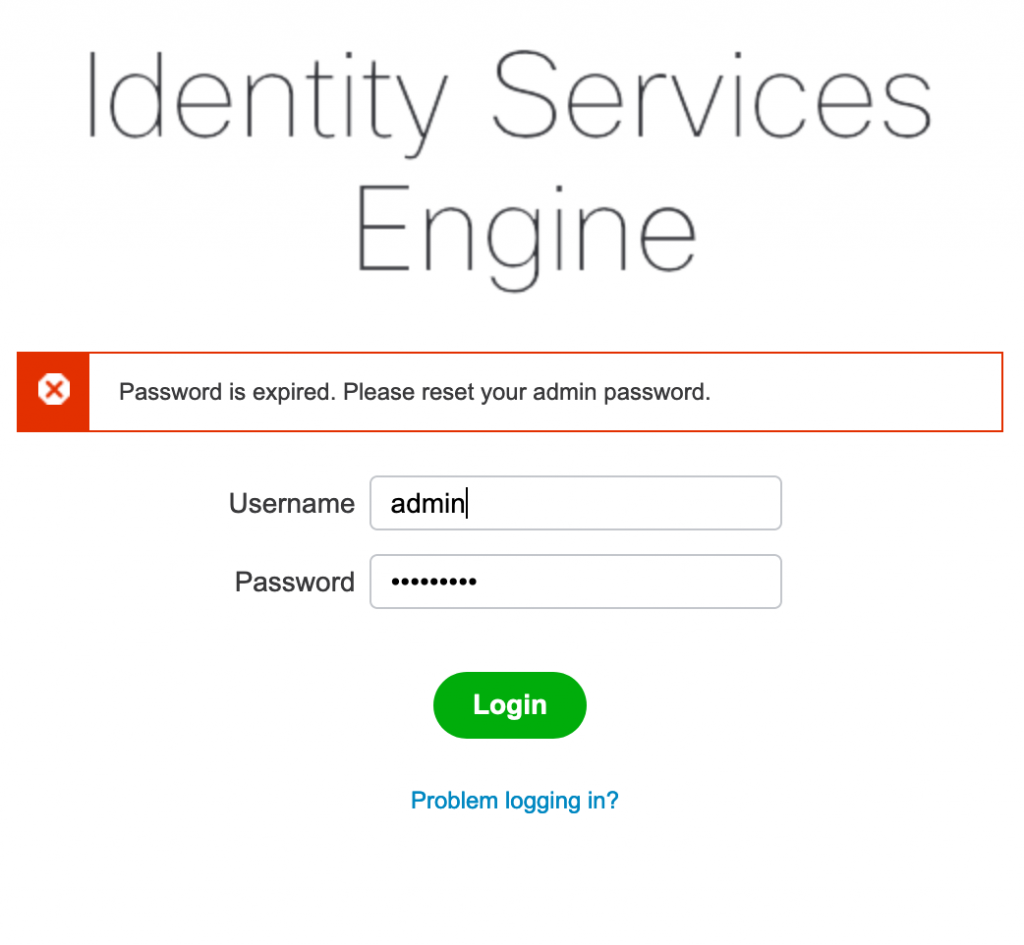
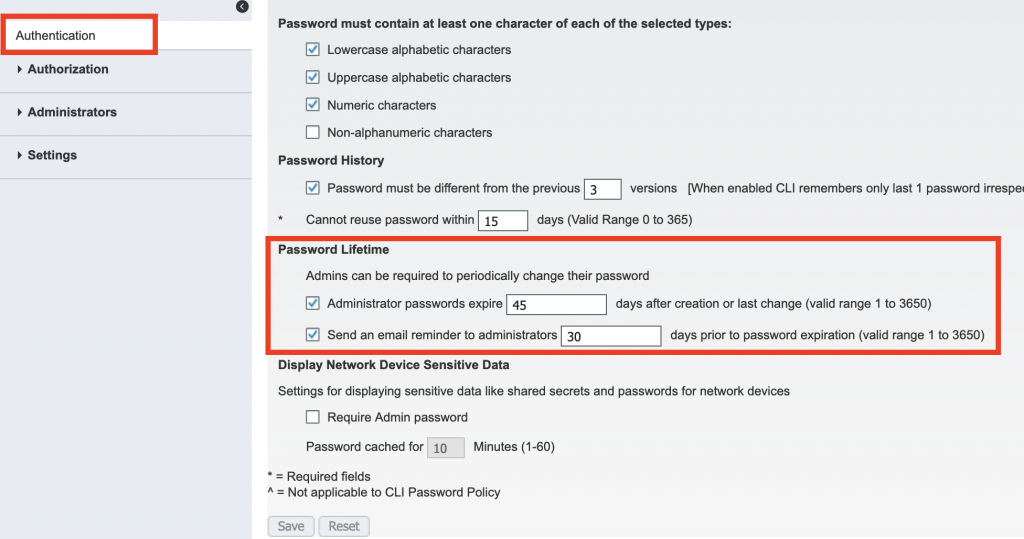
So you’ve installed ISE, configured your policies, got everything up and running. Life is peachy…until you attempt to log in and receive the following error:
One little gotcha. Out of the box, the GUI admin account is set to expire after 45 days. So just when you thought everything was up and running smoothly you hit this little stumbling block.
Thankfully the fix is fairly straight forward, but if you’ve just received the error above you’ll need to do a little CLI intervention.
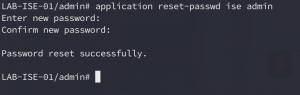
SSH into your ISE server with your CLI username/password. At the command prompt enter “application reset-passwd ise admin” and follow the on-screen prompts:
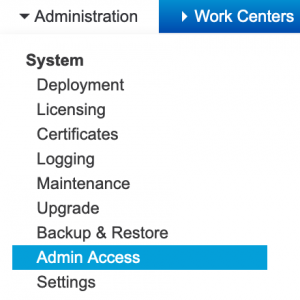
Now to avoid the headache of resetting your password from the CLI every 45 days you can edit the admin password policy to allow for a more lenient password history or disable expiration completely.
To do so, log into ISE then go to Administration -> Admin Access.
Under the Authentication section look for Password Lifetime. Here we can edit/enable/disable password expiration settings or even configure email alerts when the password is about to expire.