Creating a Subject Line Disclaimer in Exchange 2010

With ever increasing amounts of spam and spear phishing attacks, many companies today are going out of their way to warn users when an email is received from an external, and potentially unsafe, source. Thankfully the Exchange Management Console makes it fairly straight forward to create transport rules to add disclaimers, re-write subject lines, and even insert html into emails for all types of situations.

Recently I was asked to add an [EXTERNAL] tag to the subject line of all incoming emails from outside the organization. Below are the steps to create a Hub Transport rule to accomplish such a task.

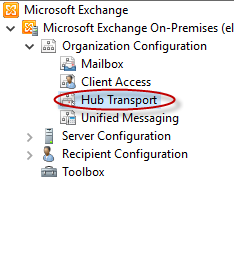
  • Open the Exchange Management Console
  • Navigate to Organization Configuration -> Hub Transport

ex-subject01

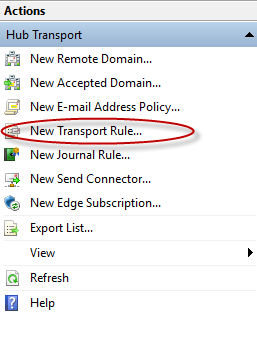
  • On the right side of the console click “New Transport Rule…

ex-subject02

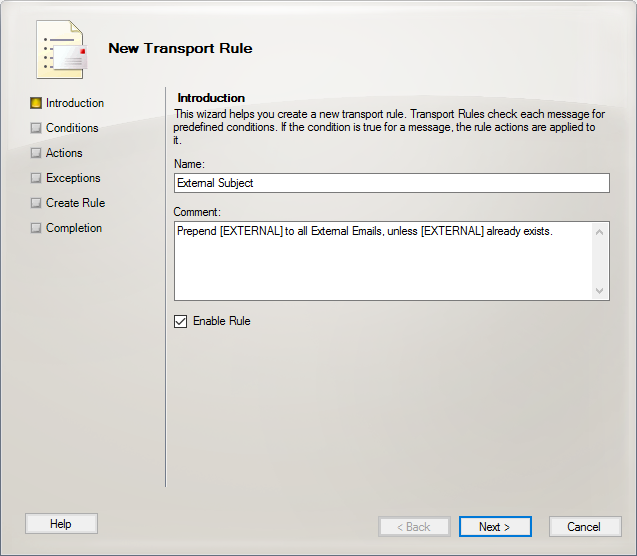
  • The New Transport Rule wizard will open. Simply follow the onscreen instructions, entering a name and comment for the rule. Click Next when finished.

ex-subject03

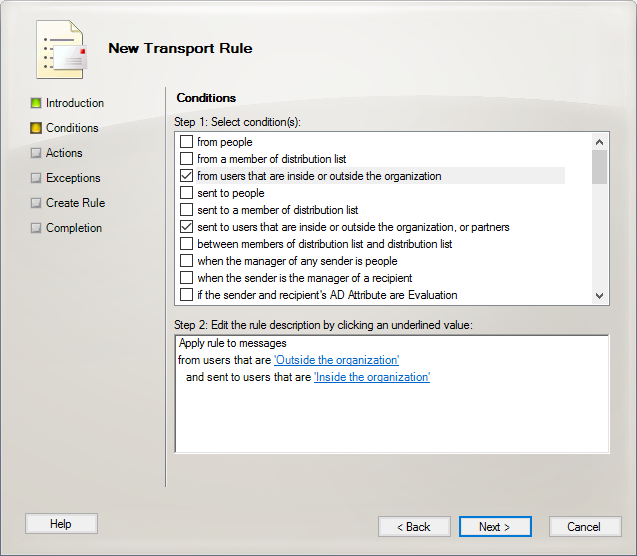
  • Under Conditions, select “from users that are inside or outside the organization” and “sent to users that are inside or outside the organization, or partners.” Click the blue links under Step 2 to change the from users field to “Outside” and the sent to users field to “Inside.” Click Next when completed.

ex-subject04

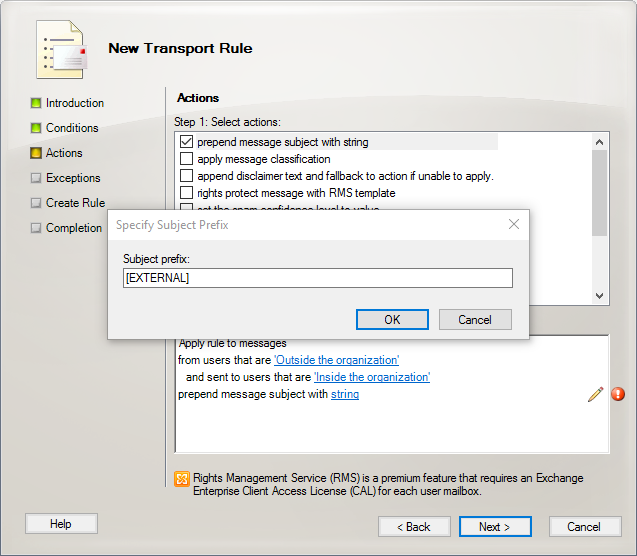
  • Under actions, check “prepend message subject with string.” Click the blue link next to “string” to edit the subject prefix. Enter the tag that you’d like to appear in the subject line. Click OK and Next.

ex-subject05

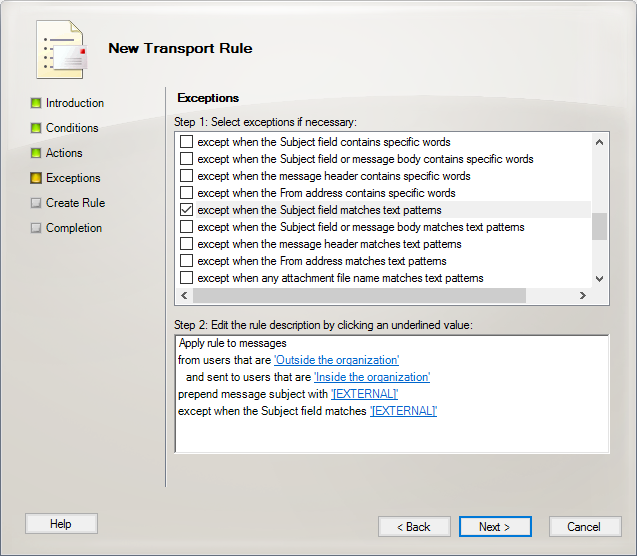
  • Under Exceptions click “except when the Subject field matches text patterns.” Click the blue link next to “string” and added the same prefix you added in the previous step. This will prevent multiple subject stamping from occurring when people email back and forth. Click Next.

ex-subject06

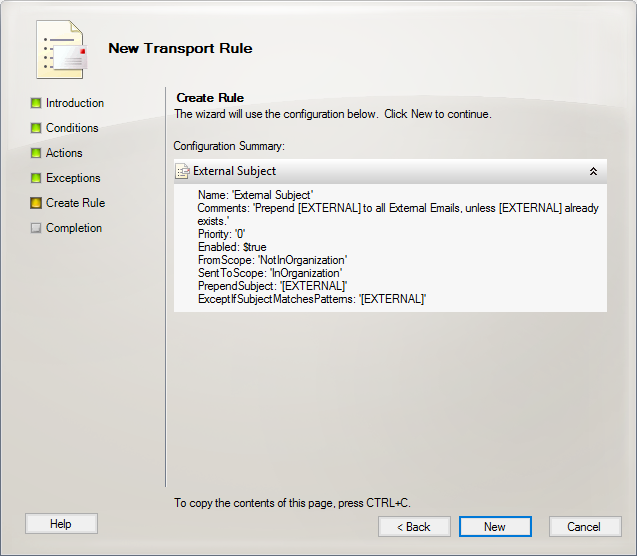
  • Click New to create your new transport rule.

ex-subject07

  • Emails from an external source should now have a new tag in the subject line.

ex-subject08

Fix for “The Change Password Operation Failed” Error on XenApp 6.5

After running February 2016’s batch of Microsoft security updates, we started receiving calls from end users about errors when attempting to update their passwords through the Citrix web interface.

xenapppass01While the error indicates the password change failed, it does in fact work, and users can log out and log back in with the new password.

Thankfully it didn’t take long for some savvy Citrix support forums users to pinpoint the issue to a recent patch Microsoft released which changes the api behavior for NetUserChangePassword.

http://discussions.citrix.com/topic/375446-help-wi-error-when-user-changes-password/

Uninstalling patches KB3126587 or KB3126593 from your Citrix XML brokers will resolve the issue, but on March 8th 2016, Microsoft released a security update which addresses the problem.

Simply install the new patch on your XML brokers –which does require a reboot!– and you should be good to go.

See Citrix’s updated support article below, along with Microsoft’s patch information.

http://support.citrix.com/article/CTX207802

https://support.microsoft.com/en-gb/kb/3140410

xenapppass02

Windows 10 WMI Filter for Group Policy

Windows 10 devices have started to trickle into our production environment and I needed a quick way to apply Windows 10 specific policies to these computers.

By creating a WMI filter that looks for the Windows 10 version number and then linking that query to our Windows 10 group policies, we can ensure that only Windows 10 PCs will get the policies we want.

First we use the command line utility ‘wmic‘ to find out what version of Windows wmi is reporting. (Make note of the version number, quite a jump from previous versions of windows; Windows 7 used 6.1, Windows 8 used 6.2, and Windows 8.1 used 6.3)

  • wmic os get buildnumber,caption,version

win10gpo03

  • Open Group Policy Management and expand Domains -> your Domain -> WMI Filters
  • Right click WMI Filters and select New
  • Enter a name for the filter, I went with the descriptive “Windows 10,” and then click Add
  • Namespace should say root\CIMv2 and under query we’ll enter the following select * from Win32_OperatingSystem where Version like "10.%" and ProductType="1"

win10gpo01

  • Click OK and then Save
  • Now find the policy that you want to apply the filter to and look for the section at the bottom that says WMI Filtering
  • Click the drop down box and select your new Windows 10 WMI Filter

win10gpo02


You can validate that the WMI filter worked correctly by running a group policy results report on a Windows 10 PC that would receive the policy.

Look at the details tab of the report and then under WMI Filters

win10gpo04