Zero Downtime ASA Upgrade (ASDM)

In the same vein as my last post, this update will take you through the steps of performing a zero downtime upgrade on a HA pair of ASA 5525-X’s, this time via the ASDM GUI.

Take a look here for Cisco’s official documentation, which will be the blueprint for our guide.

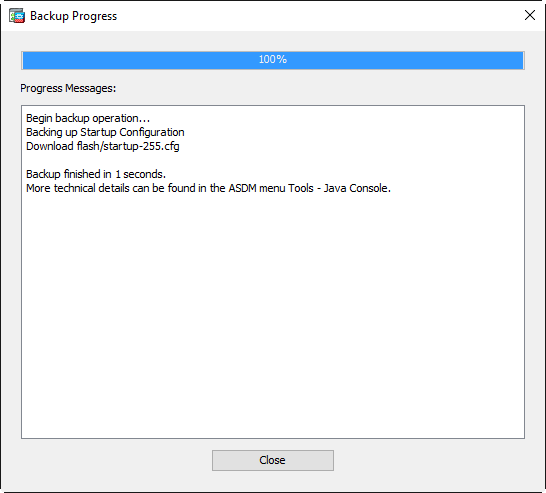
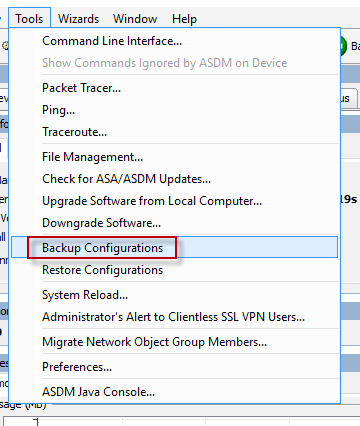
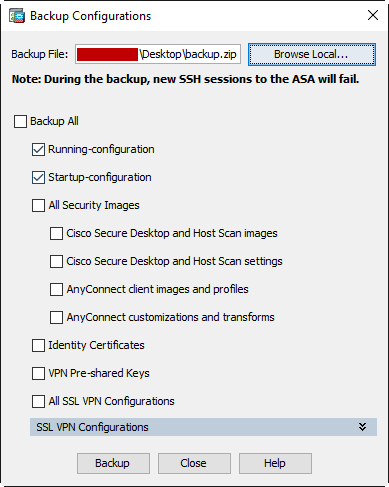
  • First, back up your configuration by going to Tools -> Backup Configurations

asdm-update-01asdm-update-02asdm-update-03

  • Download your updated ASDM and ASA software from Cisco.com
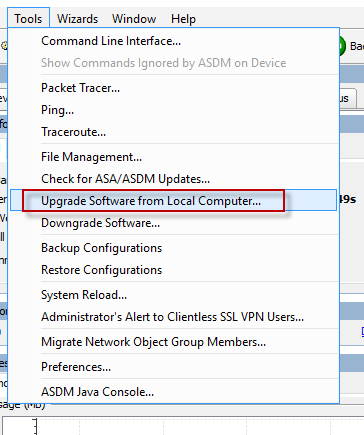
  • Click Tools -> Upgrade Software from Local Computer

asdm-update-04

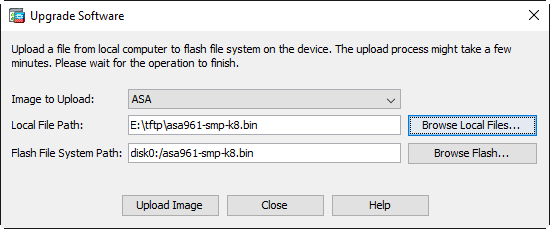
  • We’ll update ASDM first, select ASDM from the drop down box and click Browse Local Files. Navigate to where you downloaded your images and select the new ASDM image then click Upload Image.

asdm-update-05

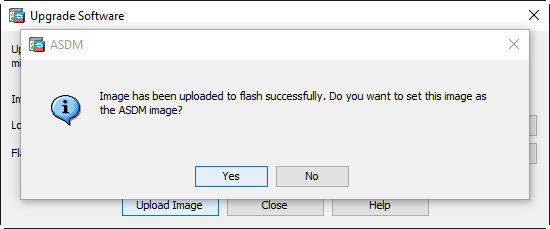
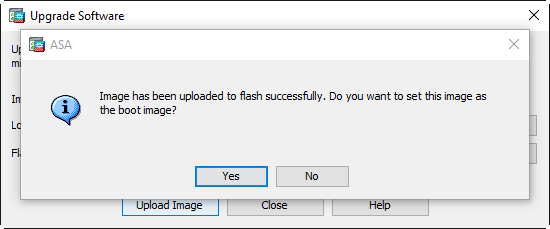
  • You will receive a prompt asking to set this image as the ASDM image. Click No for now. If we select Yes you will not be able to use ASDM to connect to the secondary unit and upload the new images in the later steps.

asdm-update-06

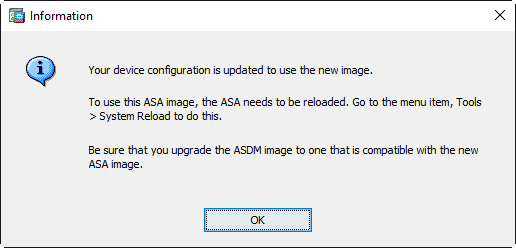
  • Now let’s update the ASA software. Again, click Tools -> Upgrade Software from Local Computer. Select ASA from the drop down menu and click Browse Local Files. Navigate to where you downloaded your images and select the new ASA image then click Upload Image. Click yes on the prompt.

asdm-update-09asdm-update-10asdm-update-11

  • Open a new ASDM window and connect to the standby ASA IP address. Follow the same steps as above to upload the new ASDM and ASA images. Close the ASDM window for the secondary unit when finished.
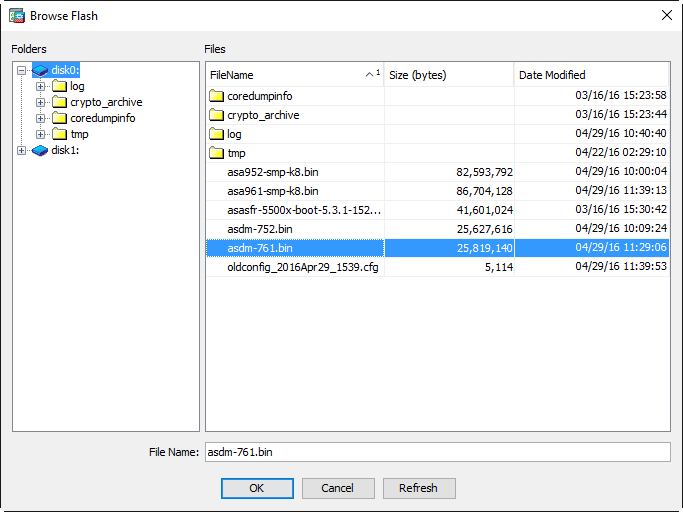
  • On the Primary ASDM window click Configuration -> Device Management -> expand System Image/Configuration -> click Boot Image/Configuration. Under ASDM Image File Configuration click Browse Flash and select our new ASDM image we uploaded earlier. Save the configuration.

asdm-update-12asdm-update-13

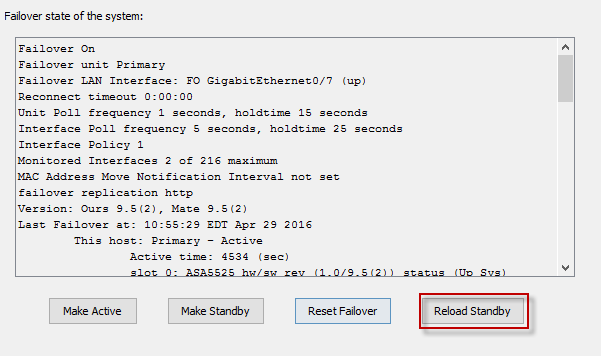
  • We can now reload the secondary unit to start the upgrade process. Click Monitoring -> Properties -> Failover -> Status. Click Reload Standby.

asdm-update-15

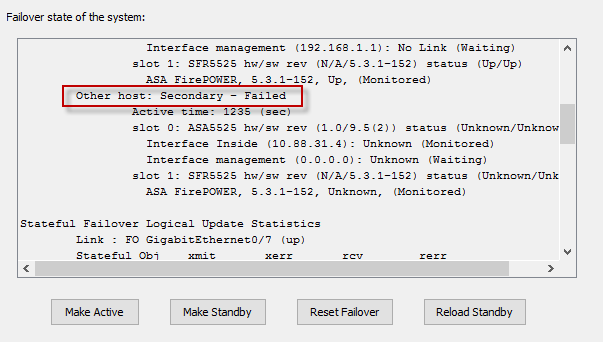
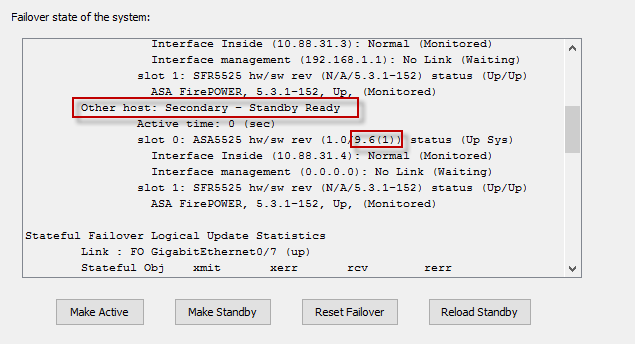
  • Refresh the Failover Status page until the Secondary unit moves from a failed state to standby ready. Make note of the sw rev field. It should reflect the new ASA software version.

asdm-update-16asdm-update-18

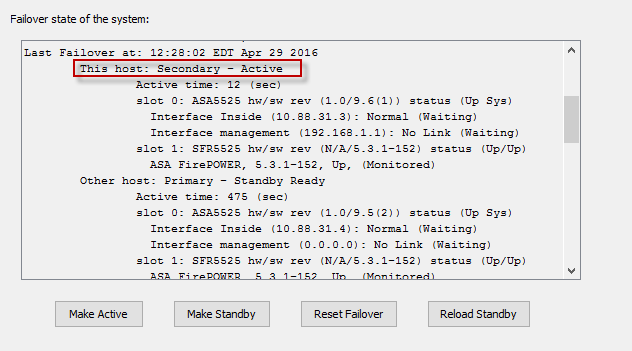
  • Force the active unit to failover to standby by clicking the Make Standby button on the Failover Status page. Refresh the Failover Status page to verify the Secondary unit is now the active unit. Now click Reload Standby to reboot the primary/standby unit and complete the upgrade.

asdm-update-19

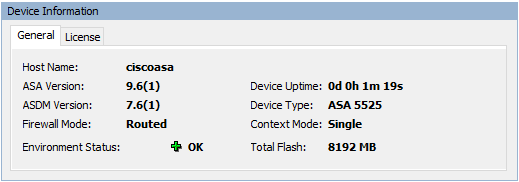
  • Exit ASDM and relaunch. You should now see the updated ASDM and ASA software versions under Device Information.

asdm-update-20

Zero Downtime ASA Upgrade (CLI)

So you have stateful failover configured on your pair of Cisco ASAs and need to upgrade ASDM or the os? Maybe a critical security vulnerability was discovered with the software and you need to upgrade them ASAP. With stateful failover, we can perform a zero downtime upgrade on our ASAs to minimize end user disruption. Below are the steps I used to upgrade a pair of ASA 5525-X’s using the command line interface. You can find Cisco’s documentation for upgrading an Active/Standby Failover Configuration here.

  • First, back up your current configuration!
ciscoasas# copy running-config tftp://10.1.1.10/ciscoasa-config.txt

Source filename [running-config]?

Address or name of remote host [10.1.1.10]?

Destination filename [ciscoasa-config.txt]?
Cryptochecksum: 495070f8 a3de0875 adfc16d6 18c04464
!!
4996 bytes copied in 0.660 secs
  • Download your updated ASDM and ASA software from Cisco.com
  • Copy new ASA operating system to active and standby units.
ciscoasa# copy tftp://10.1.1.10/asa952-smp-k8.bin disk0:/asa952-smp-k8.bin

Address or name of remote host [10.1.1.10]?

Source filename [asa952-smp-k8.bin]?

Destination filename [asa952-smp-k8.bin]?

Accessing tftp://10.1.1.10/asa952-smp-k8.bin...
!!!!!!!
Writing file disk0:/asa952-smp-k8.bin...
!!!!!!!
82593792 bytes copied in 211.300 secs (391439 bytes/sec)
ciscoasa# failover exec mate copy /noconfirm tftp://10.1.1.10/asa952-smp-k8.$

Accessing tftp://10.1.1.10/asa952-smp-k8.bin...
!!!!!!!
Writing file disk0:/asa952-smp-k8.bin...
!!!!!!!
82593792 bytes copied in 192.570 secs (430176 bytes/sec)
  • Copy new ASDM software to active and standby units.
ciscoasa# copy tftp://10.1.1.10/asdm-752.bin disk0:/asdm-752.bin

Address or name of remote host [10.1.1.10]?

Source filename [asdm-752.bin]?

Destination filename [asdm-752.bin]?

Accessing tftp://10.1.1.10/asdm-752.bin...
!!!!!!!
Writing file disk0:/asdm-752.bin...
!!!!!!!
25627616 bytes copied in 57.570 secs (449607 bytes/sec)
ciscoasa# failover exec mate copy /noconfirm tftp://10.1.1.10/asdm-752.bin d$

Accessing tftp://10.1.1.10/asdm-752.bin...
!!!!!!!
Writing file disk0:/asdm-752.bin...
!!!!!!!
25627616 bytes copied in 58.190 secs (441855 bytes/sec)
  • Verify the current boot images, making note of the boot order. Remove the current image and set the config to boot from the newly uploaded image followed by the old image as a back up.
ciscoasa# sh running-config boot system
boot system disk0:/asa922-4-smp-k8.bin
ciscoasa# conf t
ciscoasa(config)# no boot system disk0:/asa922-4-smp-k8.bin
ciscoasa(config)# boot system disk0:/asa952-smp-k8.bin
ciscoasa(config)# boot system disk0:/asa922-4-smp-k8.bin
ciscoasa(config)# end
ciscoasa# sh running-config boot system
boot system disk0:/asa952-smp-k8.bin
boot system disk0:/asa922-4-smp-k8.bin
  • Configure the ASA to use the new ASDM image
ciscoasa(config)# asdm image disk0:/asdm-752.bin
  • Save your configuration and reload the secondary standby unit.
ciscoasa# wr
Building configuration...
Cryptochecksum: c4c58b75 ea6ca884 235cc59e 05d6f114

5030 bytes copied in 0.670 secs
[OK]
ciscoasa# failover reload-standby
ciscoasa#
************WARNING****WARNING****WARNING********************************
   Mate version 9.5(2) is not identical with ours 9.2(2)4
************WARNING****WARNING****WARNING********************************
Beginning configuration replication: Sending to mate.
End Configuration Replication to mate
  • Verify the standby unit is back up and running the new software version.
ciscoasa# sh failover
Failover On
Failover unit Primary
Failover LAN Interface: FO GigabitEthernet0/7 (up)
Unit Poll frequency 1 seconds, holdtime 15 seconds
Interface Poll frequency 5 seconds, holdtime 25 seconds
Interface Policy 1
Monitored Interfaces 2 of 216 maximum
MAC Address Move Notification Interval not set
failover replication http
Version: Ours 9.2(2)4, Mate 9.5(2)
Last Failover at: 03:14:15 EDT Apr 22 2016
        This host: Primary - Active
                Active time: 605706 (sec)
                slot 0: ASA5525 hw/sw rev (1.0/9.2(2)4) status (Up Sys)
                  Interface Inside (10.1.1.1): Normal (Monitored)
                  Interface management (192.168.1.1): No Link (Waiting)
                slot 1: SFR5525 hw/sw rev (N/A/5.3.1-152) status (Up/Up)
                  ASA FirePOWER, 5.3.1-152, Up
        Other host: Secondary - Standby Ready
                Active time: 0 (sec)
                slot 0: ASA5525 hw/sw rev (1.0/9.5(2)) status (Up Sys)
                  Interface Inside (10.1.1.2): Normal (Monitored)
                  Interface management (0.0.0.0): No Link (Waiting)
                slot 1: SFR5525 hw/sw rev (N/A/) status (Init/Up)
  • Make the active primary unit the new standy unit
ciscoasa# no failover active
  • You may need to re-establish your SSH connection. Log back into the ASA and verify that the secondary unit is now the active unit. Reload the primary/standby unit, wait a few minutes and verify that both units are now running identical code.
ciscoasa# failover reload-standby
ciscoasa# Beginning configuration replication: Sending to mate.
End Configuration Replication to mate
ciscoasa# sh failover
Failover On
Failover unit Secondary
Failover LAN Interface: FO GigabitEthernet0/7 (up)
Reconnect timeout 0:00:00
Unit Poll frequency 1 seconds, holdtime 15 seconds
Interface Poll frequency 5 seconds, holdtime 25 seconds
Interface Policy 1
Monitored Interfaces 2 of 216 maximum
MAC Address Move Notification Interval not set
failover replication http
Version: Ours 9.5(2), Mate 9.5(2)
Last Failover at: 10:34:53 EDT Apr 29 2016
        This host: Secondary - Active
                Active time: 429 (sec)
                slot 0: ASA5525 hw/sw rev (1.0/9.5(2)) status (Up Sys)
                  Interface Inside (10.1.1.1): Normal (Monitored)
                  Interface management (192.168.1.1): No Link (Waiting)
                slot 1: SFR5525 hw/sw rev (N/A/5.3.1-152) status (Up/Up)
                  ASA FirePOWER, 5.3.1-152, Up, (Monitored)
        Other host: Primary - Standby Ready
                Active time: 0 (sec)
                slot 0: ASA5525 hw/sw rev (1.0/9.5(2)) status (Up Sys)
                  Interface Inside (10.1.1.2): Normal (Monitored)
                  Interface management (0.0.0.0): No Link (Waiting)
                slot 1: SFR5525 hw/sw rev (N/A/) status (Init/Up)

Stateful Failover Logical Update Statistics
        Link : FO GigabitEthernet0/7 (up)
        Stateful Obj    xmit       xerr       rcv        rerr
        General         101        0          97         0
        sys cmd         93         0          92         0
        up time         0          0          0          0
        RPC services    0          0          0          0
        TCP conn        1          0          0          0
        UDP conn        0          0          0          0
        ARP tbl         5          0          4          0
        Xlate_Timeout   0          0          0          0
        IPv6 ND tbl     0          0          0          0
        VPN IKEv1 SA    0          0          0          0
        VPN IKEv1 P2    0          0          0          0
        VPN IKEv2 SA    0          0          0          0
        VPN IKEv2 P2    0          0          0          0
        VPN CTCP upd    0          0          0          0
        VPN SDI upd     0          0          0          0
        VPN DHCP upd    0          0          0          0
        SIP Session     0          0          0          0
        SIP Tx  0          0          0          0
        SIP Pinhole     0          0          0          0
        Route Session   1          0          0          0
        Router ID       0          0          0          0
        User-Identity   1          0          1          0
        CTS SGTNAME     0          0          0          0
        CTS PAC         0          0          0          0
        TrustSec-SXP    0          0          0          0
        IPv6 Route      0          0          0          0
        STS Table       0          0          0          0

        Logical Update Queue Information
                        Cur     Max     Total
        Recv Q:         0       12      336
        Xmit Q:         0       29      300
ciscoasa#


And there you have it. If you’d like, after monitoring and verification, you can remove the old ASA and ASDM images from the boot order commands as well as the disk to keep things clean.

ciscoasa# delete /replicate disk0:/asa922-4-smp-k8.bin

Delete filename [asa922-4-smp-k8.bin]?

Delete disk0:/asa922-4-smp-k8.bin? [confirm]

ciscoasa# delete /replicate disk0:/asdm-7221.bin

Delete filename [asdm-7221.bin]?

Delete disk0:/asdm-7221.bin? [confirm]
ciscoasa# sh run boot
boot system disk0:/asa952-smp-k8.bin
boot system disk0:/asa922-4-smp-k8.bin
ciscoasa# conf t
ciscoasa(config)# no boot system disk0:/asa922-4-smp-k8.bin
ciscoasa(config)# end
ciscoasa# sh run boot
boot system disk0:/asa952-smp-k8.bin
ciscoasa#
 

Configuring Stateful Failover on a Cisco ASA HA Pair

The ASA, Cisco’s Adaptive Security Appliance, has been around for over 15 years and has since become an ubiquitous network security solution, securing networks the world over.

Because it is such a critical device in our networks, it has become best practice to deploy these security appliances in a resilient and highly available configuration.

Currently, Cisco supports Active/Active as well as Active/Standby failover. This article contains a simple example of how to configure Active/Standby stateful high availability on a pair of Cisco ASAs, where one unit acts as the primary ASA and a standby unit becomes active once a failover has occurred. When stateful failover is enabled, connection states are continuously passed between the active and standby units keeping session information available to the new active unit. Please note that both ASAs must be running identical hardware and software versions.

Detailed instructions from Cisco on how to configure Failover can be found here: http://www.cisco.com/c/en/us/td/docs/security/asa/asa91/configuration/general/asa_91_general_config/ha_failover.html

  • Each interface on the primary ASA will need an additional “standby” IP address, for example:
interface GigabitEthernet0/0
description Inside Interface
nameif Inside
security-level 100
ip address 10.1.1.1 255.255.255.0 standby 10.1.1.2
  • Specify failover interface on the primary ASA
    ciscoasa(config)# failover lan interface failover GigabitEthernet0/7
  • Configure failover link IP address
ciscoasa(config)# failover interface ip failover 192.168.1.1 255.255.255.0 standby 192.168.1.2
  • Configure shared failover key
ciscoasa(config)# failover key PASSWORD123
  • Configure ASA as primary
ciscoasa(config)# failover lan unit primary
  • Enable stateful failover
ciscoasa(config)# failover link failover GigabitEthernet0/7
  • Enable failover
ciscoasa(config)# failover
  • On the secondary ASA we’ll need to do some similar configuration:
    ciscoasa(config)# failover
    ciscoasa(config)# failover lan unit secondary
    ciscoasa(config)# failover lan interface failover GigabitEthernet0/7
    INFO: Non-failover interface config is cleared on GigabitEthernet0/7 and its sub-interfaces
    ciscoasa(config)# failover link failover GigabitEthernet0/7
    ciscoasa(config)# failover interface ip failover 192.168.1.1 255.255.255.0 standby 192.168.1.2
    ciscoasa(config)# failover key PASSWORD123

If everything is configured properly you should see some console output regarding configuration replication.

Detected an Active mate
Beginning configuration replication from mate.
End Configuration Replication to mate

Now verify the status of failover with a show failover:

ciscoasa# show failover
Failover On
Failover unit Primary
Failover LAN Interface: failover GigabitEthernet0/7 (up)
Unit Poll frequency 1 seconds, holdtime 15 seconds
Interface Poll frequency 5 seconds, holdtime 25 seconds
Interface Policy 1
Monitored Interfaces 2 of 216 maximum
MAC Address Move Notification Interval not set
failover replication http
Version: Ours 9.2(2)4, Mate 9.2(2)4
Last Failover at: 03:14:15 EDT Apr 22 2016
 This host: Primary - Active
 Active time: 469208 (sec)
 slot 0: ASA5525 hw/sw rev (1.0/9.2(2)4) status (Up Sys)
 Interface Inside (10.88.31.3): Normal (Monitored)
 Interface management (192.168.1.1): No Link (Waiting)
 slot 1: SFR5525 hw/sw rev (N/A/5.3.1-152) status (Up/Up)
 ASA FirePOWER, 5.3.1-152, Up
 Other host: Secondary - Standby Ready
 Active time: 2808 (sec)
 slot 0: ASA5525 hw/sw rev (1.0/9.2(2)4) status (Up Sys)
 Interface Inside (10.88.31.4): Normal (Monitored)
 Interface management (0.0.0.0): No Link (Waiting)
 slot 1: SFR5525 hw/sw rev (N/A/5.3.1-152) status (Up/Up)
 ASA FirePOWER, 5.3.1-152, Up

Stateful Failover Logical Update Statistics
 Link : FO GigabitEthernet0/7 (up)
 Stateful Obj xmit xerr rcv rerr
 General 119141 0 62582 0
 sys cmd 62578 0 62578 0
 up time 0 0 0 0
 RPC services 0 0 0 0
 TCP conn 7 0 0 0
 UDP conn 0 0 0 0
 ARP tbl 56548 0 3 0
 Xlate_Timeout 0 0 0 0
 IPv6 ND tbl 0 0 0 0
 VPN IKEv1 SA 0 0 0 0
 VPN IKEv1 P2 0 0 0 0
 VPN IKEv2 SA 0 0 0 0
 VPN IKEv2 P2 0 0 0 0
 VPN CTCP upd 0 0 0 0
 VPN SDI upd 0 0 0 0
 VPN DHCP upd 0 0 0 0
 SIP Session 0 0 0 0
 Route Session 8 0 0 0
 Router ID 0 0 0 0
 User-Identity 0 0 1 0
 CTS SGTNAME 0 0 0 0
 CTS PAC 0 0 0 0
 TrustSec-SXP 0 0 0 0
 IPv6 Route 0 0 0 0
 STS Table 0 0 0 0

 Logical Update Queue Information
 Cur Max Total
 Recv Q: 0 10 62681
 Xmit Q: 0 1 373300

Creating a Subject Line Disclaimer in Exchange 2010

With ever increasing amounts of spam and spear phishing attacks, many companies today are going out of their way to warn users when an email is received from an external, and potentially unsafe, source. Thankfully the Exchange Management Console makes it fairly straight forward to create transport rules to add disclaimers, re-write subject lines, and even insert html into emails for all types of situations.

Recently I was asked to add an [EXTERNAL] tag to the subject line of all incoming emails from outside the organization. Below are the steps to create a Hub Transport rule to accomplish such a task.

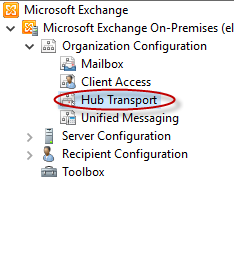
  • Open the Exchange Management Console
  • Navigate to Organization Configuration -> Hub Transport

ex-subject01

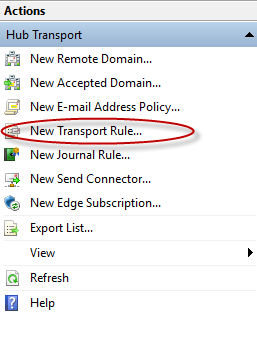
  • On the right side of the console click “New Transport Rule…

ex-subject02

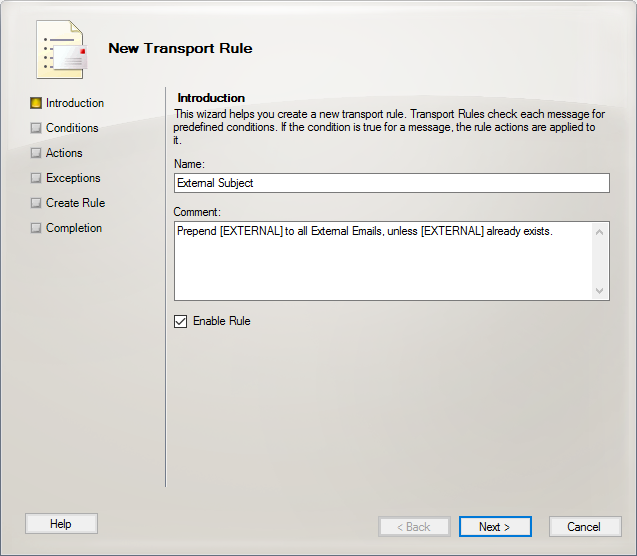
  • The New Transport Rule wizard will open. Simply follow the onscreen instructions, entering a name and comment for the rule. Click Next when finished.

ex-subject03

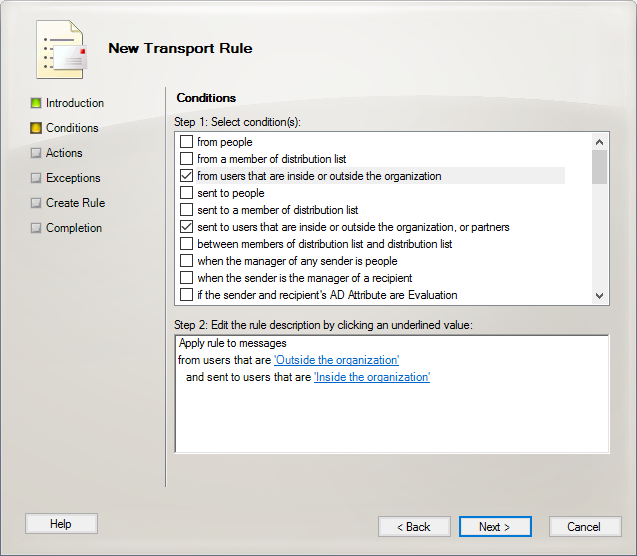
  • Under Conditions, select “from users that are inside or outside the organization” and “sent to users that are inside or outside the organization, or partners.” Click the blue links under Step 2 to change the from users field to “Outside” and the sent to users field to “Inside.” Click Next when completed.

ex-subject04

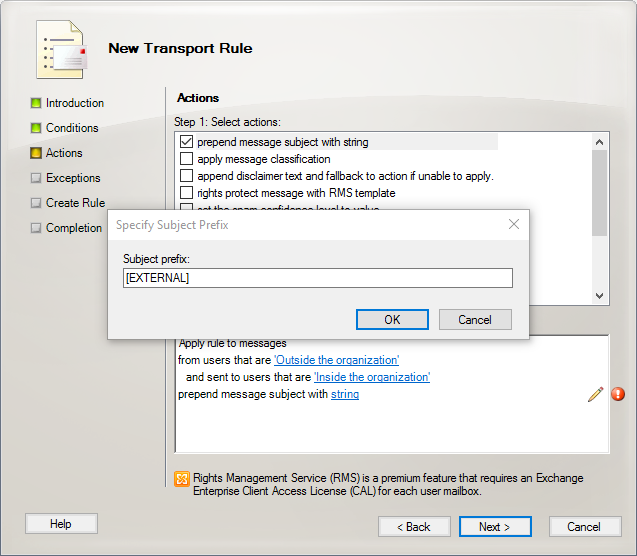
  • Under actions, check “prepend message subject with string.” Click the blue link next to “string” to edit the subject prefix. Enter the tag that you’d like to appear in the subject line. Click OK and Next.

ex-subject05

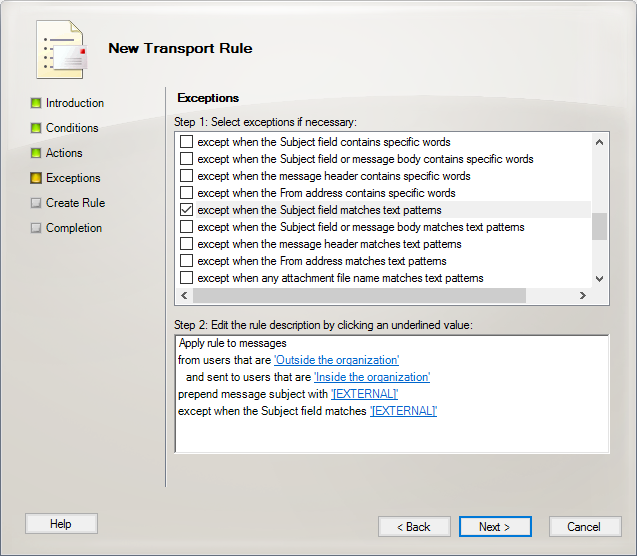
  • Under Exceptions click “except when the Subject field matches text patterns.” Click the blue link next to “string” and added the same prefix you added in the previous step. This will prevent multiple subject stamping from occurring when people email back and forth. Click Next.

ex-subject06

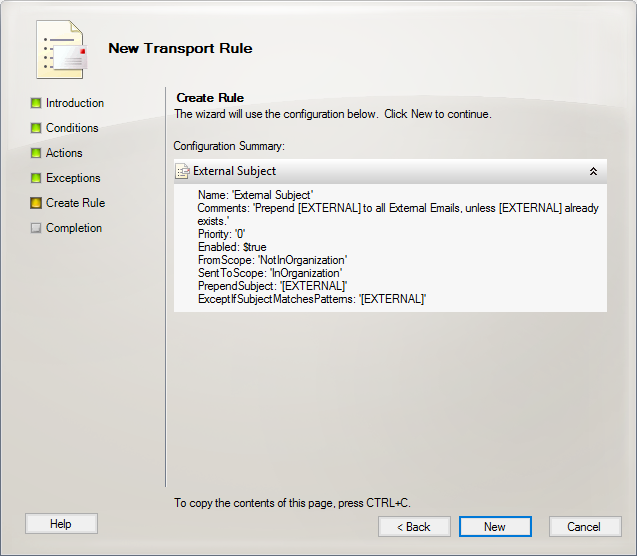
  • Click New to create your new transport rule.

ex-subject07

  • Emails from an external source should now have a new tag in the subject line.

ex-subject08