Cisco ISE Deployment: OVF parameter chunkSize Error

Ran into a fun issue with vCenter 6.5 and a deployment of ISE. When deploying the ISE ova template we received a chunk size error: “OVF parameter chunkSize with value XXXXXXXXXX” is currently not supported for OVF package import.

Thankfully a VMware kb article walks us through how to fix the issue.

https://kb.vmware.com/s/article/2148588?lang=en_US

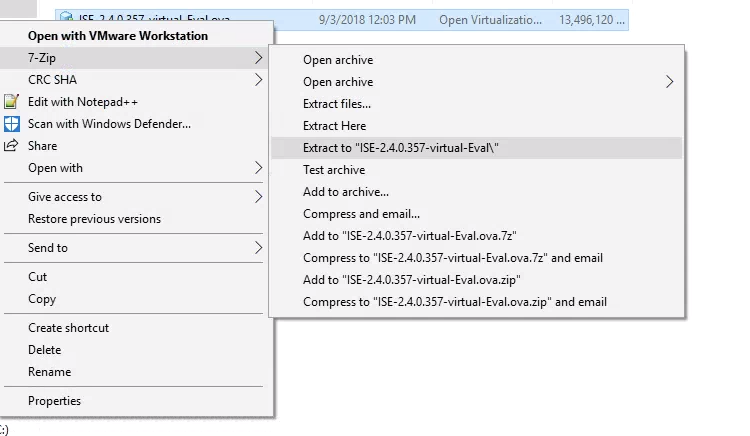
The first step is to unpack the ova file with a tool such as 7zip on Windows or tar on Linux/Mac.

Windows:
Linux/Mac:

tar xvf ISE-2.4.0.357-virtual-Eval.ova

Depending on the version of ISE you’re deploying there should be a number of vdmk files. On Linux/Mac we can use the cat command to combine these into one disk file. On windows the copy command will accomplish the same thing.

Windows:

copy /b ISE-2.4.0.357-virtual-Eval-disk1.vmdk.gz.000000000 + ISE-2.4.0.357-virtual-Eval-disk1.vmdk.gz.000000001 + ISE-2.4.0.357-virtual-Eval-disk1.vmdk.gz.000000002 + ISE-2.4.0.357-virtual-Eval-disk1.vmdk.gz.000000003 + ISE-2.4.0.357-virtual-Eval-disk1.vmdk.gz.000000004 + ISE-2.4.0.357-virtual-Eval-disk1.vmdk.gz.000000005 + ISE-2.4.0.357-virtual-Eval-disk1.vmdk.gz.000000006 ISE-2.4.0.357-virtual-Eval-disk1.vmdk

Linux/Mac:

cat ISE-2.4.0.357-virtual-Eval-disk1.vmdk.* > ISE-2.4.0.357-virtual-Eval-disk1.vmdk

Next we just have to edit the .ovf file to point to the new disk1 we created. Open the ovf in a text editor and find the chunk size attribute.

Original value:

< File ovf:href="ISE-2.4.0.357-virtual-Eval-disk1.vmdk" id="file1" size="13819990977" / >

chunkSize removed:

< File chunkSize="2147483648" compression="gzip" href="ISE-2.4.0.357-virtual-Eval-disk1.vmdk.gz" id="file1" size="13819990977" / >


Deploy your edited ovf and you should now be able to proceed with the ISE installation error free.
Cisco ISE: Fixing “Certificate Generation Failed” Error with Android Devices and Cisco Network Setup Assistant

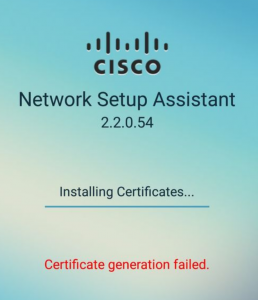
Ran into some issues recently with Android devices and the Cisco Network Setup Assistant while attempting to provision certificates as part of the BYOD work flow.

While on-boarding an Android device, the following error occurred:

TAC pointed me to this helpful YouTube video that contained the solution.

Starting with Android 6, EST is natively used by the device for Certificate Signing Requests. To fix the issue we need to allow the EST authentication request through ISE. This can be accomplished with a new Authorization Policy that matches the EST request and then permits access.

  • To create the rule first navigate to Policy -> Policy Sets.
  • Select your wireless policy.
  • Expand your Authorization Policy.
  • Insert a new rule.
  • Give the rule a descriptive name.
  • Click + under conditions.
  • For Attribute we want Cisco: cisco-av-pair
  • For the Attribute Value we want est-csr-request=true

Your condition should look something like this:

  • Click Use.
  • Under Results -> Profile, select Permit Access.
  • Save your Authorization Policy.

Your new Policy should look something like this:

Try to enroll your android device again and you should now be successful in EST authentication and device provisioning.

Configuring Hotspot Guest Access with Cisco ISE

Been toying with the Cisco vWLC and ISE in the home lab. Evaluation copies of ISE can be found on Cisco’s box share here: https://cisco.app.box.com/v/ISE-Eval

Here are my notes on configuring a Guest Hotspot portal. Hotspots are a simple portal where users will need to accept an Acceptable Use Policy before being granted access to the internet.

Please also see the ISE Guest Access Deployment Guide from Cisco for more details on setting up different Guest Access scenarios: https://community.cisco.com/t5/security-documents/ise-guest-access-deployment-guide/ta-p/3640475

After installing vWLC and ISE, add ISE as a AAA server on the vWLC.

  • Log into the vWLC. Click the security tab at the top.
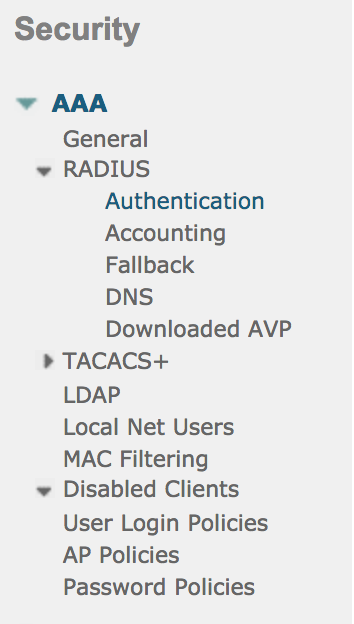
  • On the left hand menu click Authentication under Radius/AAA.
  • Click the New button to add a new AAA server.
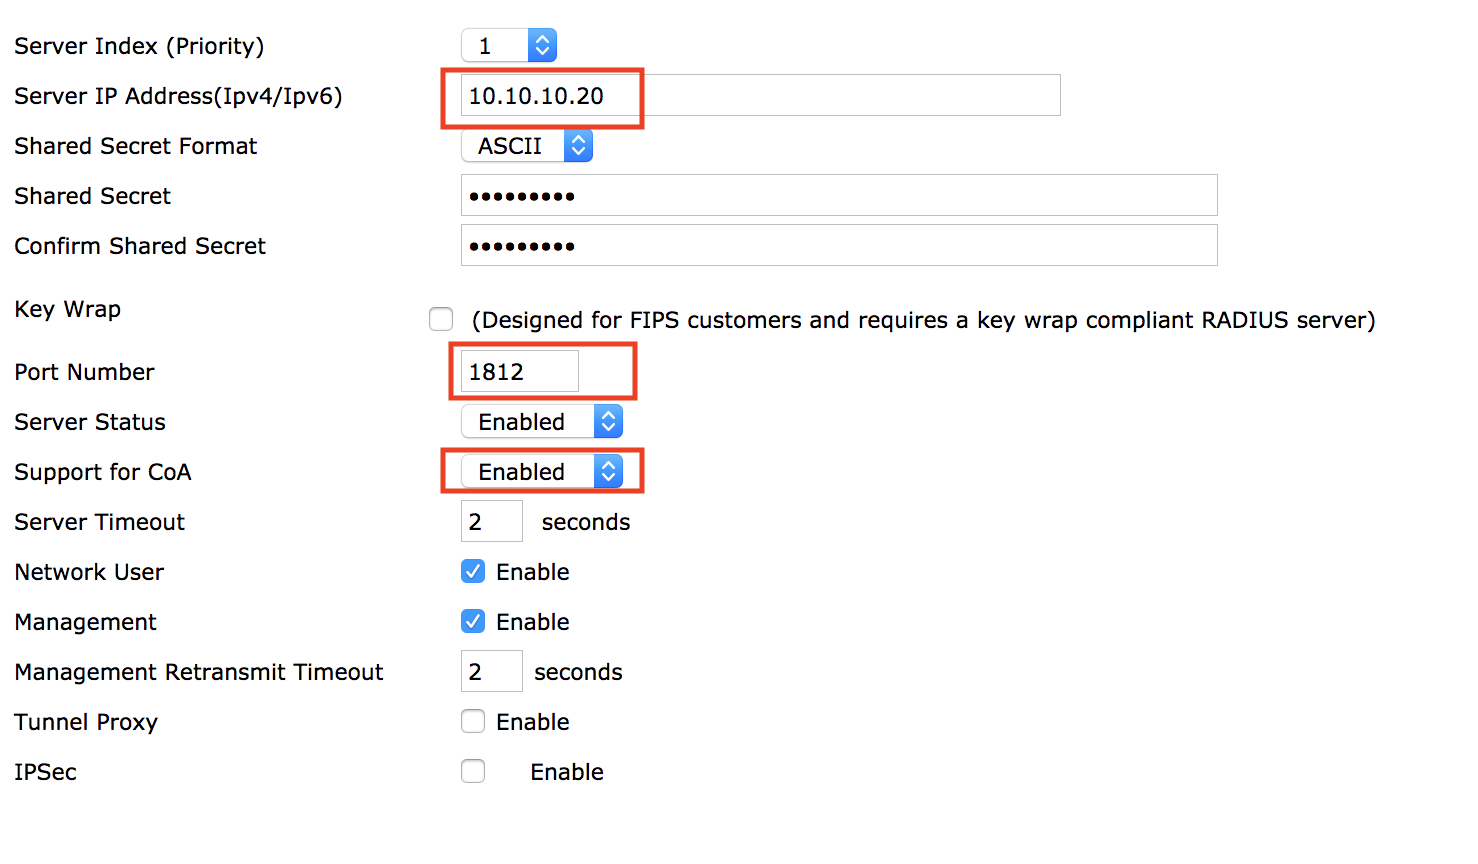
  • Enter the IP address of the ISE server, be sure port number is 1812, and that Support for COA is checked. Create a Shared Secret and make note of it as ISE will need to be configured with the same secret. Click Apply.
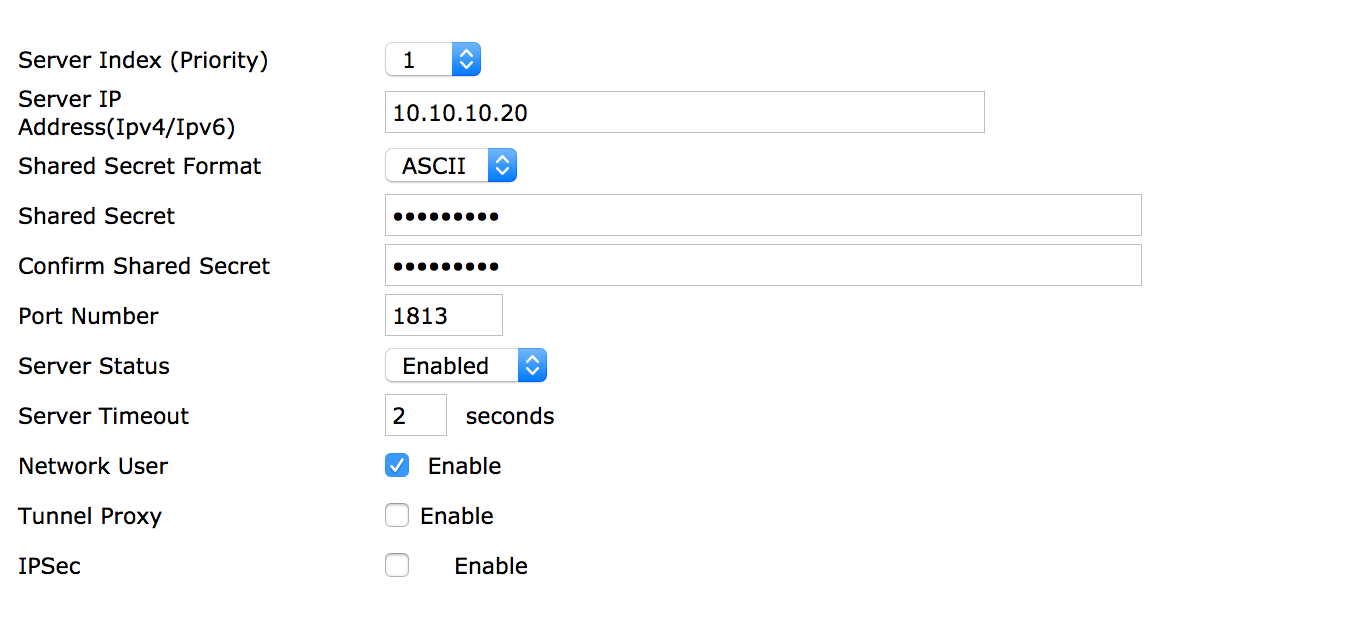
  • Next click Accounting from the Security/AAA menu on the left. Hit New and enter the required information.

Next we will log into ISE and configure the WLC as a network device.

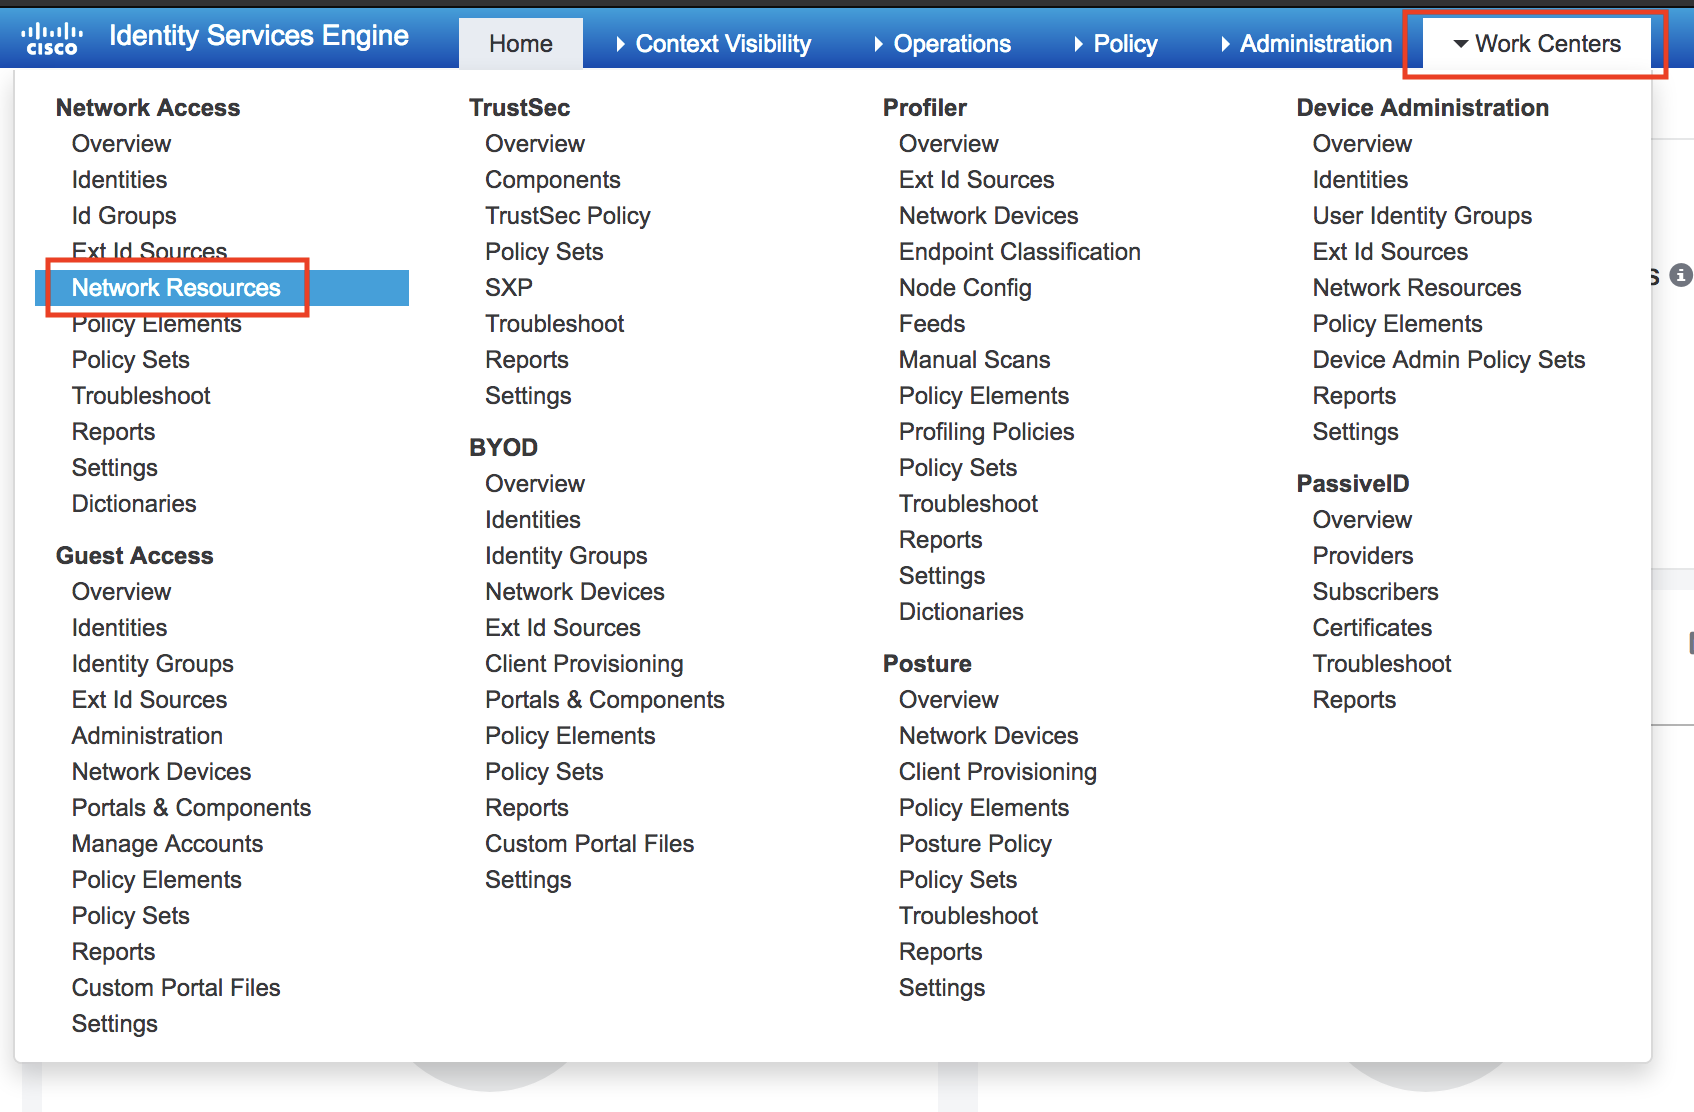
  • Go to Work Centers, then Network Resources.
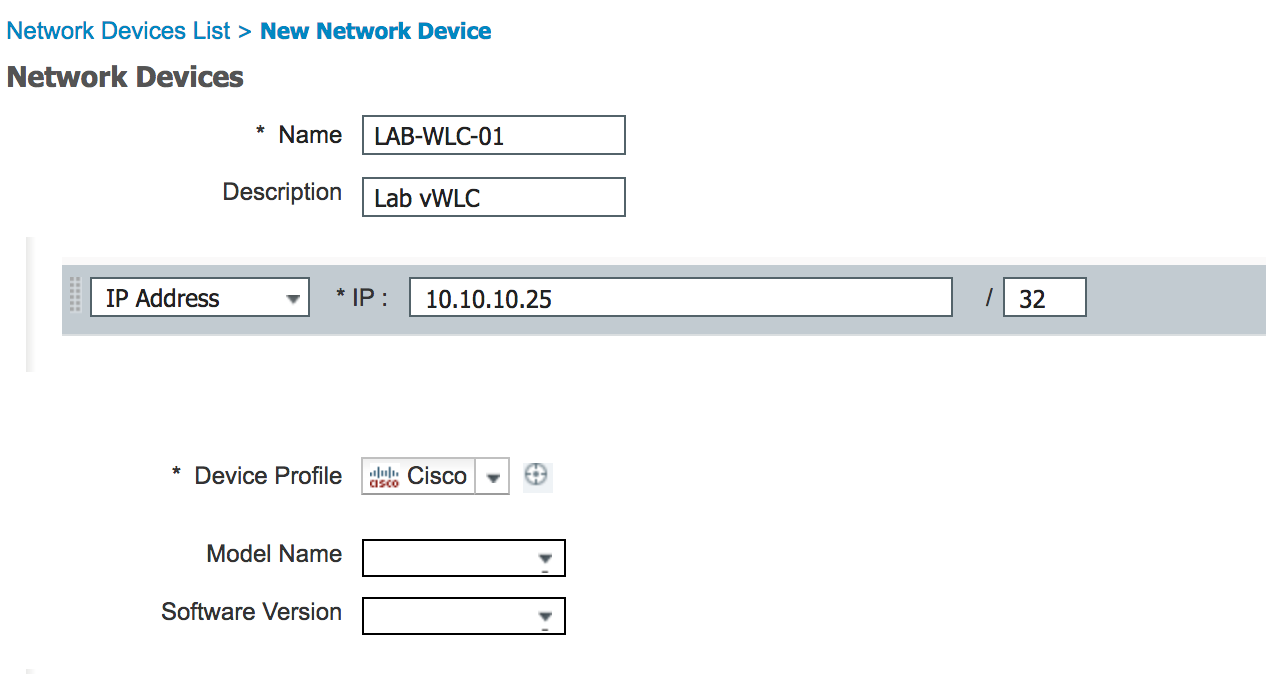
  • Click Add and fill out the WLC information. Check Radius Auth. Settings and be sure to fill out the Shared Secret we filled out earlier in the WLC.

The next step is to configure our Guest WLAN/SSID.

  • Log into your WLC and click the WLANs tab. Choose Create New from the drop down box and click Go.
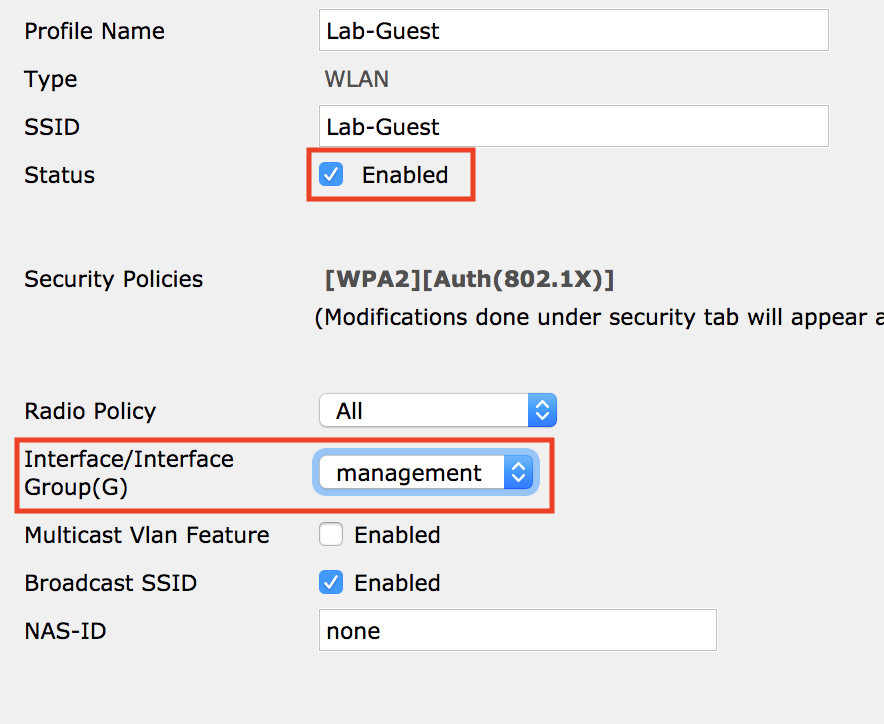
  • Enter a profile name and SSID.
  • Select Status Enabled, and the correct interface for your guest traffic.
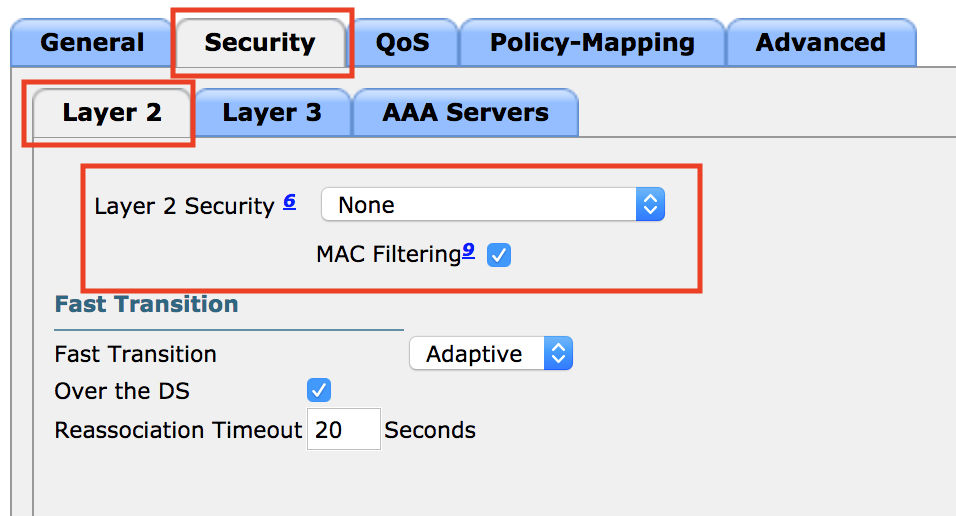
  • Next click the Security tab.
  • Change Layer 2 Security to None, and check MAC Filtering.
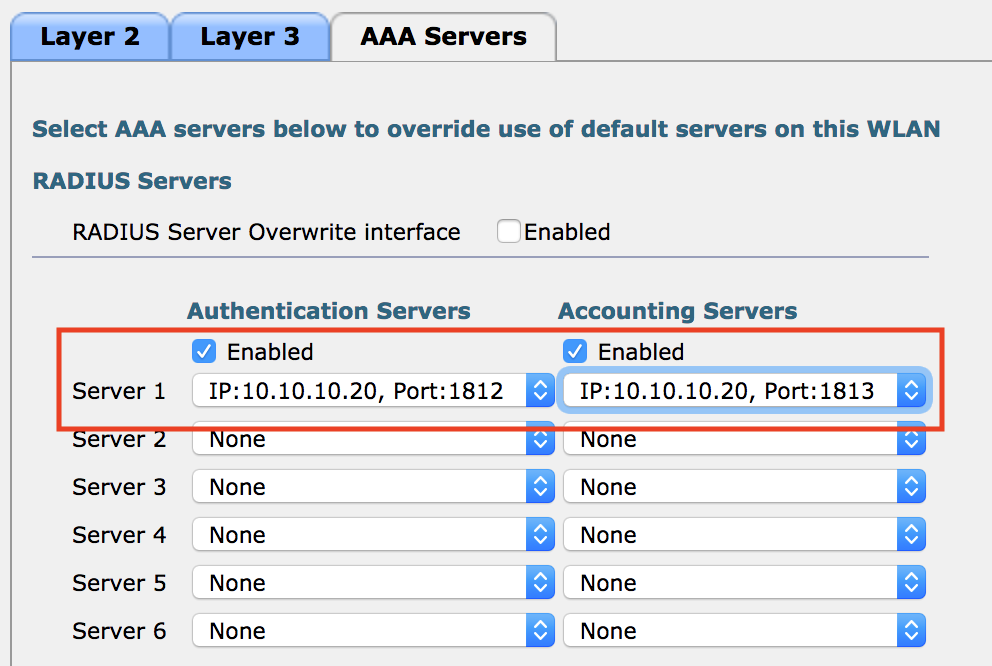
  • Click AAA Servers, and change the Authentication and Authorization servers to the ISE server via the drop down boxes.

Click the Advanced tab.

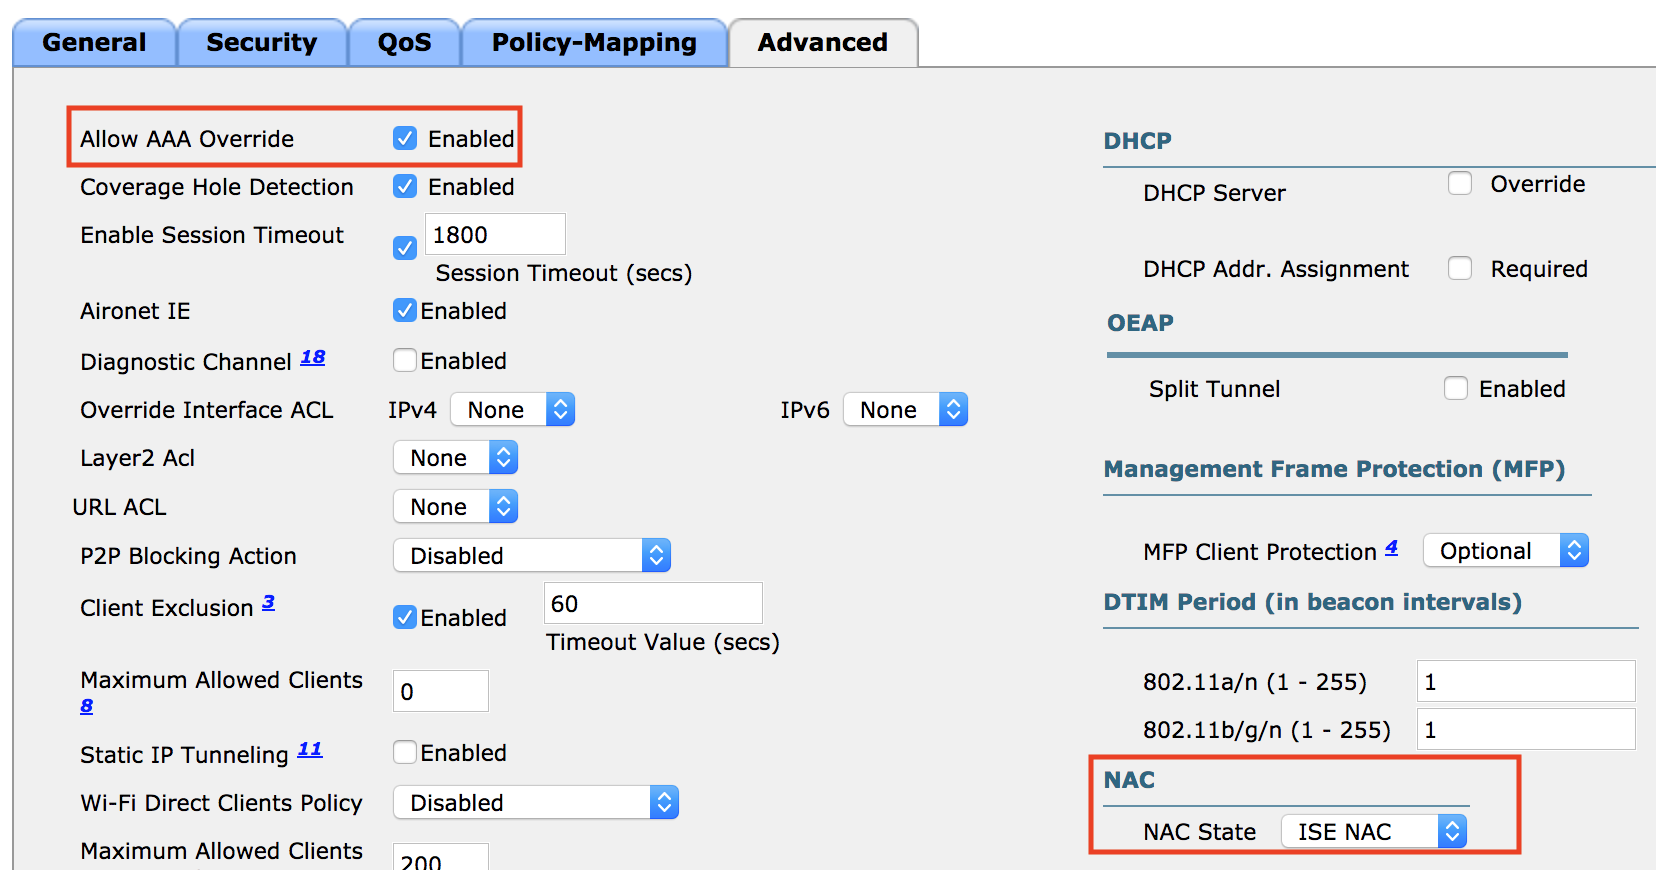
Check Allow AAA Override.

Under NAC change the drop down to ISE NAC.

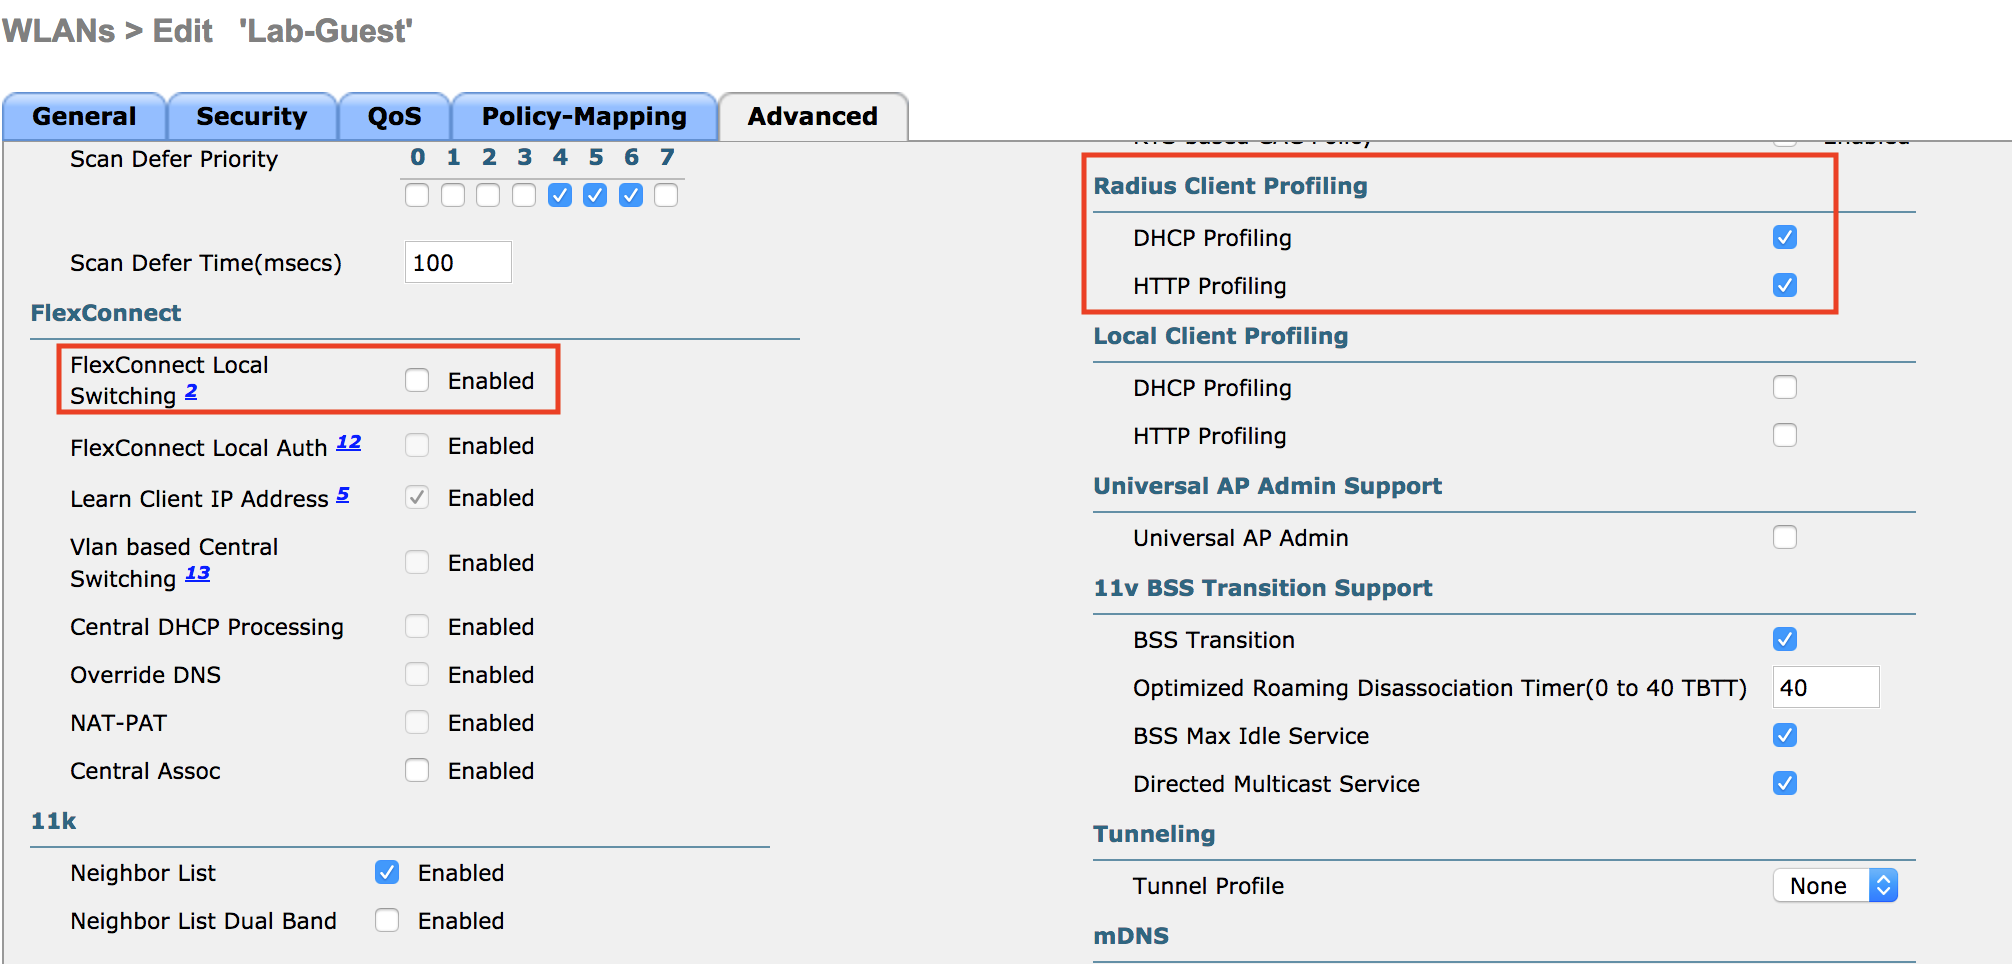
Uncheck Flex Connect Local Switching if enabled.

Check DHCP/HTTP profiling under Radius Client Profiling.

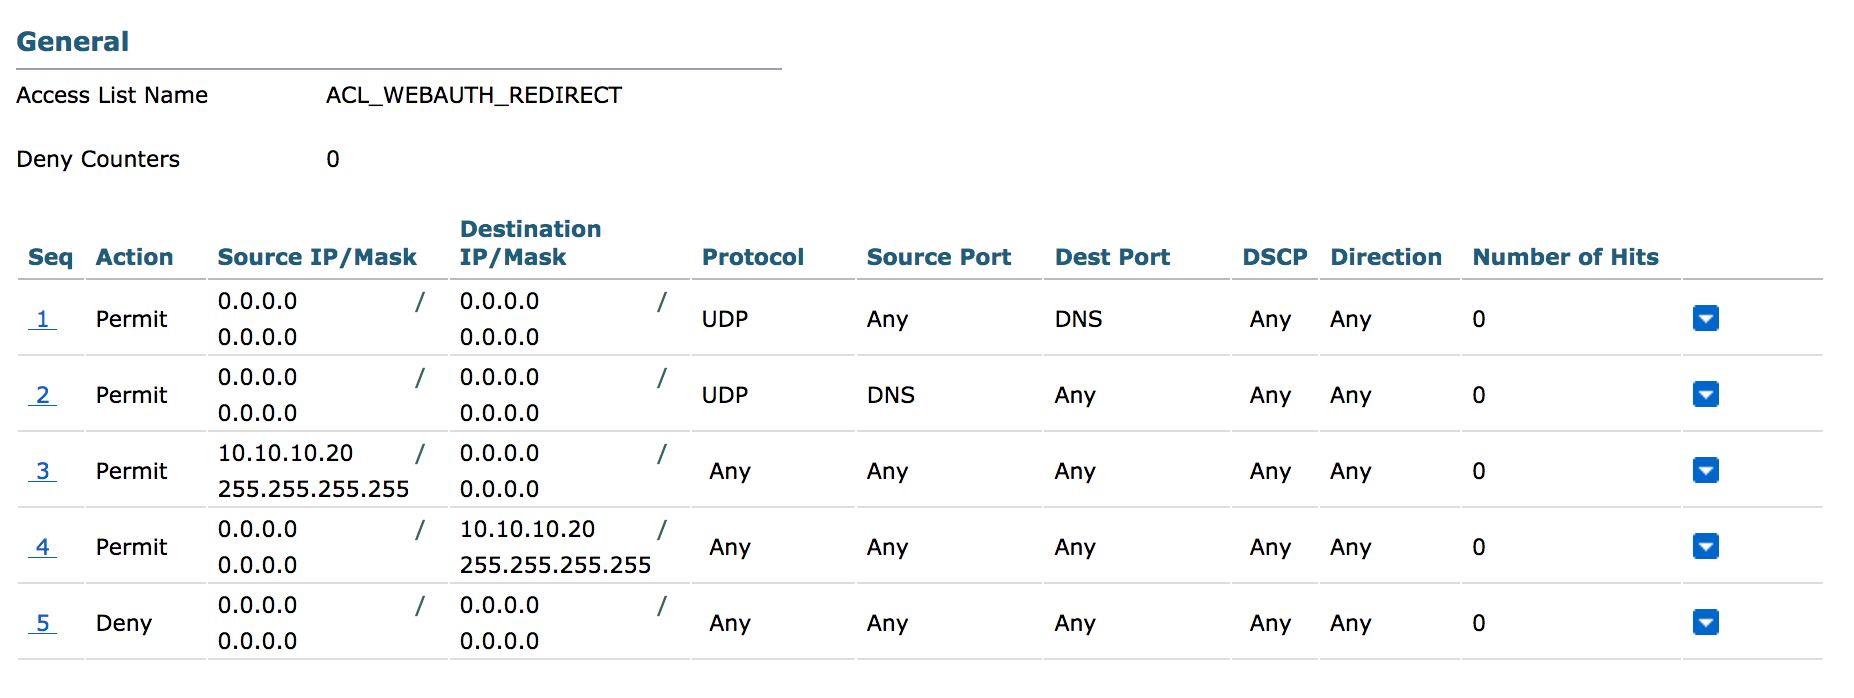
  • Click New, and for the ACL name type ACL_WEBAUTH_REDIRECT
  • Click Apply, then click the ACL name to start editing.
  • Click Add New Rule.
  • Create a rule allowing destination DNS (udp/53) from any to any.
  • Create a rule allowing source DNS from any to any.
  • Create a rule allowing tcp from ISE to any.
  • Create a rule allowing tcp from any to ISE.
  • Note: In production you would want to limit the DNS entries to just your trusted DNS server.
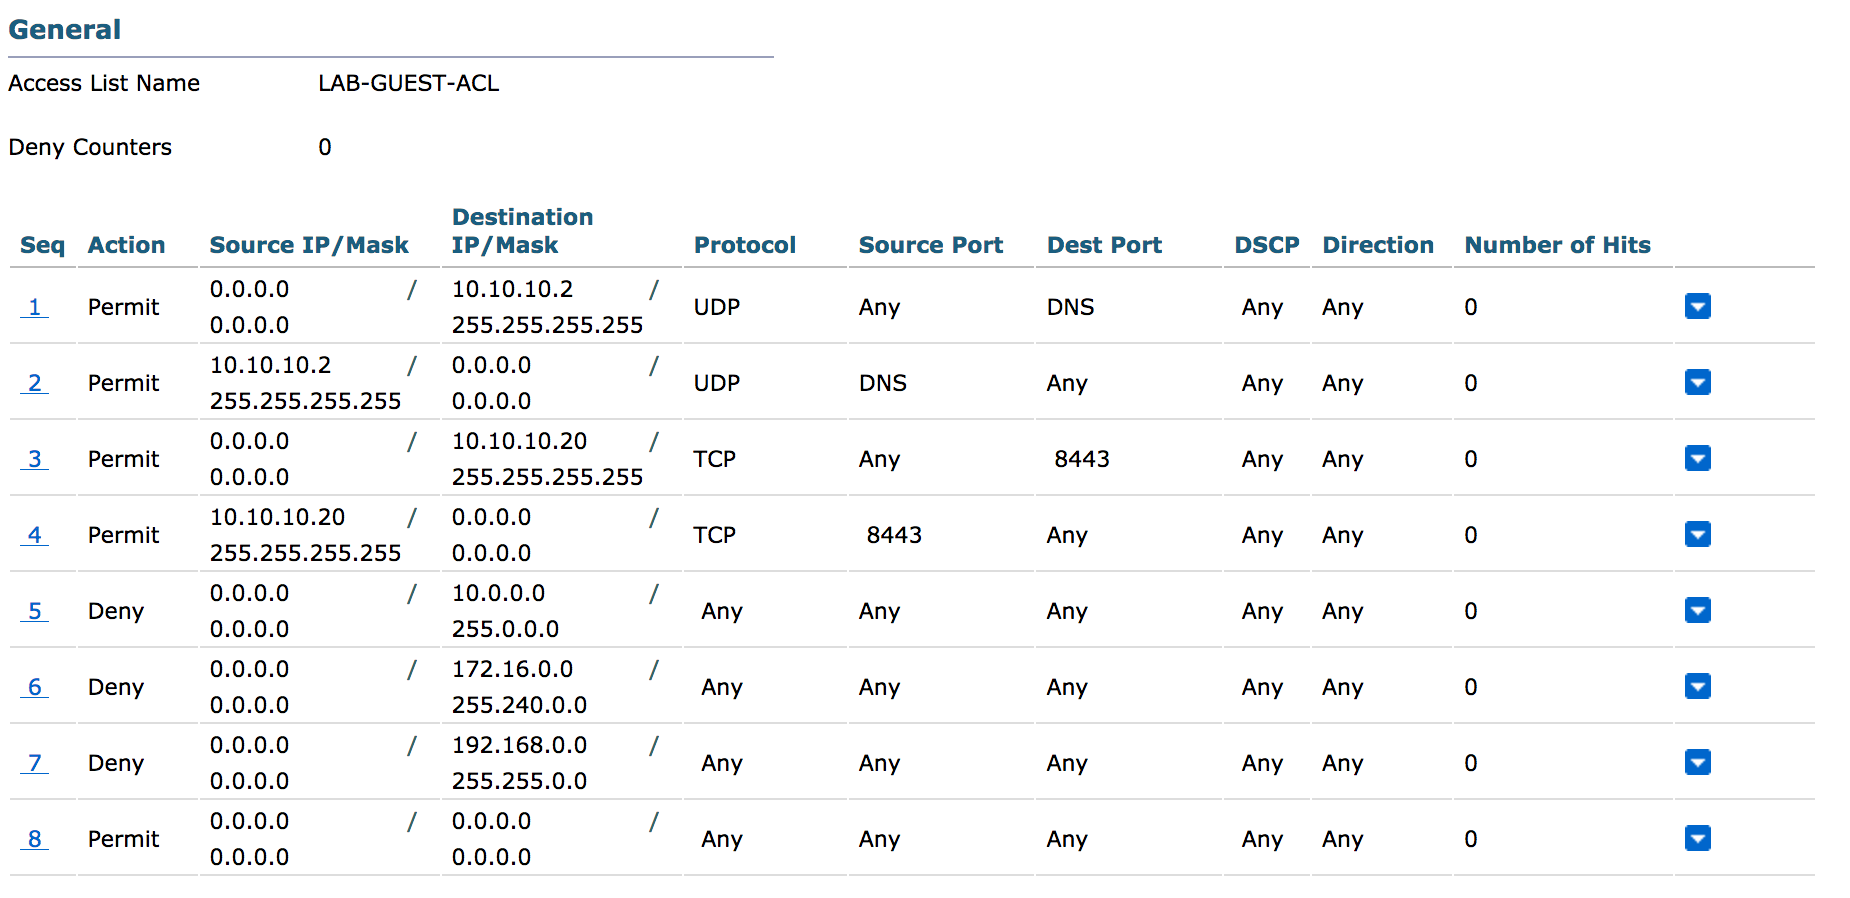
  • Create a new ACL if you’d like to place any restrictions on your guest network. e.g., blocking access to any private IP space.

Next we’ll create ISE policies to redirect users who connect to the Guest network to a web portal. Once the AUP has been accepted they will get a new policy applied to them restricting their access to internet only via the ACL we created earlier. We’re going to be using the default hotspot portal but you can design your own portals with custom graphics. Cisco also has an ISE portal builder which has an excellent WYSIWYG editor to make custom portal building a snap. The portal builder requires a Cisco login and can be found here: https://isepb.cisco.com/#/

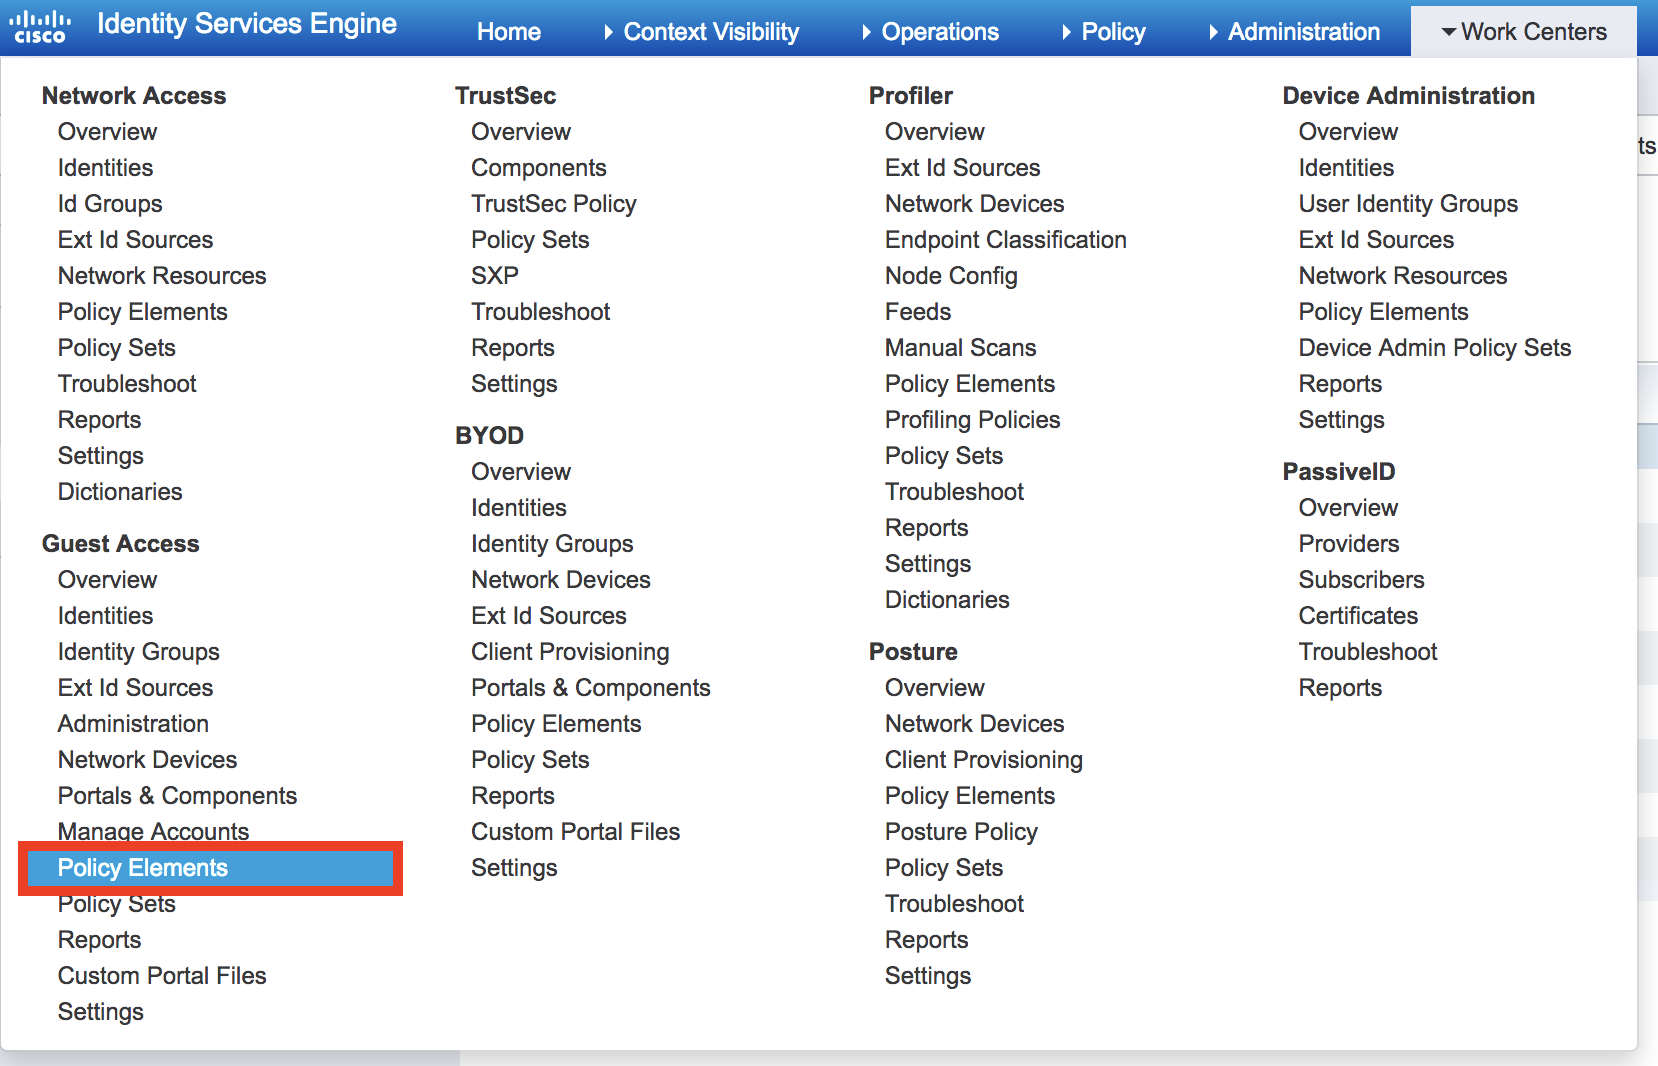
  • Log in to ISE. Go to Work Centers, Guest Access, Policy Elements.
  • Click Results and and go to Authorization Profiles.
  • Click Add to create a new profile.
  • Give the policy a descriptive name and description.
  • Scroll down a bit in the Common Tasks and check Web Redirection.
  • Select Hotspot from the drop down. Enter ACL_WEBAUTH_REDIRECT as the ACL and the value will be the Hotspot guest portal (if you’ve uploaded a customer portal you can select it here).
  • Click Submit.
  • Click Add again, enter a new name and description. This policy will apply the guest restriction ACL we created on the WLC.
  • Scroll down into the Common Tasks and find Airespace ACL, enter the name of the Guest ACL you created earlier. Click Submit.
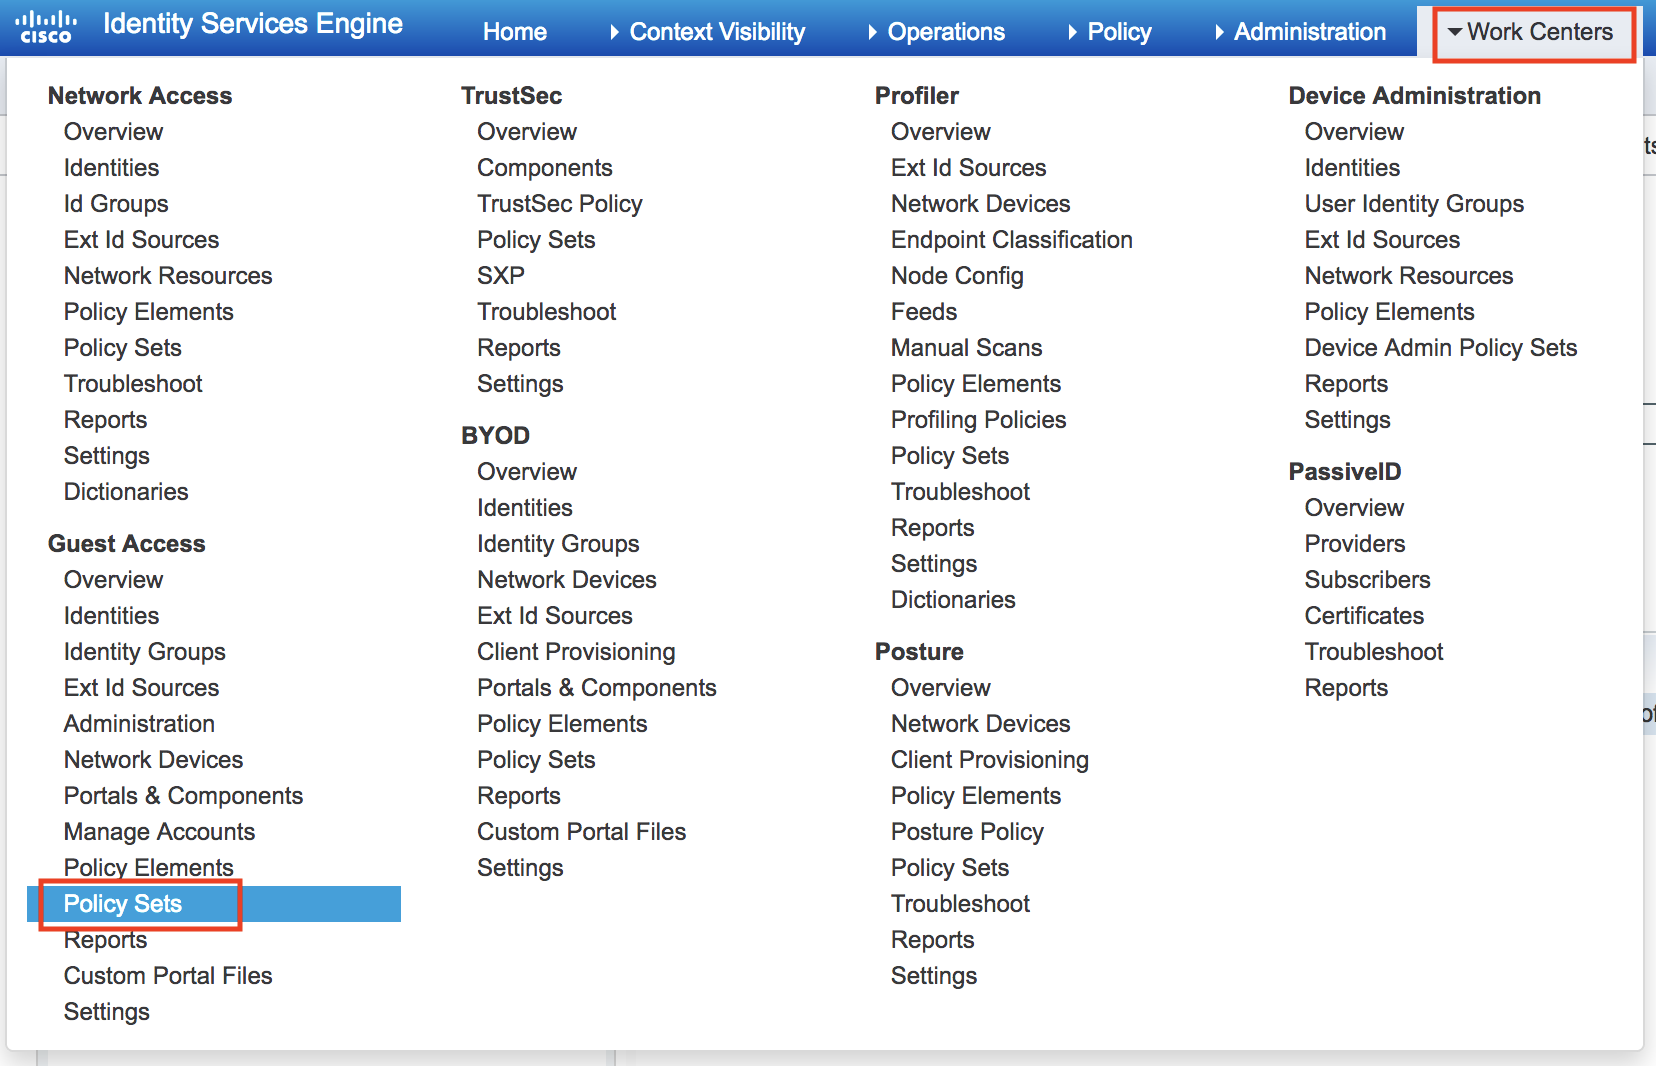
  • Now, go to Work Centers, Guest Access, Policy Sets.

  • Expand the Default policy set by clicking the arrow on the right.
  • Expand the Authentication Policy be clicking the arrow.
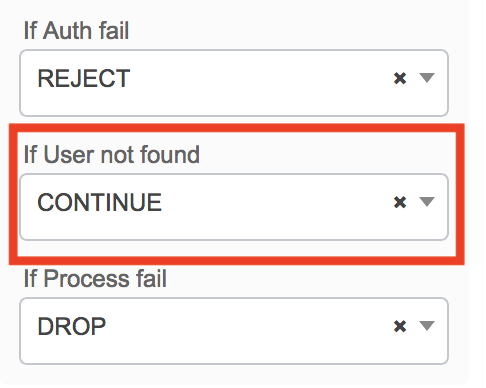
  • Find MAB (MAC Address Bypass) and expand the options menu. Be sure the option for “If User not found” is set to Continue.
  • Next we’ll create our new Authorization Polices for the Guest network. Expand Authorization Policy and select a space to insert the polices. Locate a rule and click the gear, select insert above or below rule to place the new policies where you’d like them.
  • Enter a name for the policy. Select Wireless_MAB as the condition, and Guest_Hotspot as the Profile.
  • Add a new profile above the one we just created
  • This will be for applying the Guest ACL for the user once going through the portal. Conditions will be Wireless_MAB, IdentityGroup = GuestEndpoints, and Guest_Flow. Result will be the Guest_Access policy we created which applies the ACL we created on the WLC.
  • Click Save.

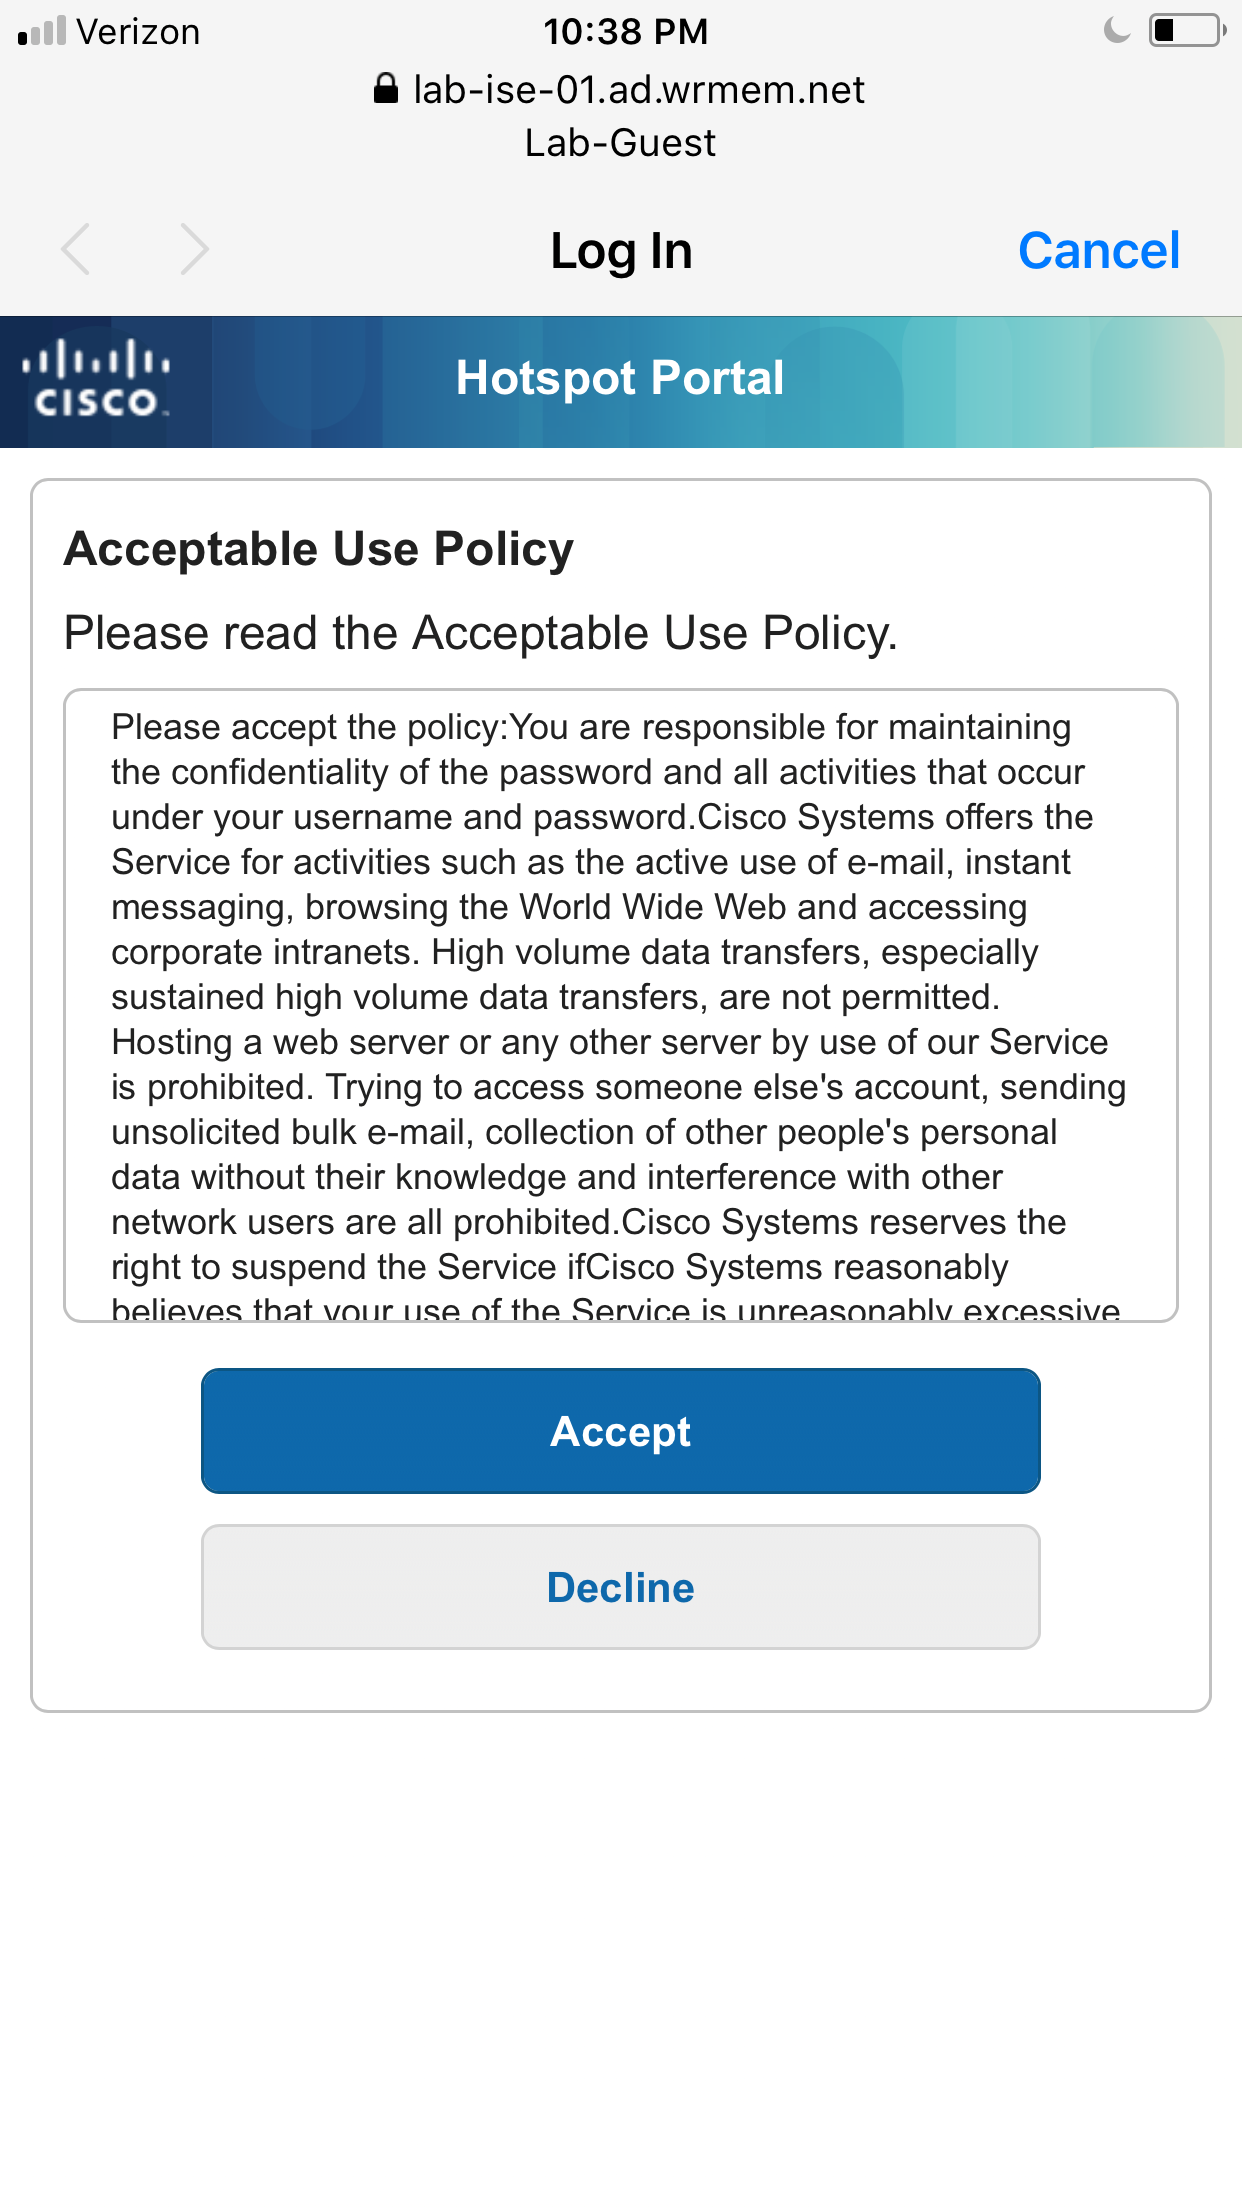
This should be enough configuration to get the Guest Hotspot SSID up and running. Connecting to the new SSID should pop up the AUP, once accepted you should then have access to the internet.

Hosting a Static Webpage on AWS

Here are some more notes/little projects from playing around with the AWS free tier. This time, hosting a static webpage on S3, setting permissions on the bucket, and using Route 53 to point my domain to a statically hosted site.

Again, the docs and examples found on the AWS documentation site walk through all this in-depth and have been invaluable in learning more about the process: https://docs.aws.amazon.com/AmazonS3/latest/dev/website-hosting-custom-domain-walkthrough.html

Note: I bought and registered a new domain through AWS to play around with the free tier (wrmem.io), this automatically adds the hosted zones in Route 53.

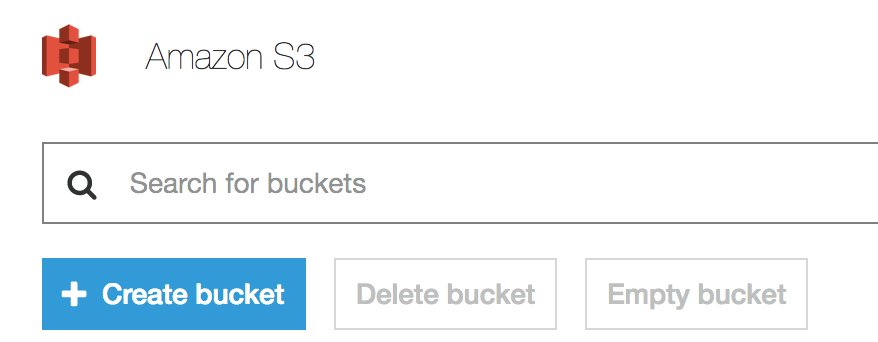
  • In your AWS console navigate to S3. Click Create Bucket to begin creating your new bucket that will host the static webpage.

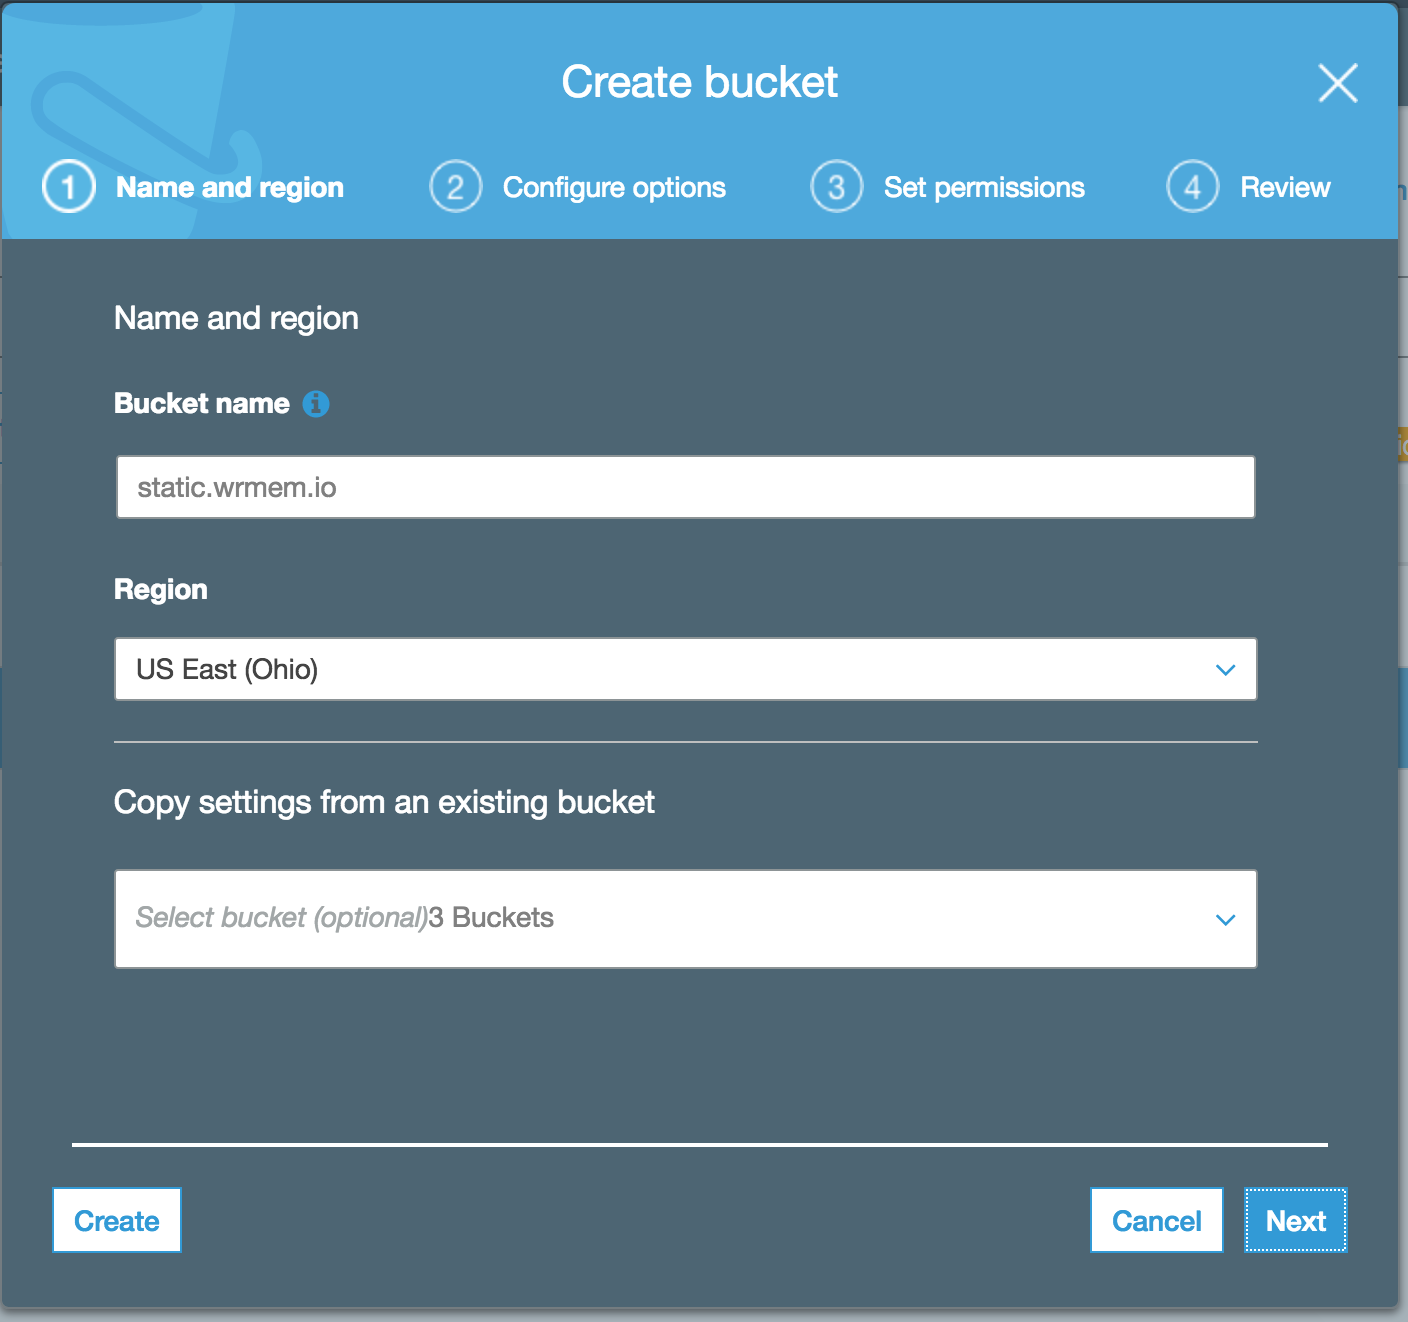
  • On the create bucket settings enter a dns compliant name, for example I’ll be hosting my static page at static.wrmem.io

  • From here you can just hit create. It’s best to leave the defaults for the bucket and adjust settings/permissions later when you upload your hosted content.

  • Create a second bucket for the www. subdomain, this will be configured as a re-direct to the original bucket we created. Again enter the dns complaint name and hit create to leave the default bucket settings.
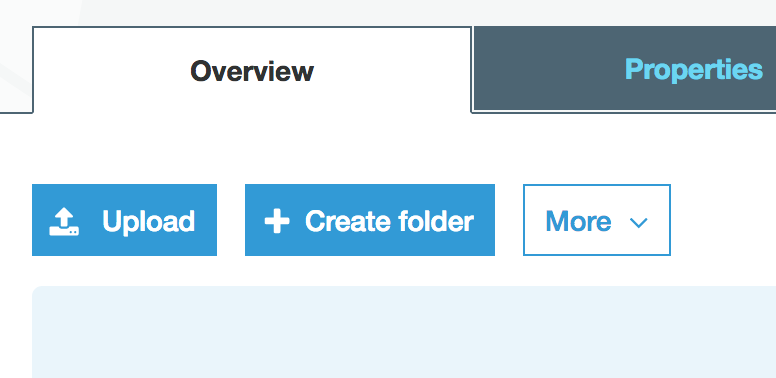
  • Click the original bucket you created and under the Overview tab hit Upload.

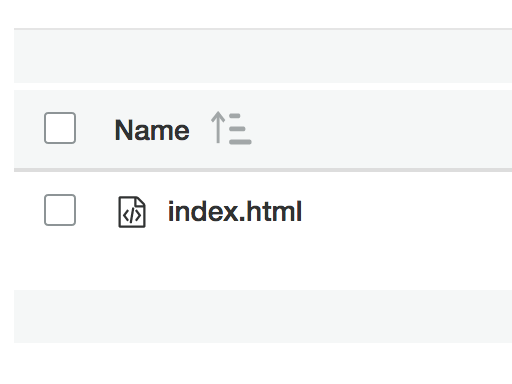
  • For this example I uploaded a basic index.html with a simple ‘hello world’ type message.
<html xmlns="http://www.w3.org/1999/xhtml" >
<head>
    <title>Hello World</title>
</head>
<body>
  <h1>This is my static website hosted on AWS</h1>
  <p></p>
</body>
</html>

  • Next we need to set the permissions on this S3 bucket to allow for the public to be able to read its contents. This can be done via an S3 bucket policy.
  • In your S3 bucket, click Permissions, then Bucket Policy.
  • In the Bucket Policy editor you can paste the following code (making changes to whatever your resource may be):
{
  "Version":"2012-10-17",
  "Statement":[{
	"Sid":"PublicReadGetObject",
        "Effect":"Allow",
	  "Principal": "*",
      "Action":["s3:GetObject"],
      "Resource":["arn:aws:s3:::static.wrmem.io/*"
      ]
    }
  ]
}
  • The code allows for the public to read/get objects from the S3 resource static.wrmem.io/*
  • After making the change you should now see the Public sub heading alerting you that this bucket is now publicly accessible.
  • Next we’ll need to set the bucket to allow for web hosting.
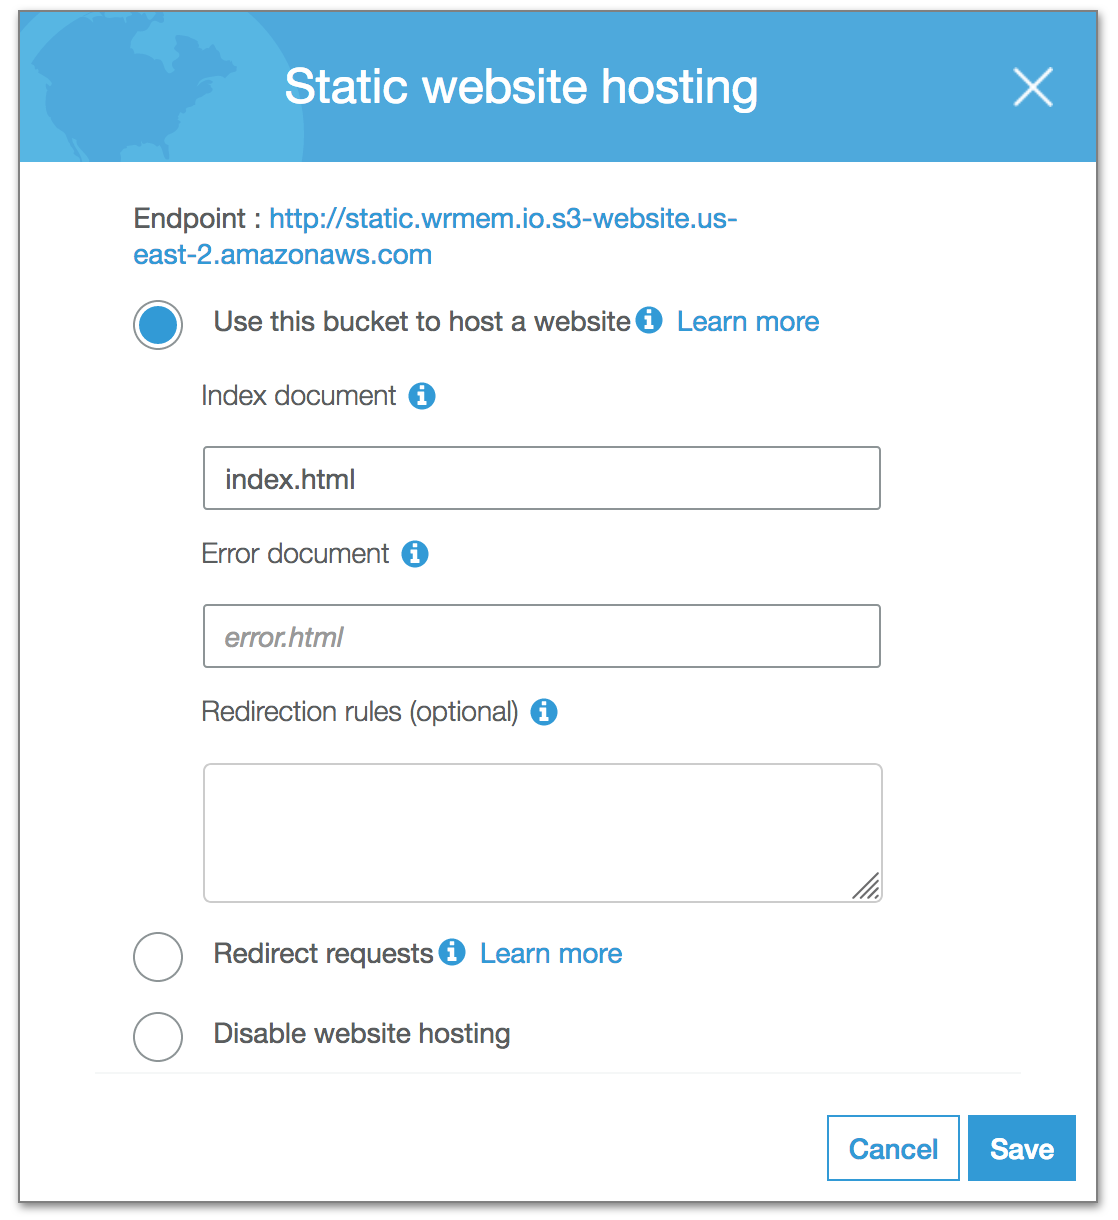
  • In your bucket click Properties then find the Static Website Hosting option.
  • Enter options for the index file and then hit save.
  • Next we’ll need to setup our re-direct for the www. bucket.
  • Enter the www.whatever bucket. Click Properties then find the Static Website Hosting option.
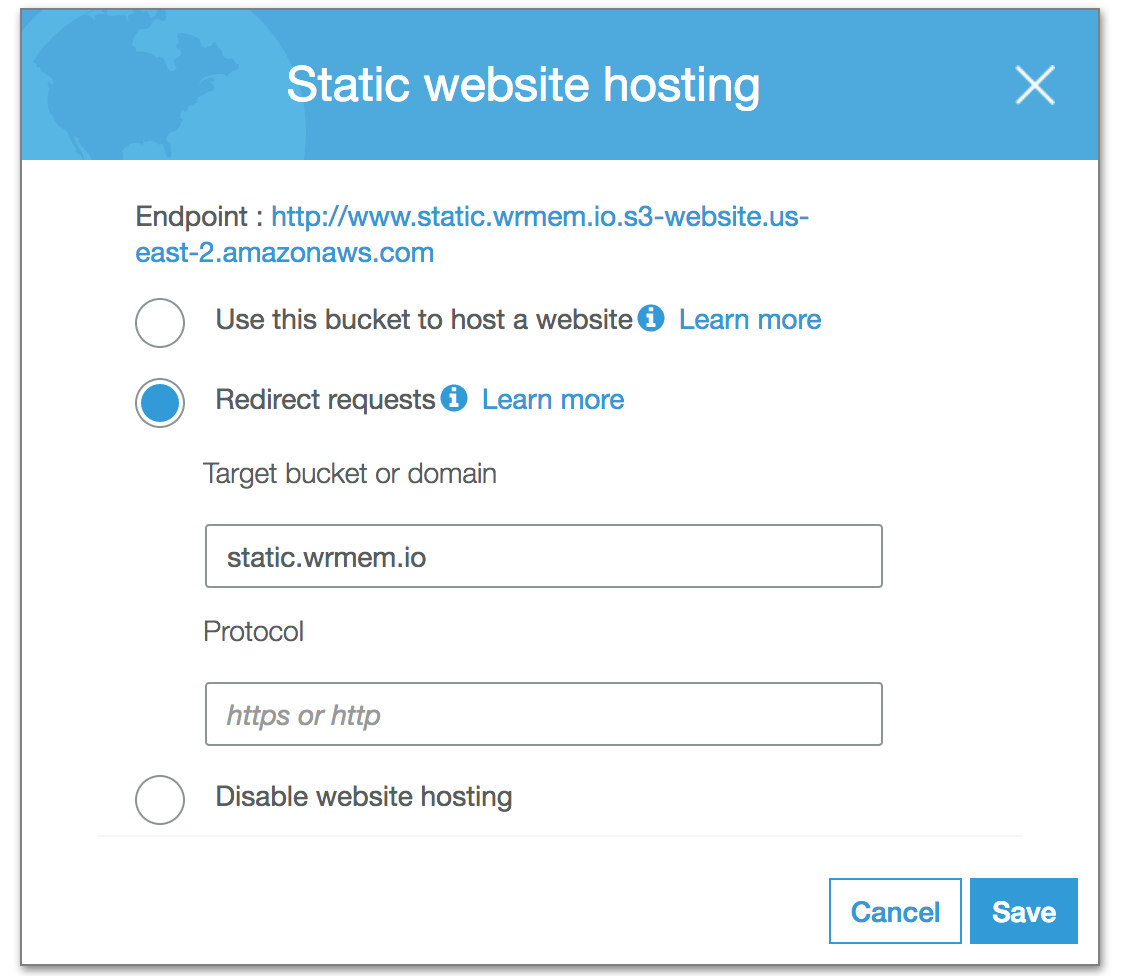
  • Select Redirect requests and point it to the domain you want.
  • All we need to do next is point our dns for static.wrmem.io to our bucket.
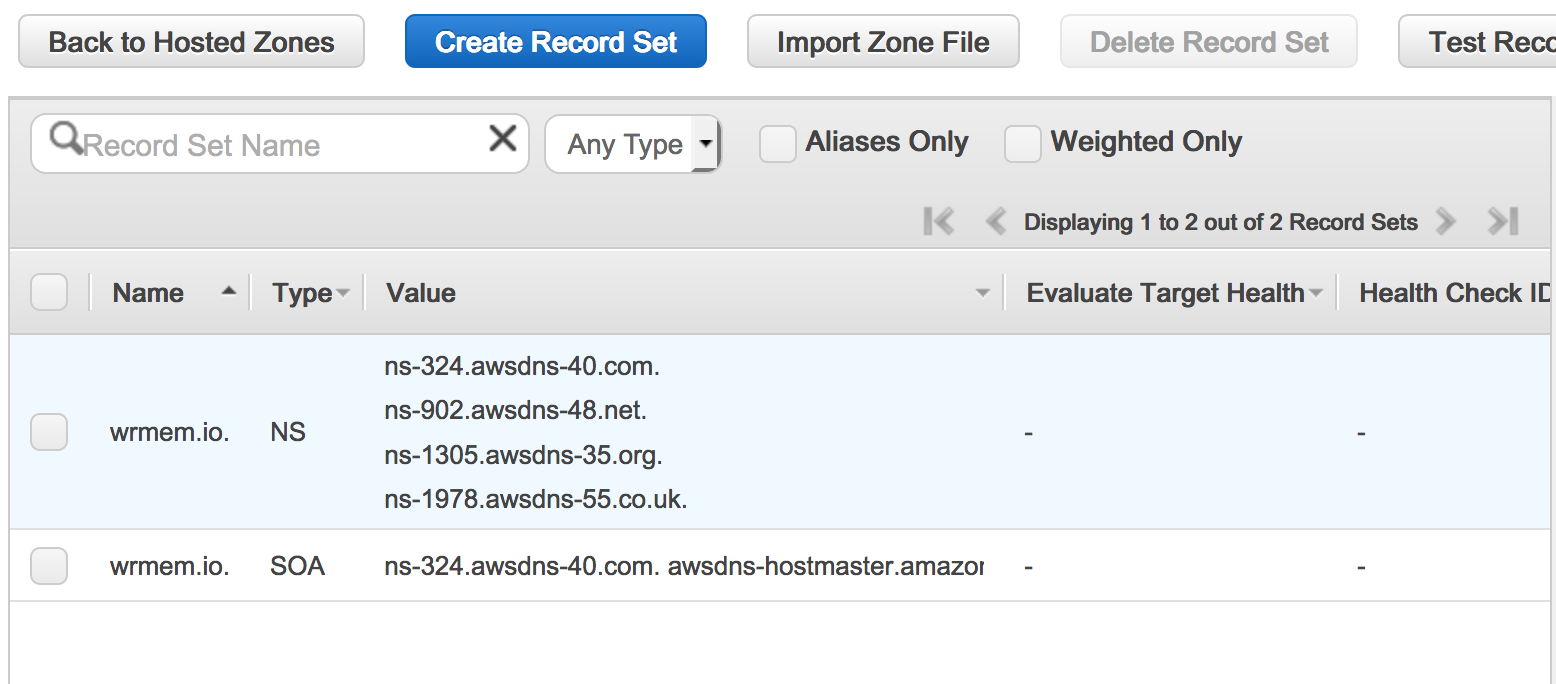
  • Go to your Route 53 console and enter your hosted zones.
  • Select the zone you want to edit.
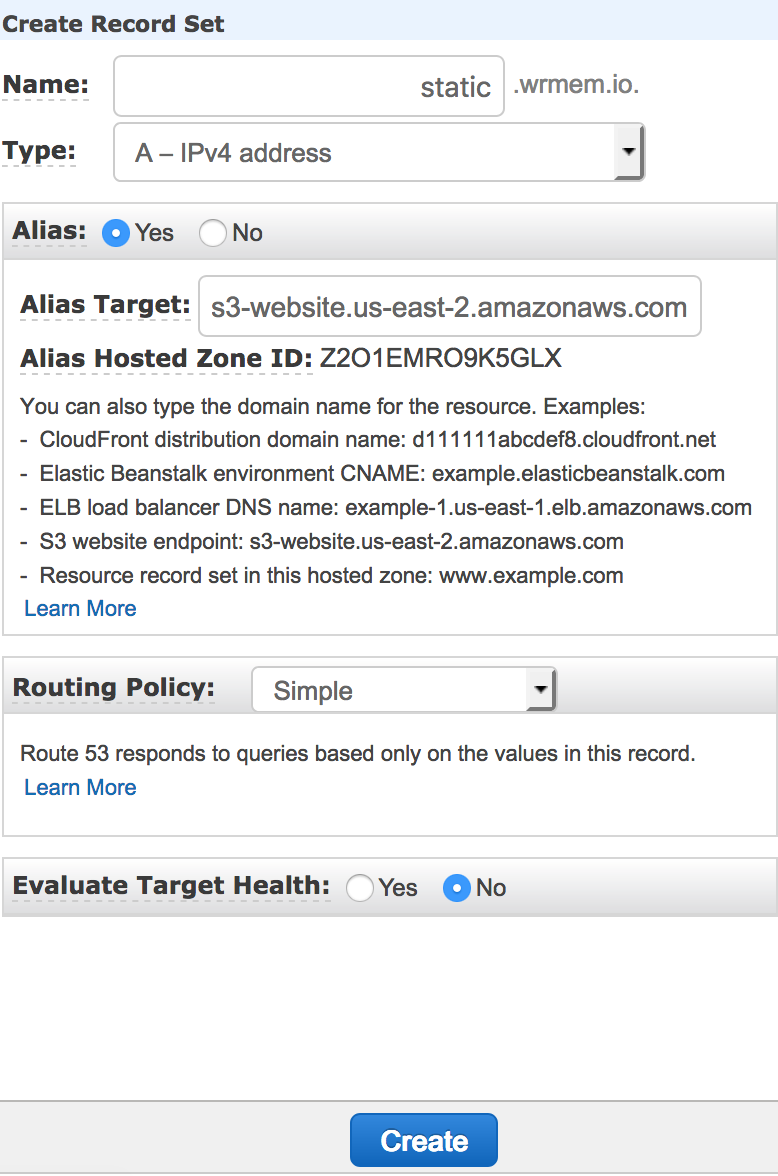
  • Click Create Record Set.
  • For the name I entered static.wrmem.io, and the alias points to my S3 region. Click Create.
  • After creating the dns record go ahead and test. For my configuration it’s simply navigating to http://static.wrmem.io/ in my browser.

Set a Budget in AWS to Avoid Costly Overages

If you’re like me and are experimenting with the AWS free tier it might be a good idea to configure a budget notification to avoid getting caught off guard by any overages.

Amazon has a great document on how to enable alerts located here, but here’s a quick guide on how to enable alerts and budget reminders.

  • First, log in to your AWS account.
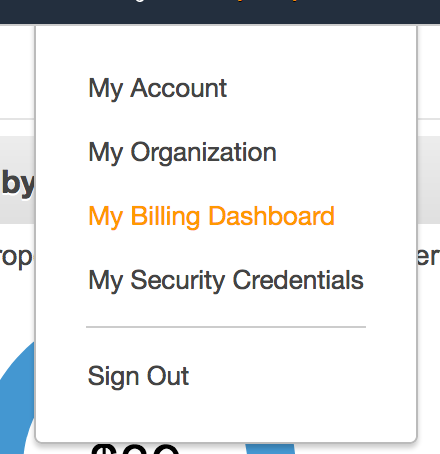
  • Click the drop down menu next to your name on the top right hand of the console page and select “My Billing Dashboard.”

  • From the left hand menu select Preferences.
  • Check “Receive Free Tier Usage Alerts” and enter your email address. Click Save Preferences.

  • Next, click Budgets from the left hand menu.
  • Click Create Budget.

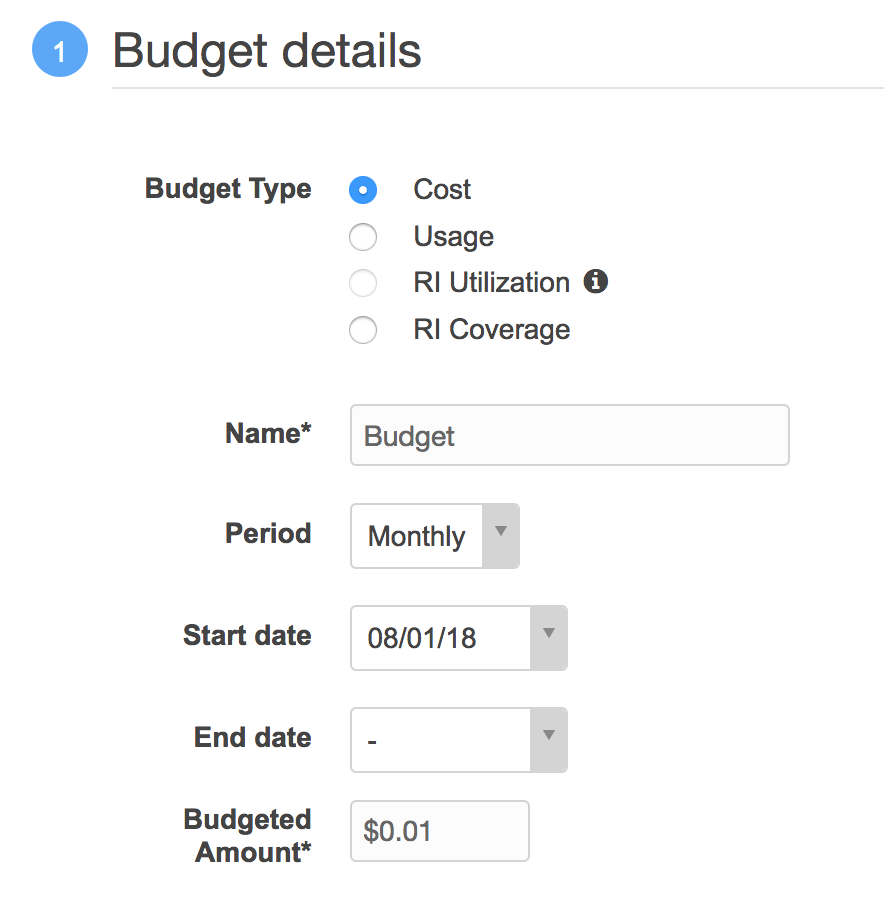
  • Select Cost and under Budgeted Amount select the threshold you’d like to be alerted at. For example, $0.01.

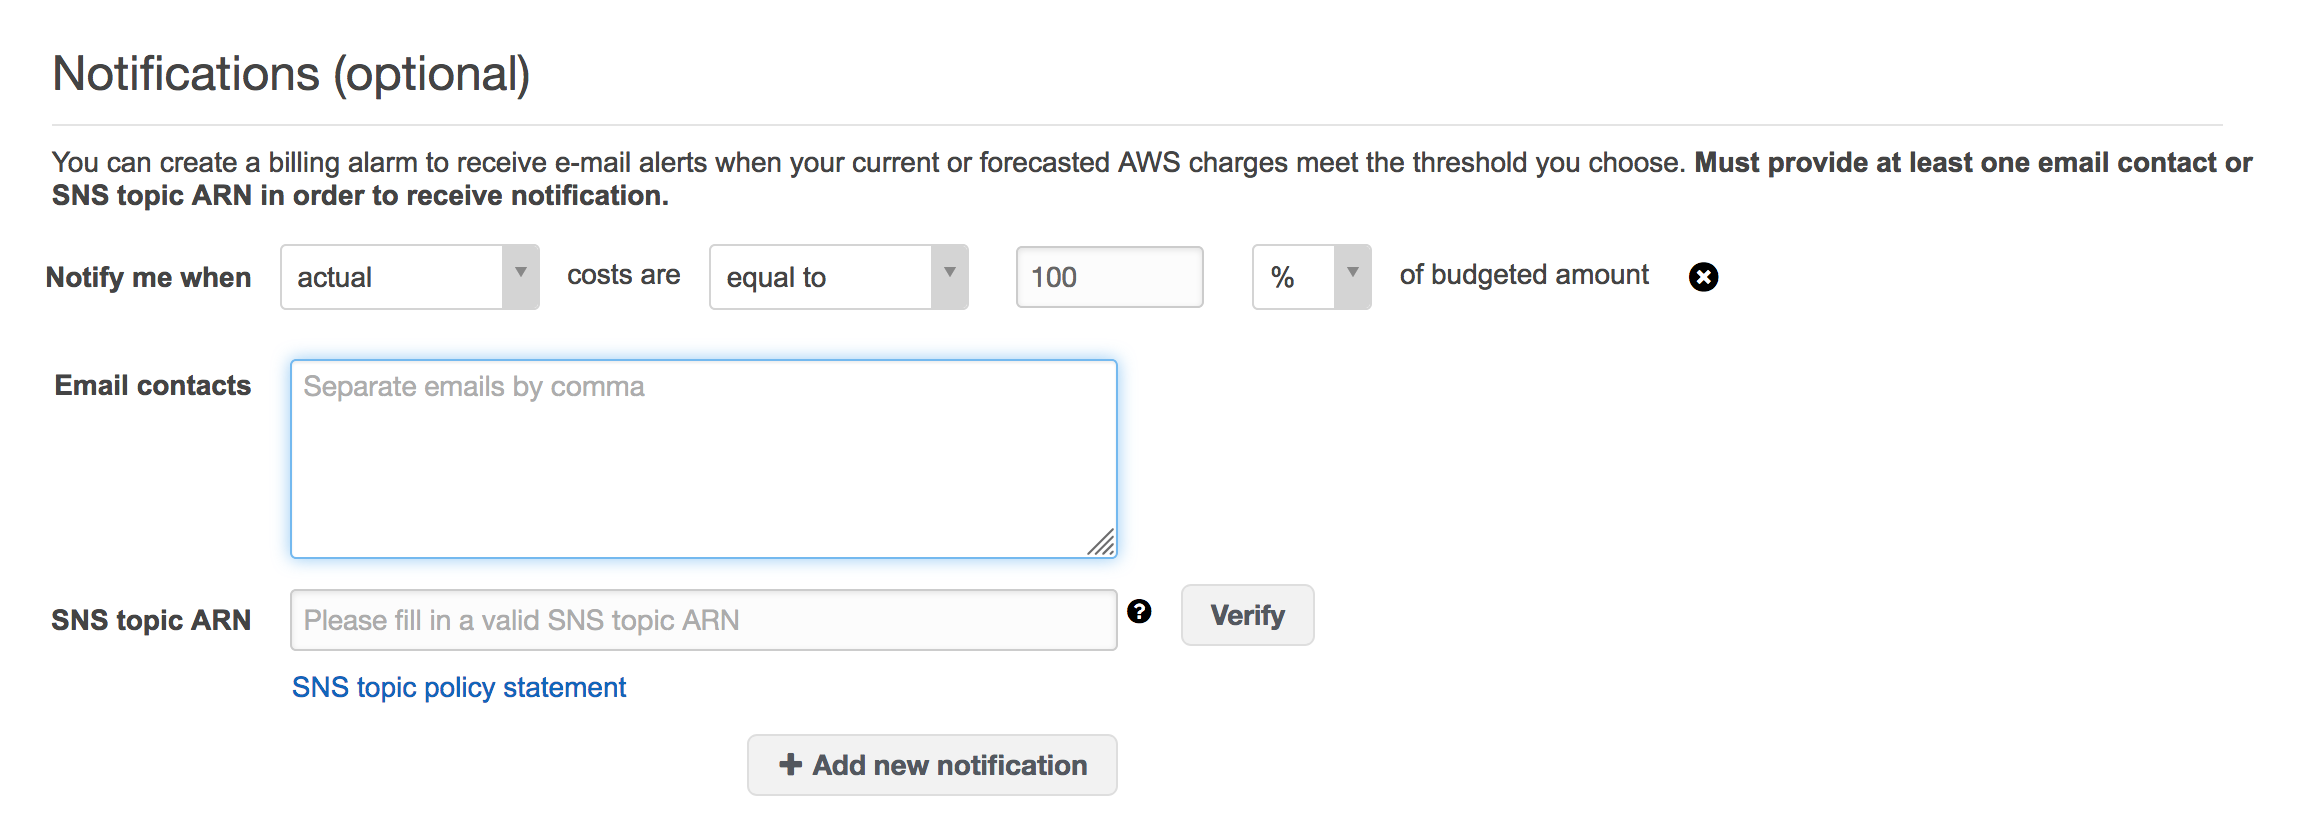
  • Under Notifications select to be alerted when costs are equal to your 100% of your Budgeted Cost and enter your email address.

  • Click Create and you should now have a new budget alert that will email you if you’re free tier is about to cost you some actual money.